February 7, 2026
Replacement Windows and the Thermal Bridge Problem No One's Telling You About
Author
You installed replacement windows. The drafts are gone. The house looks better. The salesperson promised lower energy bills.
But your heating bill barely moved. Maybe it dropped a little - 10%, maybe 15%. Certainly not the dramatic savings you expected after spending thousands on replacement.
Understanding the science behind how heat moves through your home helps explain why - especially when you look beyond windows alone to the full system.
That gap usually comes down to something almost nobody mentions during the sales process: thermal bridging.
Most homeowners focus on the glass when choosing replacement —triple-pane, argon gas, Low-E coatings, impressive U-factor numbers. But the glass is rarely the problem.
Heat doesn’t just move through the center of the window. It escapes around it—through frames, spacer bars, and the connection between the window and the wall.
So your expensive replacement windows might be doing their job perfectly. The problem is everything around them.
Table of Contents
- TL;DR
- Why Your Energy Bills Aren't Dropping (Even After New Windows)
- The Thermal Bridge Effect: Where Heat Actually Escapes
- Installation Matters More Than the Window Itself
- Frame Material Isn't Just About Durability
- The Spacer Bar: The Small Component Making a Big Difference
- Glass Coatings vs. Gas Fills: Which Investment Actually Pays Off?
- When "Energy Efficient" Labels Mislead (And They Usually Do)
- Measuring Real Performance Beyond the Sticker
- How Your Wall Construction Changes Everything
- The Truth About Retrofit vs. Full-Frame Replacement
- How to Tell If Your Contractor Actually Knows Their Stuff (Most Don't)
TL;DR
- Your expensive new glass is probably fine. Everything around it is bleeding heat.
- That gap between your window frame and your wall? Nobody's treating it right, and it's killing your efficiency.
- Aluminum conducts heat 1,000 times faster than vinyl. Yeah, one thousand.
- Spacer bars matter as much as that argon fill you paid extra for. Maybe more.
- NFRC labels show lab performance. Your wall isn't a lab.
- Retrofit installations save money upfront. They also leave old thermal bridges in place.
- Most heat loss happens at edges and installation points, not through the center of your glass.
- Your contractor's knowledge of building science matters more than the window brand. Way more.
Why Your Energy Bills Aren't Dropping (Even After New Windows)
The Promise vs. The Reality
So you dropped $8,000 on new windows. Maybe $12,000. The sales guy promised your heating bill would drop by 30%, maybe 40%. Windows look great. Installation crew was professional, cleaned up after themselves, whole thing took two days.
Six months later? Your gas bill is maybe 10% lower.
What the hell happened?
This happens all the damn time. I hear this story at least twice a month. According to the U.S. Department of Energy, heat gain and heat loss through windows account for 25% to 30% of residential heating and cooling energy use. So new windows should make a real difference, right?
They should. But even after replacement, most homeowners see energy bills drop by only 10-15%. Sometimes less.
The gap between what you were promised and what actually happened usually comes down to thermal bridging. Heat is lazy. It takes the easiest path out of your house. And that path? Usually straight through your window frame, around the edges, through the installation gaps. Your expensive glass is sitting there doing its job while heat just walks around it.
Your replacement windows might be performing exactly as rated.
The problem is everything around them.
And nobody told you.
Look, I've been installing windows for over 15 years. Done probably 3,000+ installations. We rarely talk about thermal bridging during the sales process because it complicates the pitch. High-performance glass is easy to sell. You can see it, touch it, understand the specs. Explaining how heat moves through your entire wall assembly? That requires a longer conversation that most salespeople either don't want to have or don't know how to have.
But if you're staring at your utility bill wondering why your investment isn't paying off, thermal bridging is probably the culprit.
Where the Heat Actually Goes
Most people obsess over center-of-glass U-factors when shopping for windows. That's the number salespeople hammer on because it's impressive. U-0.22! U-0.18! Triple-pane!
Here's what they don't mention: in many modern windows, the frame and edge-of-glass areas account for 30-40% of total heat loss.
Heat doesn't just pass through glass. It travels through frames, around installation gaps, along any continuous material connecting your warm interior to the cold exterior. Your wall becomes part of the window system, not just a hole the window sits in. When we ignore this reality, we end up with beautiful windows that underperform.
Last winter, I got a call from a guy in Minneapolis. Let's call him Tom. He'd replaced all 15 windows in his 1980s split-level with triple-pane, argon-filled units rated at U-0.22. Spent about $18,000. The windows themselves were excellent. Top-tier product.
The installer used standard practice: set the frames flush with exterior sheathing, filled gaps with basic expanding foam, relied on vinyl J-channel for the finished look. Nothing wrong with that approach on paper. It's what most crews do.
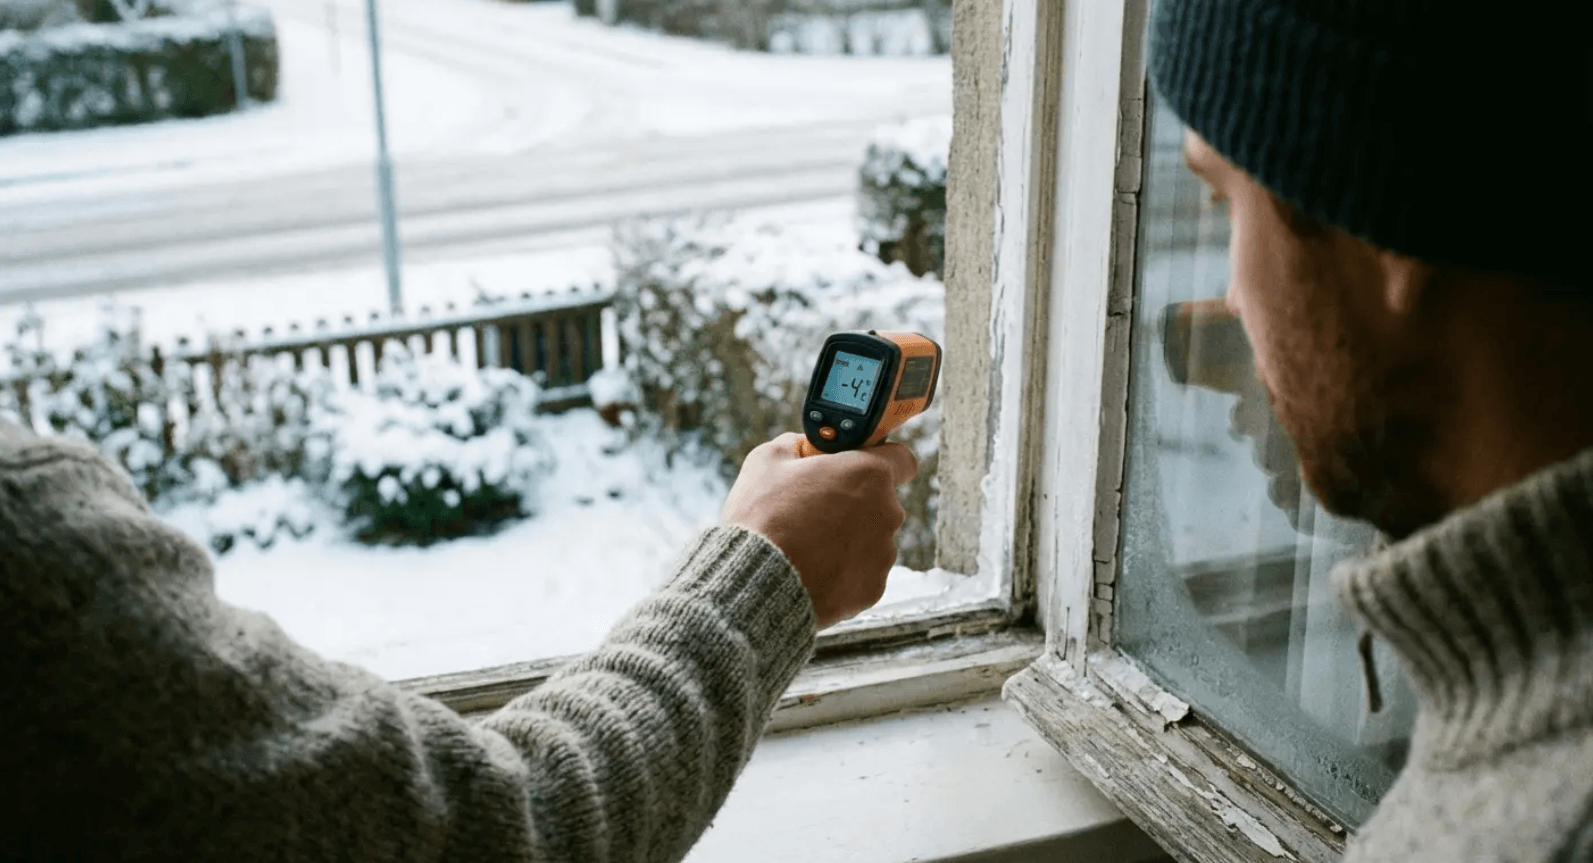
First real cold snap in January, Tom noticed frost forming along the bottom of every window frame. He grabbed an infrared thermometer from the hardware store and started measuring. Center of the glass? 58°F on a night when it was 15°F outside. Great performance.
The vinyl frame edges? 38 to 42°F.
One window frame measured 32°F. That's literally freezing.
He called me, sent photos. I came out with a thermal camera. The entire window perimeter was glowing bright yellow and orange on the camera (heat loss). The glass center showed dark blue (good insulation).
The expensive triple-pane glass was working beautifully. Everything around it was failing.
The Thermal Bridge Effect: Where Heat Actually Escapes
What Thermal Bridging Actually Means for Your Home
Thermal bridging is any continuous path that lets heat bypass insulation. Sounds complicated, but it's not. In window installations, these paths form through window frames, fasteners, and installation methods that create gaps in your home's thermal envelope.
(Side note: "thermal envelope" is industry jargon for "the barrier between inside and outside." I should just say that instead of using jargon, but old habits.)
Even triple-pane windows with argon fills can underperform if the frame conducts heat rapidly or if the installation creates gaps. This isn't about window quality. It's about system thinking. You have to consider how every component works together, from the glass to the frame to the connection between your window and wall structure.
This matters more in extreme climates. If you're in Minnesota or Arizona, anywhere that regularly hits 90°F or drops below 20°F, thermal bridging becomes a bigger deal.
Here's something weird: older homes with thicker walls sometimes perform better than newer construction when thermal bridging isn't addressed. That extra wall thickness provides more opportunity for insulation and reduces the impact of conductive paths. Assuming the installation takes advantage of it, which it usually doesn't.
| Common Thermal Bridge Locations | Heat Loss Impact | Can You See It? | Does Standard Installation Fix It? |
|---|---|---|---|
| Window frame material | High (20-30% of window heat loss) | Nope | Depends on what frame you buy |
| Frame-to-wall connection | Very High (30-40% of window heat loss) | Hidden by trim | Rarely |
| Spacer bars between glass panes | Medium (10-15% of window heat loss) | Nope | Only if you specifically ask for warm-edge |
| Fasteners through frame | Low to Medium (5-10% of window heat loss) | Nope | Almost never |
| Rough opening gaps | High (15-25% of window heat loss) | Hidden by trim | Sometimes (basic foam only) |
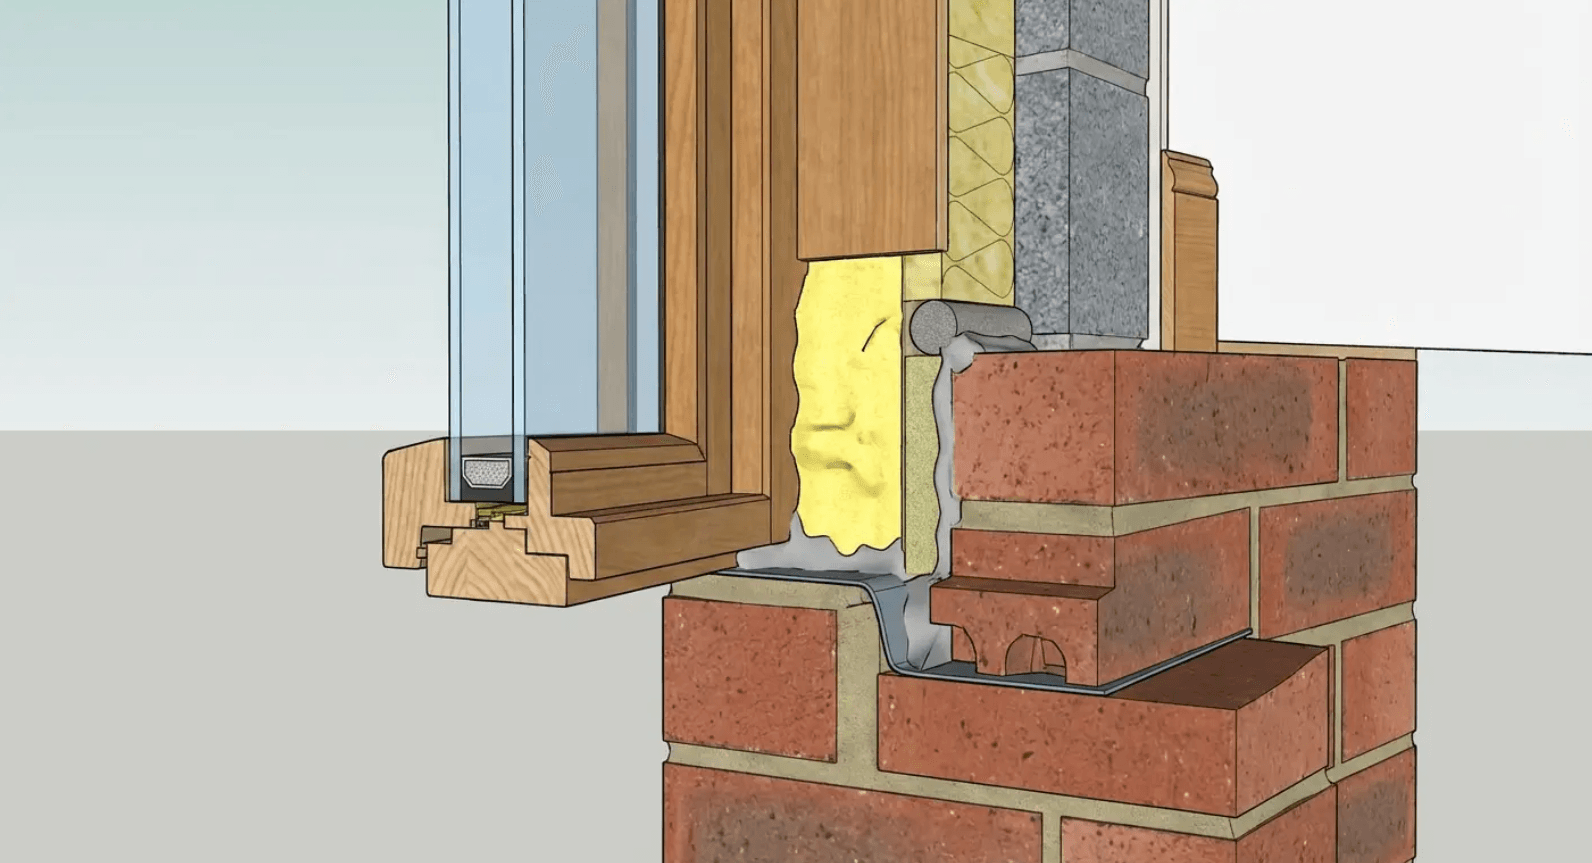
The Frame-to-Wall Connection Nobody Inspects
The junction where your window frame meets your wall structure is where thermal bridging gets really problematic.
It's also hidden behind trim and almost never inspected after installation.
That gap between the rough opening and the window frame needs more than spray foam. Though foam helps. You need continuous insulation, proper flashing, thermal breaks at this connection point. These determine real-world performance. And you can't see thermal bridging with your eyes, which is why infrared cameras reveal problems that visual inspections completely miss.
Most installation crews focus on making windows look good and seal against water. Those are important goals. I'm not saying they're not. But thermal performance requires additional steps that aren't standard practice. The crew might be excellent at their job as they understand it, while still creating thermal bridges because thermal performance wasn't part of their training.
And this drives me crazy because the fix isn't even that complicated. It just requires knowing what to look for and caring enough to do it right.
The frame-to-wall connection is where good intentions meet physics. Your installer might be a great guy, really skilled at what he does. But if he doesn't understand heat flow through building assemblies, he'll create a watertight, attractive installation that bleeds heat all winter and gains heat all summer.
You won't know until the bills arrive.
Installation Matters More Than the Window Itself
Why Installation Standards Lag Behind Window Technology
Window technology has improved dramatically over the past 20 years.
Installation practices? Not so much.
Manufacturer specs often provide minimum requirements for weatherproofing, not optimal thermal performance. That gap between the rough opening and window frame (typically ½ to 1 inch all around) becomes a thermal weak point if you only fill it with low-density spray foam.
I've seen this pattern over and over: window technology advances, but installation crews use the same methods they learned in 2005. Those methods keep water out. Window stays in the hole. But heat transfer? Nobody's thinking about that.
The difference between installers who understand building science and those who simply follow the steps they've always used can mean the difference between 15% energy savings and 30% energy savings. Finding installers who prioritize thermal performance over speed requires asking specific questions during the quote process. We'll get to those questions.
The importance of proper installation is gaining recognition even in institutional settings. Warwick School District in Pennsylvania recently sought a $4 million state grant for window replacement at Warwick High School. The project specifically emphasized "high-efficiency windows" and "professional oversight necessary to ensure successful project completion."
If school districts are factoring installation quality into their budgets, shouldn't you do the same for your house?
The Questions Your Installer Should Be Asking You
Here's how to identify a contractor who actually knows building science: listen to the questions they ask you, not just the answers they give.
Contractors who don't ask about your wall construction are using a one-size-fits-all approach. They're treating your 1960s ranch the same as a 2015 colonial. That doesn't work. The best installers want to understand your wall assembly before they quote the job.
Questions a building-science-informed contractor should ask:
- What type of wall construction do you have? (2x4, 2x6, masonry, other)
- Do you know what insulation is in your walls currently?
- Do you have exterior insulation or just cavity insulation?
- What's your primary goal here: energy savings, comfort, noise reduction, or aesthetics?
- Have you noticed condensation on your current windows? Where specifically?
- What's your budget range, and are you open to phasing the project?
- Are you planning any other exterior work in the next few years? Siding, insulation upgrades?
- Do you have any concerns about the condition of your window openings or surrounding structure?
Higher quotes often reflect more thorough installation methods, not just higher profit margins. Though sometimes it's both, and you need to be able to tell the difference.
A contractor who asks these questions is thinking about how your windows will perform in your specific home. Not just whether they'll fit in the opening.
Frame Material Isn't Just About Durability
The Conductivity Factor Everyone Overlooks
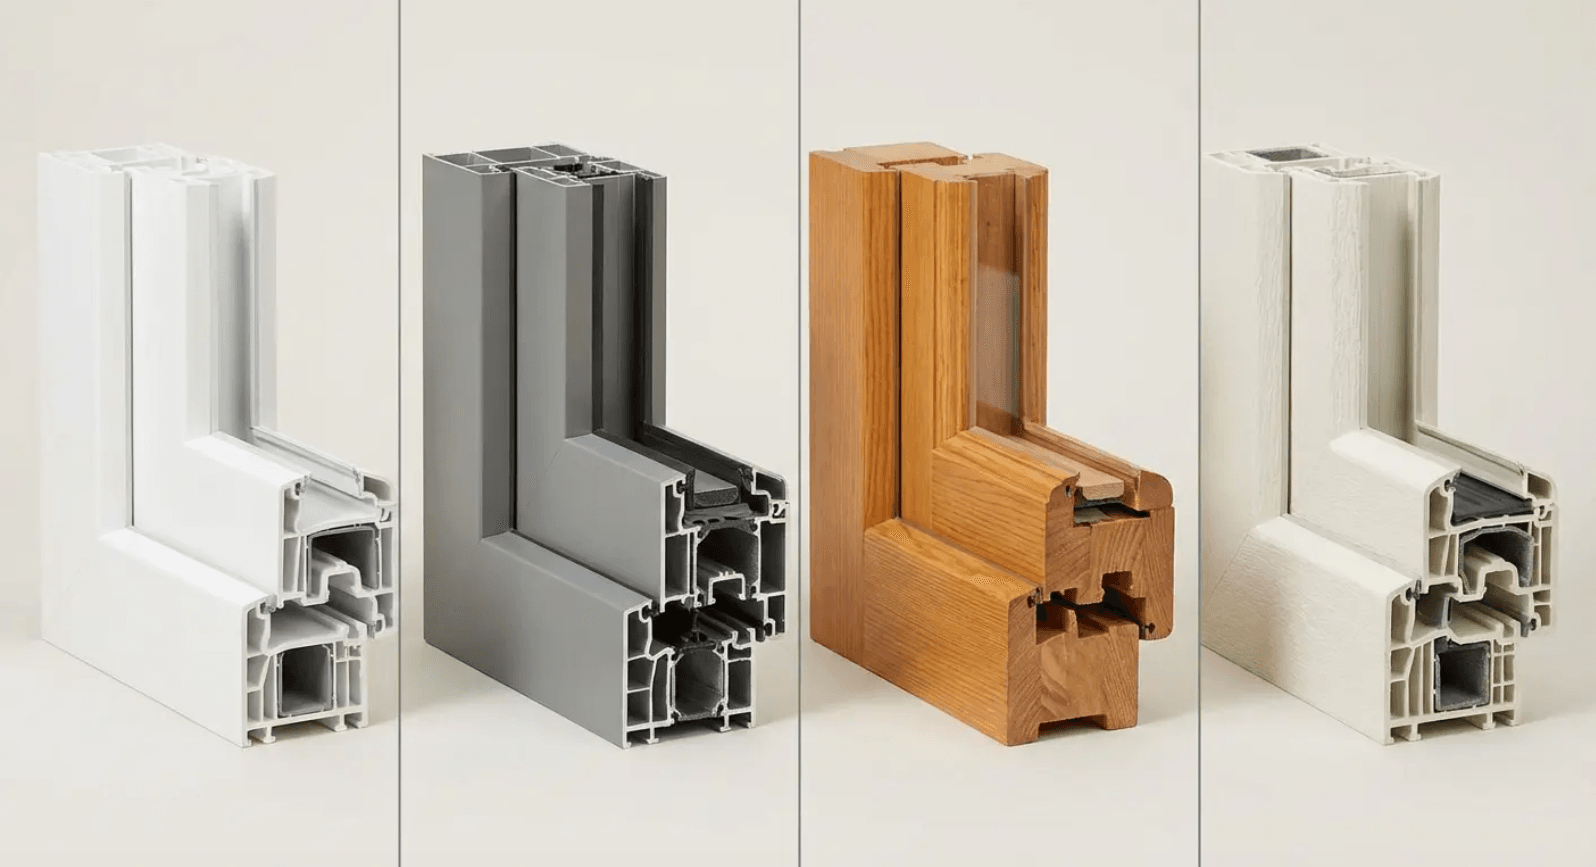
When shopping for windows, most people think about how long the frame will last. Fewer people think about how quickly it conducts heat.
Aluminum conducts heat about 1,000 times faster than vinyl.
Not a typo. One thousand times.
It also conducts heat 400 times faster than fiberglass and 1,500 times faster than wood. These differences are massive.
This is why thermally broken aluminum frames exist. They interrupt the conductive path with plastic insulators. Solid aluminum frames, despite their strength and durability, create huge thermal bridges. You could have the most advanced glass technology available, and the frame would still bleed heat at an alarming rate.
Vinyl's low conductivity makes it popular for energy efficiency, though it has structural limitations. You can't make vinyl frames as thin or as strong as aluminum. Fiberglass offers a middle ground with better strength than vinyl and similar thermal performance. Wood provides excellent insulation but requires maintenance that most people would rather avoid.
If you're replacing windows for energy savings, conductivity should drive your material choice. A frame that lasts 50 years while conducting heat rapidly will cost you more in energy bills than a frame that lasts 30 years while insulating well.
| Frame Material | Heat Conductivity (Compared to Vinyl) | Typical U-Factor | Durability | Maintenance | Relative Cost |
|---|---|---|---|---|---|
| Aluminum (no thermal break) | 1000x worse | 1.0 to 2.0 | Excellent | Very Low | $ |
| Aluminum (thermal break) | ~100x worse | 0.4 to 0.6 | Excellent | Very Low | $ |
| Vinyl | Baseline | 0.3 to 0.4 | Good | Very Low | $ |
| Fiberglass | About the same | 0.3 to 0.4 | Excellent | Very Low | $ |
| Wood | Slightly better | 0.3 to 0.5 | Fair | High | $ |
| Composite | About the same | 0.3 to 0.4 | Very Good | Low | $ |
Composite and Hybrid Frames: Worth the Premium?
Many manufacturers now offer composite frames (wood fiber and polymer blends) or hybrid designs (vinyl exterior with wood interior, or fiberglass with foam cores).
Are these premium options worth it? Do they deliver real thermal improvements or just aesthetic benefits?
Foam-filled frames can improve U-factors by 10-15%, which translates to real energy savings over decades. But here's the thing, and I can't stress this enough: proper installation of a standard vinyl frame often outperforms poor installation of a premium frame.
Budget constraints are real. I get it. Sometimes the best choice is a mid-range frame with excellent installation rather than a premium frame installed hastily. You need to weigh cost against performance while remembering that installation quality can make or break any frame material's performance.
A client in Denver got quotes for 12 windows last year. Company A offered standard vinyl frames with professional installation including exterior insulation wrapping and careful air sealing for $8,500. Company B offered premium fiberglass frames with foam cores for $11,200 but used a quick retrofit installation method.
She chose Company A. After installation, she used an infrared camera during a cold snap. The vinyl frames showed minimal temperature variation from edge to center. Her neighbor who'd used Company B's premium frames (installed the same week) showed major cold spots at all frame-to-wall junctions.
The lesson? A $3,000 frame upgrade couldn't compensate for installation shortcuts that created thermal bridges. The cheaper windows with better installation outperformed the expensive windows with standard installation.
The Spacer Bar: The Small Component Making a Big Difference
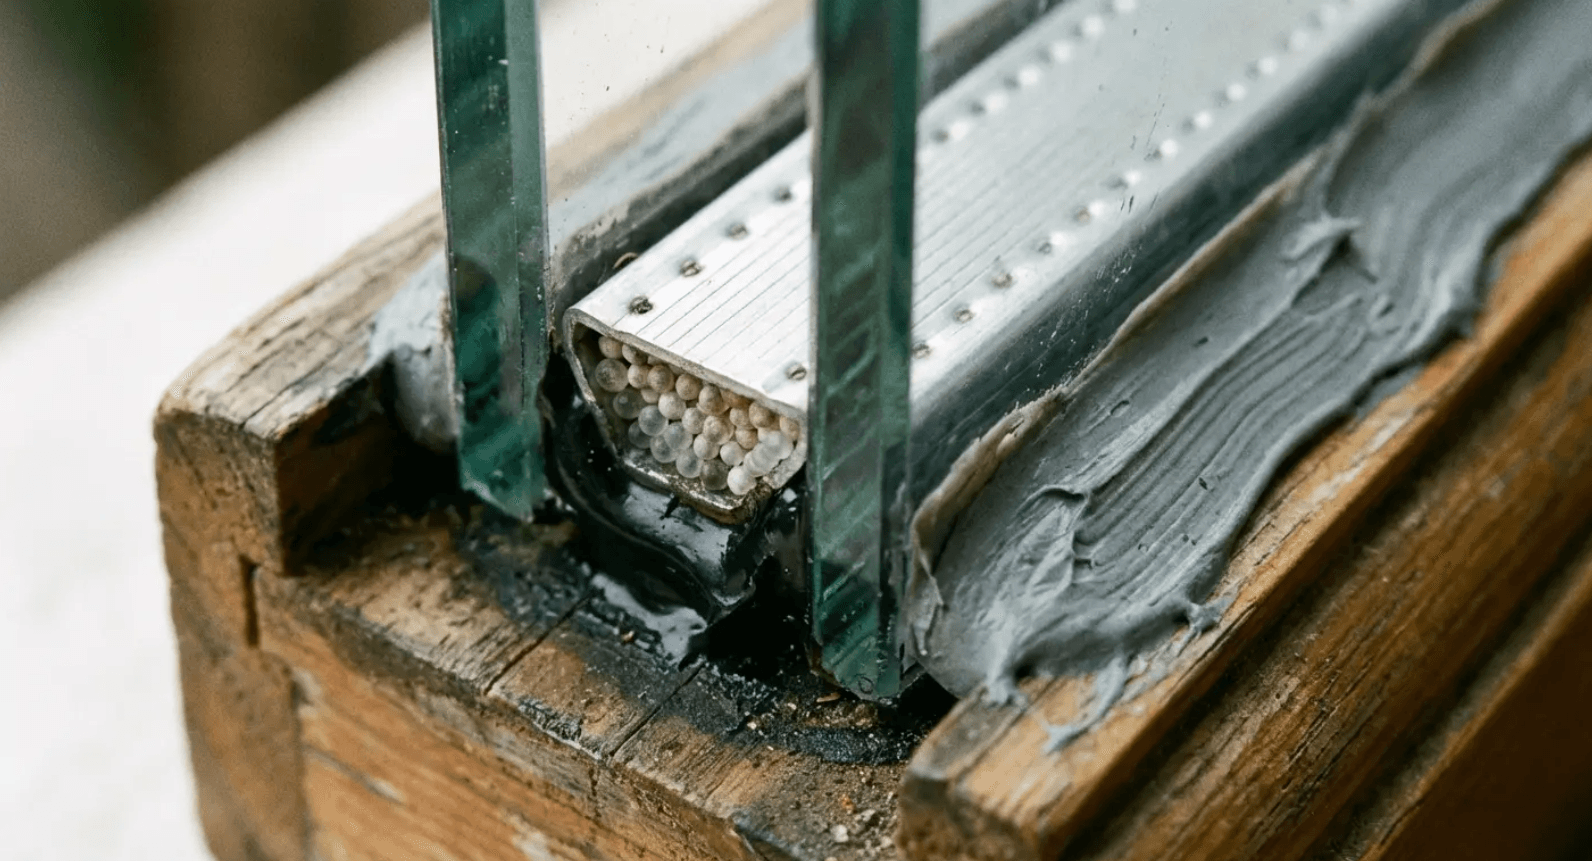
What Spacers Do and Why They Matter
Most people have never heard of spacer bars.
They sit at the edge of every insulated glass unit, separating the panes and creating the sealed airspace. You can't see them when you look at a window, but they have a huge impact on performance.
Traditional aluminum spacers conduct heat rapidly, creating a thermal bridge right at the edge of the glass where it meets the frame. Already a vulnerable area. This edge-of-glass zone experiences the most dramatic temperature differences in your entire window.
Warm-edge spacers, made from foam, vinyl, or stainless steel with thermal breaks, reduce heat transfer big time.
That condensation forming at the bottom corners of your windows? Often indicates a spacer problem, not a seal failure. That distinction matters because it changes what needs to be fixed.
Warm-edge spacers typically add $50 to $100 per window but can improve overall window U-factor by 5-10%. That might not sound dramatic. But across 15 to 20 windows over 20 years, it adds up to real money saved on heating and cooling.
The spacer bar thing? Most people skip this. Big mistake.
The Condensation Connection
Spacer technology links directly to a problem you can actually see: condensation and frost on window edges during cold weather.
When the edge of the glass gets cold enough (because of conductive spacers), moisture in your indoor air condenses there first. Over time, this moisture can damage window frames, sills, and surrounding walls. Upgrading to warm-edge spacers isn't just about energy efficiency. It's about preventing moisture damage.
Some condensation can occur even with warm-edge spacers if indoor humidity is really high. This isn't a magic solution. But it raises the threshold considerably. The difference between condensation at 40% relative humidity versus 60% relative humidity is the difference between constant problems and occasional issues during extreme weather.
You can't see what spacer type is installed by looking at a window. You need to ask specifically and verify on product specs. Don't assume that expensive windows automatically include warm-edge spacers. I've seen premium window packages with aluminum spacers because the buyer didn't know to specify otherwise.
Spacer Bar Questions to Ask Your Window Supplier:
- What spacer material is used? (Aluminum, foam, vinyl, stainless steel, hybrid)
- Is it classified as "warm-edge" technology?
- What's the spacer's thermal conductivity rating?
- How much does the spacer improve the overall window U-factor compared to aluminum?
- Is warm-edge standard or an upgrade? What's the cost difference?
- Does the warranty cover spacer performance or just seal integrity?
- Can you provide a cross-section diagram showing spacer placement?
Glass Coatings vs. Gas Fills: Which Investment Actually Pays Off?
Low-E Coatings Without the Marketing Spin
Low-emissivity (Low-E) coatings are microscopically thin metallic layers applied to glass to reflect infrared heat while allowing visible light through. The marketing terms (Low-E2, Low-E3, LoE-180) are designed to sound impressive, but what you actually need to know is simpler.
Coatings can be tuned for cold climates (keeping heat in) or hot climates (reflecting heat out). Some windows have multiple coatings on different panes. Here's the key insight: Low-E coatings typically improve window performance more than gas fills do. Yet they're often bundled together so you can't easily compare.
Ballpark figures: a good Low-E coating might improve U-factor by 25-30%, while argon fill improves it by 10-15%. Both together work best. But if budget forces choices, coating matters more.
I see homeowners agonizing over whether to upgrade from argon to krypton gas while accepting whatever coating the manufacturer includes as standard. That's backwards. The coating deserves your attention first.
Gas Fills: Argon, Krypton, and the Seal That Holds Them
Argon and krypton are denser than air, which means (and I'm simplifying here) they transfer heat more slowly between glass panes. Krypton performs better but costs way more and is typically used only in very narrow gaps (less than ½ inch) where argon doesn't fit efficiently.
Gas fills eventually leak out. Well, not leak exactly. More like slowly permeate through the seal over time. But whatever. Seals are designed to last 20+ years, but failures happen. A window that's lost its gas fill still functions. It just performs like an air-filled unit. Not catastrophic failure, just performance degradation.
Manufacturers don't typically guarantee gas retention separately from seal integrity. Testing whether gas is still present requires special equipment. You won't know your gas has leaked until you notice condensation between panes or measure performance degradation with specialized tools.
Gas fills are worth having, but they're not the primary performance factor you should focus on when comparing windows. Think of them as a nice bonus that enhances the coating and glass package, not as the main event.
When "Energy Efficient" Labels Mislead (And They Usually Do)
NFRC Ratings Show Lab Performance, Not Installed Reality
The National Fenestration Rating Council (NFRC) label on windows shows U-factor, Solar Heat Gain Coefficient (SHGC), and other metrics measured under standardized lab conditions. These numbers reflect the window unit itself. Not how it performs once installed in your wall.
A window with a U-factor of 0.30 in the lab might perform at 0.35 or 0.40 after installation if thermal bridges are created at the frame-to-wall connection. NFRC ratings are useful for comparing windows to each other. They're not predictions of actual energy savings.
The U.S. Department of Energy actually tells homeowners to "look for whole-unit U-factors and SHGCs, rather than center-of-glass U-factors and SHGCs" because "whole-unit numbers more accurately reflect the energy performance of the entire product."
This distinction matters big time: center-of-glass measurements can show U-factors as low as 0.15 to 0.20, while whole-unit performance for the same window might be 0.30 to 0.35 once frame and edge effects are included. Yet many window salespeople push center-of-glass numbers because they sound more impressive. They're leaving you with unrealistic performance expectations.
The ENERGY STAR label? It uses NFRC ratings and sets different thresholds for different climate zones, which is helpful. But it still doesn't account for installation quality. It's better than nothing. That's the nicest thing I can say about it.
You can't shop for windows purely by specs. You need to evaluate the entire installation approach.
The Marketing Terms That Don't Mean What You Think
Terms like "thermally efficient," "energy saving," and "high performance" aren't regulated. They mean whatever the manufacturer wants them to mean.
"Double-pane" is standard, not special. "Insulated glass" just means multiple panes with an airspace. "Energy efficient" might only mean it meets minimum ENERGY STAR requirements. "Lifetime warranty" often covers seal failure but not gas fill loss, and may not transfer to future homeowners.
"Low maintenance" typically refers to exterior cladding, not the entire window system. I've seen windows marketed as "virtually maintenance-free" that still require periodic hardware adjustments, weatherstripping replacement, and cleaning of weep holes.
Look, I'm not trying to make you paranoid. But you need to push past vague claims to concrete specifications. What's the U-factor? What spacer type? What Low-E coating? What does the warranty cover, specifically? Make them answer with numbers and details, not marketing fluff.
Measuring Real Performance Beyond the Sticker
Whole-Window U-Factor vs. Center-of-Glass
NFRC labels show whole-window U-factor, which includes frame and edge effects, not just the center of the glass. This is good. But even this doesn't tell the whole story.
Center-of-glass U-factors are often way better than whole-window numbers because frames and edges underperform. In large windows, the center-of-glass area dominates, so whole-window performance approaches center-of-glass performance. In smaller windows with more frame relative to glass area, whole-window performance is noticeably worse.
Window size and configuration matter when comparing specs. Picture windows (fixed, no operable parts) typically perform better than casement or double-hung windows because they have better seals and fewer moving parts creating gaps.
Bigger windows aren't just about views. They can also perform better thermally per square foot. That's counterintuitive for homeowners who assume larger windows mean more heat loss, but the math works out when you consider frame-to-glass ratios.
How to Actually Test Your Windows After Installation
Infrared thermometers (cheap, $20 to $30) can measure frame temperatures during cold weather to identify thermal bridges. Running your hand around the frame and sash on a windy day reveals air leaks. Condensation patterns tell you where cold spots exist.
For professional assessment, energy auditors use infrared cameras and blower door tests to quantify window performance and air leakage. Most people won't do detailed testing. But even simple checks can reveal problems.
The first winter after installation is the time to identify issues while warranty coverage is unquestionable. If you notice problems, document them with photos and temperature readings before calling the installer.
Last year, a client in Boston had 18 windows installed in October. She decided to do basic performance testing that first winter. Using a $25 infrared thermometer from the hardware store, she measured interior surface temperatures on a 15°F night.
Center of her new triple-pane glass measured 58°F. Excellent.
The vinyl frame edges measured 38 to 42°F. Not great, but not terrible.
One window's frame measured 32°F. That's literally freezing.
She took photos with the thermometer display visible and called the installer. An inspection revealed that the 32°F window had been installed with minimal foam fill due to a particularly tight rough opening, creating a direct thermal bridge. The installer added proper insulation and air sealing at no charge because she'd documented the problem within the warranty period.
Without testing, she would have assumed all the windows were performing equally. Might not have caught the problem until ice damage occurred.
How Your Wall Construction Changes Everything
The Rough Opening Size and Its Thermal Implications
Your wall's rough opening (the hole cut for the window) is typically ½ to 1 inch larger than the window frame on all sides. This gap must be filled with something. What goes there determines how much thermal bridging occurs.
Standard practice uses low-density spray foam, which insulates better than air but still creates a weak point compared to your wall insulation. High-density foam, foam backer rod with sealant, or even rigid foam shims can improve performance.
The rough opening is also where air leakage most commonly occurs because it's a transition between materials. Framing, insulation, window frame, interior finish, exterior cladding. All meeting at one spot. Proper air sealing requires attention to both the interior and exterior sides of the window, not just filling the gap.
You should discuss rough opening treatment with your installer before work begins. Not discover their method afterward. Ask what products they'll use and why. If they look confused by the question, that tells you something important about their approach.
The financing landscape for window replacement is evolving to make energy-efficient upgrades more accessible. Lone Wolf Exteriors recently announced expanded financing options specifically for replacement vinyl windows and exterior services, noting that "the expanded financing program addresses growing demand for energy-efficient home improvements as utility costs continue rising across Texas."
This trend reflects broader recognition that proper window replacement (including attention to installation details like rough opening treatment) represents a significant but necessary investment that many homeowners need payment flexibility to pursue.
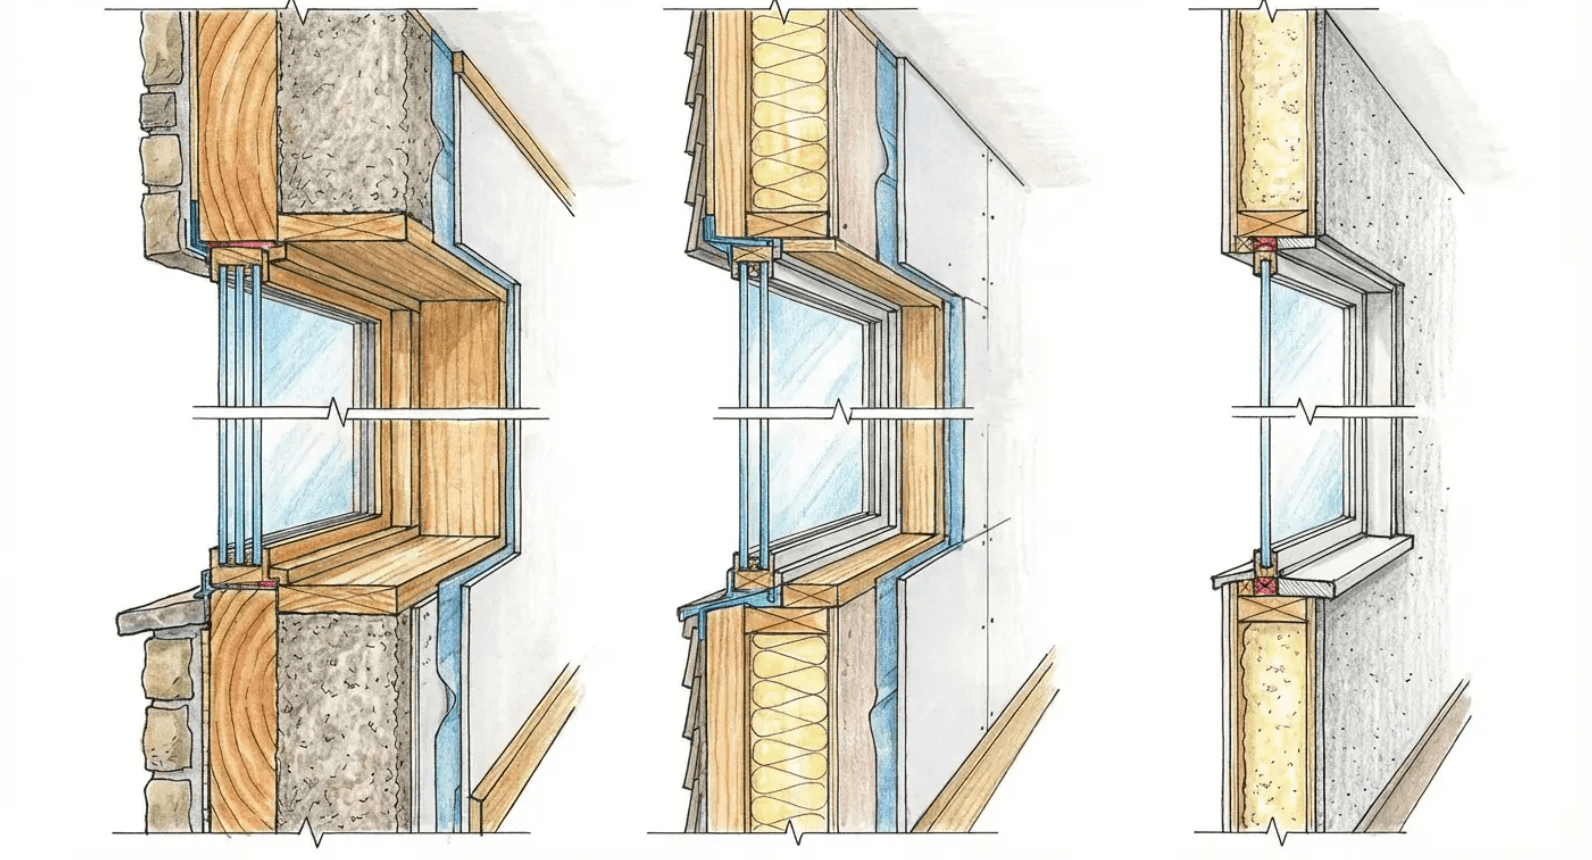
Wall Thickness, Insulation Type, and Window Placement
Where your window sits within your wall's depth matters. In older homes with thick walls, windows were often set near the middle, creating deep sills but also reducing thermal bridging.
Modern construction often places windows flush with the exterior sheathing, which looks cleaner but can create thermal bridges if exterior insulation isn't continuous around the frame. Continuous exterior insulation (foam board on the outside of sheathing) requires special attention to window installation, including extended jambs or bucks to bring the window out to the insulation layer.
Your wall assembly (2x4 vs. 2x6 framing, cavity insulation type, presence of exterior insulation) should inform window selection and installation method. You don't get to choose wall construction when replacing windows. But understanding how your existing walls work helps you make better window choices and spot when installers are ignoring important details.
I've worked with homes where the walls were better insulated than the windows, and homes where the opposite was true. The installation approach needs to account for these differences, or you're creating a weak point in whichever system was stronger.
The Truth About Retrofit vs. Full-Frame Replacement
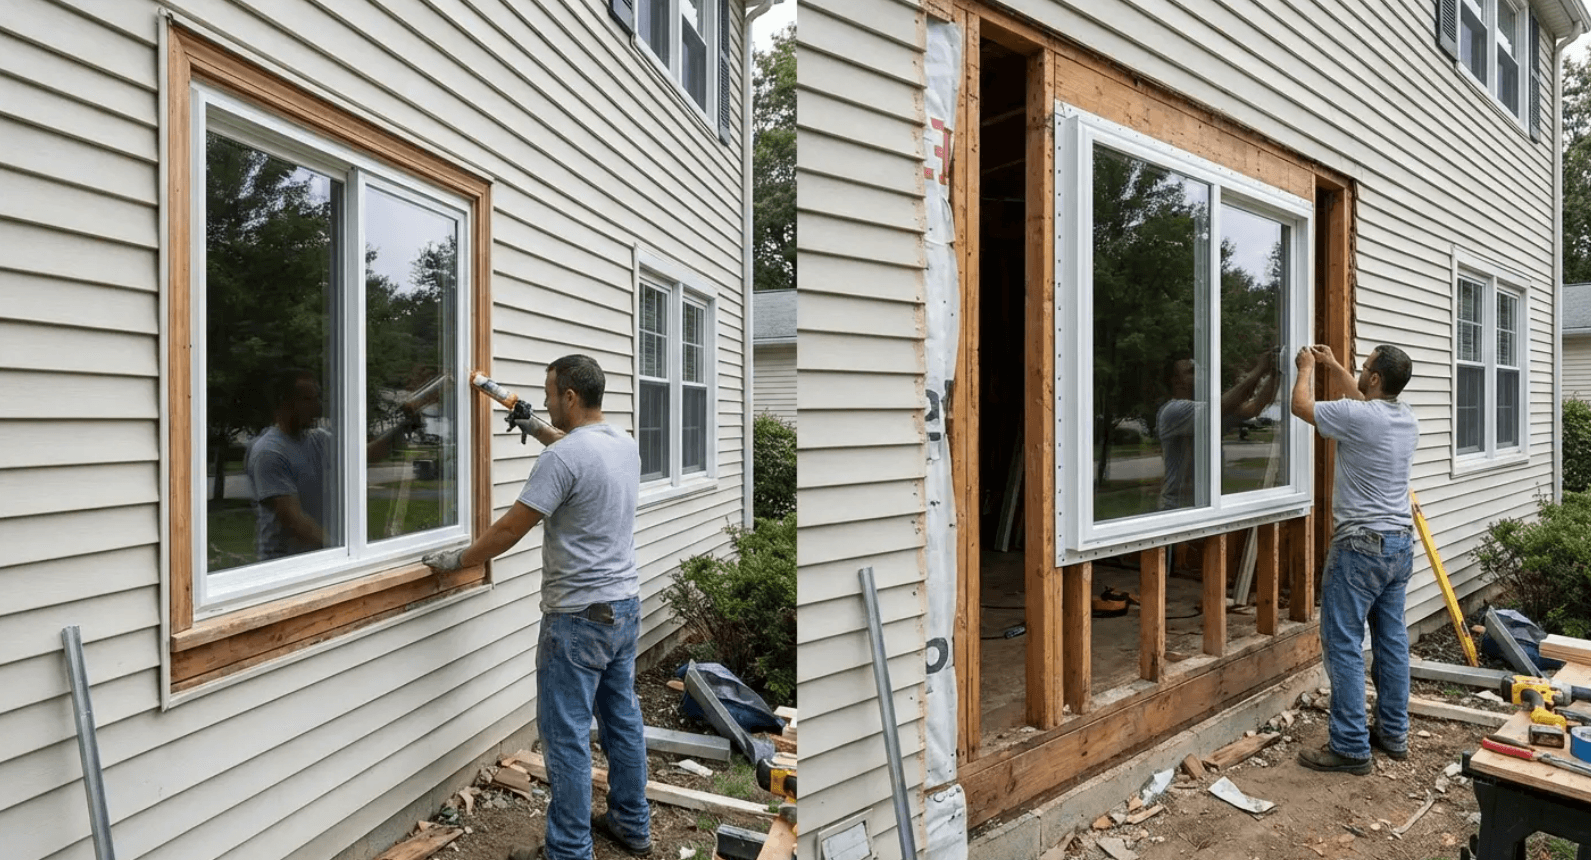
What You're Actually Getting With Each Method
Retrofit installations (also called insert or pocket installations) leave the existing frame in place and install a new window unit inside it. Full-frame replacement removes everything down to the rough opening and installs a complete new window system.
Retrofit is faster, less expensive, and less disruptive. No interior or exterior trim work. But it reduces glass area, may leave old thermal bridges in place, and can only be done if the existing frame is in good condition.
Full-frame replacement costs more and requires more labor, including trim repair and painting. But it lets you address rot, improve insulation at the rough opening, install proper flashing, and eliminate thermal bridges from old frames.
Retrofit makes sense when existing frames are sound and you're prioritizing cost. Full-frame makes sense when you're prioritizing performance or when existing frames are deteriorated.
Neither approach is inherently better. They serve different needs.
The Hidden Costs That Aren't in the Quote
Beyond the window price and installation labor, full-frame replacement often requires interior trim replacement or repair, exterior siding work, and painting. If your walls contain asbestos or lead paint (common in pre-1980s homes), abatement costs can add thousands.
Retrofit installations avoid most of these issues but may require custom-sized windows if your existing frames are non-standard dimensions, which increases window cost. Discovering rot or structural issues during full-frame installation can add unexpected expenses. Though it's better to find and fix these problems than to cover them up.
Even the U.S. Department of Energy emphasizes that "even the most energy-efficient window must be properly installed to ensure energy efficiency and comfort," noting that windows should be "installed by trained professionals according to manufacturer's instructions; otherwise, your warranty may be void."
This warning is particularly relevant for the retrofit vs. full-frame decision: a retrofit installation might preserve your warranty on paper, but if it leaves thermal bridges from old frames in place, you've paid for performance you'll never receive.
The DOE further notes that "windows, flashing, and air sealing should all be installed according to the manufacturer's recommendations to perform correctly." Requirements that full-frame replacements can meet more thoroughly than retrofit installations.
Ask contractors what's included and what scenarios would trigger additional costs. Budget realistically. The cheapest quote often becomes the most expensive project when hidden issues emerge.
How to Tell If Your Contractor Actually Knows Their Stuff (Most Don't)
The Questions That Separate Experts From Order-Takers
How do you address thermal bridging at the frame-to-wall connection?
What products do you use to air seal the rough opening?
Do you use low-expansion or high-expansion foam, and why?
Can you explain your flashing details?
Do you adjust your installation method based on wall construction?
Contractors who understand building science will answer these questions specifically. They may even ask to inspect your wall assembly. Those who deflect, oversimplify, or seem annoyed by detailed questions are probably following a standard process regardless of home-specific factors.
The best contractors often aren't the cheapest or the fastest. You're hiring expertise, not just labor. Someone who takes time to assess your specific situation and explain their approach is worth paying for.
This is going to sound cynical, but the contractors who ask the most questions usually give the highest quotes. And you know what? They're usually worth it. The cheap guy who shows up, measures, and gives you a number in 10 minutes? He's not thinking about your wall assembly. He's thinking about his next appointment.
Trust your instincts if a contractor seems dismissive of your concerns. You're not being difficult by asking detailed questions. You're protecting a significant investment.
Documentation and Follow-Up That Protects Your Investment
Good contractors document their work because they're proud of it and because it protects both parties if questions arise later.
Ask for product specifications, warranty information, installation photos (especially of flashing and air sealing before trim covers everything), and written details of any deviations from standard installation. Request photos during installation, particularly of areas that will be hidden.
Schedule a walkthrough after installation where the contractor explains what was done and addresses any concerns. Problems caught immediately are easier to resolve than those discovered months later.
Professional contractors welcome documentation requests. Those who resist may be cutting corners. I've found that the contractors most willing to photograph their work are the ones doing the best installations, because they want you to see what you're paying for.
Final Thoughts
Windows are a serious investment. The difference between adequate and excellent results often comes down to understanding thermal bridging and installation quality.
The glass technology is impressive. But it's wasted if the frame conducts heat rapidly or if installation creates thermal bridges at the wall connection. NFRC labels are starting points, not guarantees. Frame material, spacers, and installation methods matter as much as Low-E coatings and gas fills.
Maybe more.
This level of detail might feel overwhelming. But the core message is simple: focus on the complete window system, not just the glass, and work with contractors who understand building science.
The homes that see real energy savings after window replacement are the ones where these details were addressed, not overlooked. You're not being picky by asking detailed questions. You're being smart about protecting your investment and your home's performance.
I've installed thousands of windows over the years. You know who calls me back with problems? Not the people who asked annoying questions during the quote. It's always the folks who trusted that "standard installation" meant "good installation."
It doesn't.
Most installers are doing what they were taught. That's the problem. What they were taught is incomplete. Not wrong, just incomplete. You're not going to fix the industry by yourself. But you can protect your own $15,000 investment by asking the right questions.
Will some contractors think you're a pain in the ass? Yeah, probably.
That's fine. Better to be a pain in the ass with windows that actually perform than to be easygoing with frost on your frames.
Look, you're going to do what you're going to do. But at least now you know what questions to ask. You know what to look for. You know that the window itself is only part of the equation.
And you know that when your installer looks confused about thermal bridging, that's not a good sign.