March 31, 2026
Parapet Roof Design: Why the Flashing Detail Everyone Ignores Will Cost You Thousands
Author
Table of Contents
- The Hidden Vulnerability at Your Parapet's Edge
- Why Most Parapet Failures Start Where the Wall Meets the Membrane
- The Counterflashing Gap That Builders Pretend Doesn't Exist
- How Thermal Movement Destroys Even "Perfect" Parapet Installations
- Material Compatibility Issues You Won't Find in Product Specs
- The Drainage Plane Problem That Shows Up Five Years Later
- Parapet Height Codes vs. Real-World Performance (They're Not the Same Thing)
- Through-Wall Flashing: The Detail That Separates Amateurs from Professionals
- Why Your Parapet Coping Choice Matters More Than You Think
- Expansion Joint Placement That Actually Accounts for Building Movement
- The Inspection Checklist That Catches Problems Before Water Does
TL;DR
- Most parapet roof failures start at the wall-to-membrane junction, not the coping everyone stares at
- Thermal cycles create invisible gaps in counterflashing that stay hidden until water's been pouring in for months
- Different flashing materials corrode each other in ways the spec sheets never mention
- Through-wall flashing only works if someone actually installed the drainage plane correctly (spoiler: they usually didn't)
- Building codes give you minimum heights for safety, not for keeping water out or managing heat
- Your coping choice affects way more than looks, but nobody talks about the maintenance costs
- Expansion joints need to account for how your actual building moves, not some generic spacing rule
- Professional inspections catch the problems before you're looking at a five-figure repair bill
The Hidden Vulnerability at Your Parapet's Edge
Let me guess. You've been down the rabbit hole looking at coping styles. Copper versus aluminum. Comparing metal finishes in different light. Debating continuous cleat systems versus individual cap pieces. Yeah?
Here's the thing: you're looking at the wrong part of the roof.
The actual failure point sits about eighteen inches below where you're staring.
I've torn off maybe 200 failed parapet assemblies at this point. My crew can spot the problems before we even get the first piece off. And I'll tell you what causes more headaches than every other component combined: that junction where your vertical wall transitions to horizontal membrane. This zone needs perfect coordination between your roofing membrane, base flashing, counterflashing, and wall assembly. Each material expands and contracts at different rates. Each trade works on their own schedule with their own priorities.
That intersection? It gets compromised during installation more often than it stays intact.
The amount of moisture that moves through your building via air leakage at normal pressure differences is many times greater than the water vapor that can pass through permeable materials. And these air leakage pathways? They concentrate exactly where you're not looking.
Understanding what is a parapet roof starts with recognizing these vulnerable transitions. A parapet roof is basically a low protective wall that extends above the roofline, creating a barrier around the roof's perimeter. The base flashing needs to climb high enough up the parapet wall to stop water intrusion, but it also needs to stay flexible enough to handle building movement. Your counterflashing has to overlap it with enough coverage while staying mechanically attached to the wall.
Between these two critical components sits a vulnerable gap that relies entirely on sealant for weather protection.
Sealants fail. Not "if." When.
And the second they do, water finds that gap.
Property owners don't think about this detail because you can't see it from ground level. Can't even see it from the roof surface in most cases. Architects specify it in drawings, sure, but site conditions force field modifications that trash the original parapet roof design intent. Contractors know it matters, but the labor intensity and scheduling nightmare means it gets rushed during the final push to finish.
We're focusing this entire discussion on the details that actually keep water out of your building — not the aesthetically driven decisions that dominate most parapet conversations. Whether you're working on a modern parapet roof design or a more traditional flat roof parapet wall, the components that protect your building envelope don't photograph well for your architect's portfolio. But they determine whether you're dealing with minor maintenance or a major restoration five years from now.
Why Most Parapet Failures Start Where the Wall Meets the Membrane
Everyone thinks water is simple. Runs downhill, right?
Except on parapets, water does whatever the hell it wants.
It wicks. It migrates sideways. It gets pushed UP by wind. It finds gaps you can't even see.
The transition from horizontal to vertical surfaces creates what building scientists call a "critical detail." I just call it "where everything goes wrong." Water running across your roof membrane hits the parapet wall and needs somewhere to go. Without proper detailing, it finds its way behind your base flashing, between your membrane layers, or straight into the parapet wall assembly.
Cant strips help redirect water and reduce stress on the membrane, but only if they're installed correctly. I've seen countless flat roof parapet installations where the cant strip was either missing entirely or installed with gaps that defeat the whole purpose. The membrane then makes a 90-degree turn from horizontal to vertical, creating stress that can tear or separate the layers. These flat roof parapet details need obsessive attention during installation.
Your base flashing needs to extend at least eight inches up the parapet wall. Twelve inches is better.
Most installations barely hit six inches because taller base flashing means more labor, more material, more careful detailing. That missing height? That's your water intrusion pathway when wind-driven rain hits or when water backs up behind the counterflashing.
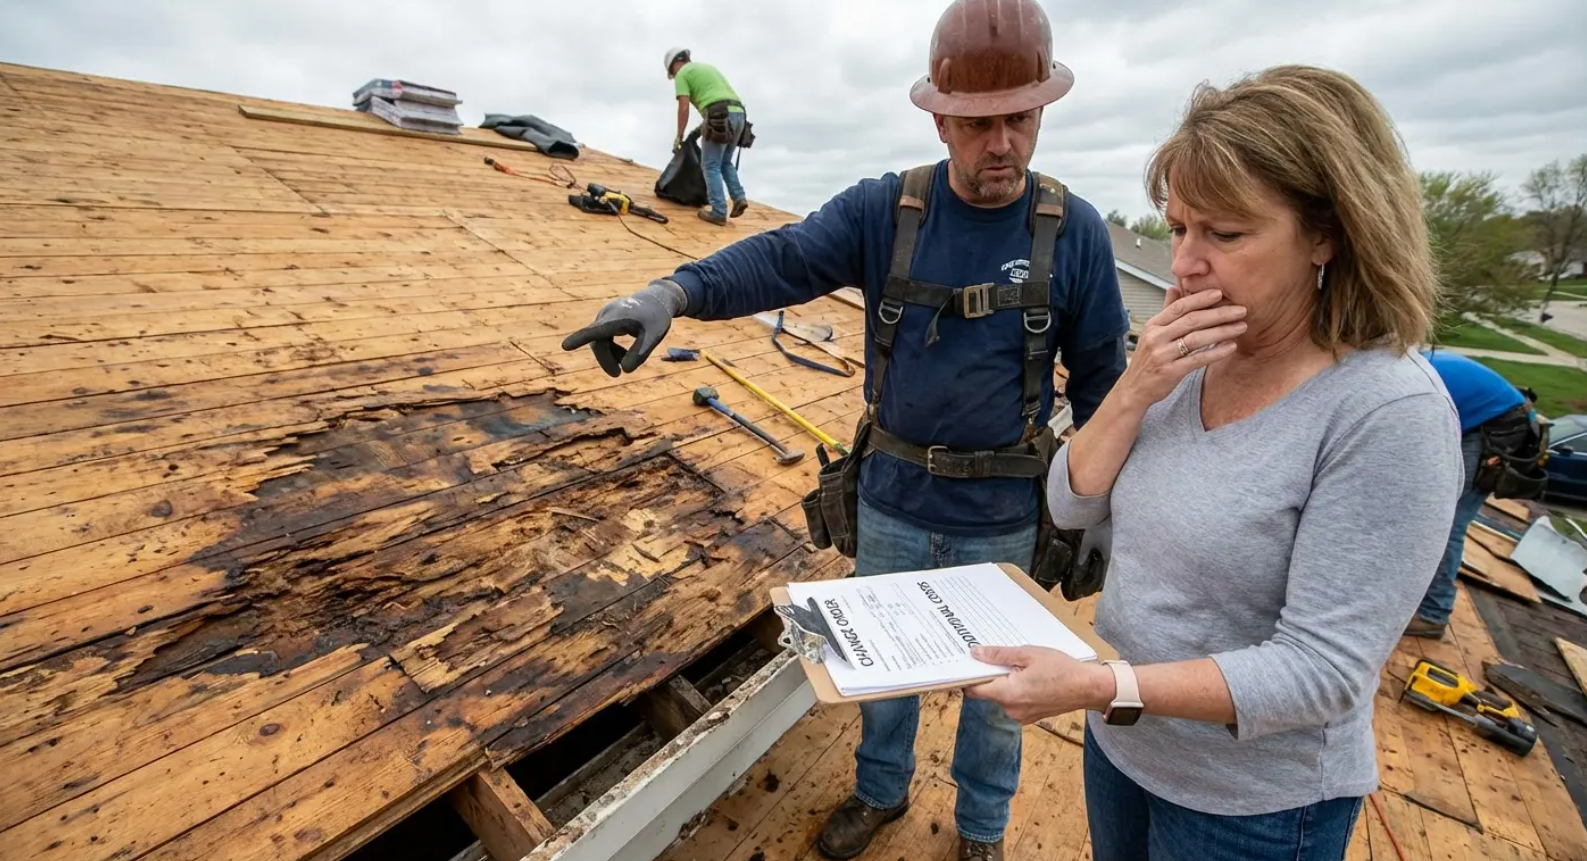
Chicago, 2018. Commercial building, nice property. The contractor used high-quality modified bitumen roofing and premium copper coping. But the base flashing only went six inches up the parapet wall to save on labor costs. During the first major wind-driven rainstorm, water got behind the counterflashing, migrated down to where the base flashing stopped, and entered the wall cavity.
By 2023, the building owner discovered extensive water damage to interior drywall, insulation that was basically mush, and the beginning stages of structural wood rot. All because of those missing six inches of base flashing height. The repair cost? $45,000. The cost to install proper-height base flashing during original construction? $1,200.
I showed the owner the numbers and he just stared at me. Then he asked if I could find out who the original contractor was. I told him that wouldn't help anything, but I understood the impulse.
Here's what actually happens during a typical failure: Water gets into that small gap between counterflashing and base flashing. Maybe the sealant degraded. Maybe it was never properly applied (happens more than you'd think). That water now sits trapped between the two flashing layers. Gravity pulls it down until it reaches the point where your base flashing stops. If that termination point sits too low on the wall, water can migrate behind the base flashing and contact your roof membrane, wall sheathing, or insulation.
Once water's in your wall assembly, you're no longer dealing with a roofing issue. You're dealing with potential structural damage, insulation degradation, interior water damage, and mold growth. The repair costs jump from hundreds to thousands or tens of thousands depending on how long the intrusion goes undetected. Understanding how long flat roofs last is directly tied to how well these parapet wall details were executed at installation.
Membrane termination at the wall requires mechanical fastening, not just adhesive. Temperature cycling, UV exposure, and physical stress from building movement will eventually trash adhesive bonds. We need mechanical attachment (termination bars, fasteners through the membrane into the wall substrate) to maintain long-term integrity. This attachment must be watertight, which means proper fastener sealing and adequate overlap with your counterflashing system.
The counterflashing itself needs to extend far enough down the wall face to overlap your base flashing by at least four inches. Six is better. It needs to be mechanically fastened into the wall at the top edge, with fasteners properly sealed or concealed behind reglets or masonry joints. The bottom edge must stay free to allow for thermal movement while maintaining the overlap with base flashing.
Every one of these requirements adds complexity, labor, and cost to the installation. Every one of them gets compromised regularly in the field to save time or money.
Every shortcut creates a potential failure point that won't show symptoms until water's been entering your building for months or years.
Getting the roof parapet detail right at this critical junction means understanding how water behaves under real-world conditions, not just following generic specifications that don't account for your building's specific exposure. The parapet wall detail at this transition zone determines whether your roofing system provides decades of reliable service or needs expensive repairs within just a few years.
The Counterflashing Gap That Builders Pretend Doesn't Exist
Every counterflashing system in existence relies on a material that will fail within ten to fifteen years. We install it anyway because we don't have a better option.
Then we collectively pretend it'll last as long as the metal components around it.
Sealant serves as the final barrier between your counterflashing and base flashing. It fills the gap, bridges the overlap, and theoretically prevents water from migrating into the space between the two flashing layers. Polyurethane sealants might give you fifteen years in ideal conditions. Silicone could stretch to twenty if you're lucky and it's not in direct UV exposure. Cheaper acrylic or latex sealants start degrading within five years.
The gap exists because your counterflashing needs to stay mechanically attached to the parapet wall while your base flashing needs to move with the roof membrane. These components experience different thermal expansion rates, different movement patterns, different stress loads. A rigid connection between them would tear apart during the first significant temperature swing.
So we leave a gap and fill it with a material we know will eventually fail.
What's the alternative? Some designers specify drip edges on the counterflashing that project outward beyond the wall face, directing water away from the vulnerable overlap zone. This helps, but it doesn't eliminate water intrusion from wind-driven rain or from water that creeps upward through capillary action. Others use kick-out flanges or complex lapped systems that create multiple barriers to water entry.
These enhanced parapet wall detail approaches work better than simple sealant joints, but they cost more to fabricate and install. They require skilled metal fabricators who understand water behavior and building movement. They add material costs and labor hours to a project component that's already expensive and invisible to the building owner.
Most projects default to the standard detail: counterflashing overlapping base flashing with a sealant bead at the bottom edge. It's in the specifications. It's what contractors know how to install. And it'll probably last long enough that the current project team won't be responsible when it fails.
You need to know this going into your parapet roof design project. The sealant joint represents scheduled maintenance, not a permanent installation. Plan for inspection every five years at minimum, with resealing as needed. Budget for it. Schedule it. Follow through.
Or accept that you're gambling on how long the sealant holds up and whether water intrusion will cause minor staining or major damage when it eventually fails. This detail requires periodic inspection and maintenance that rarely happens — similar to how maintaining your shingle roof requires consistent attention to prevent costly failures.
Last month? Saw both extremes. One building caught it early. $3K fix. Another waited until there was mold. $67K.
The difference usually comes down to how quickly the failure gets detected and addressed, which brings us back to inspection and maintenance that most building owners never perform until they notice interior water damage.
How Thermal Movement Destroys Even "Perfect" Parapet Installations
A 100-foot metal coping cap can expand more than an inch and a half when it goes from winter cold to summer heat. Your brick or concrete parapet wall expands too, but at a different rate and by a different amount. The roofing membrane, the base flashing, the counterflashing... they're all moving, all at different rates, all creating stress on the connections between them.
This movement happens every single day as temperatures rise and fall. It happens seasonally as you move from winter to summer. It happens suddenly when afternoon thunderstorms drop temperatures 30 degrees in fifteen minutes.
Your parapet assembly experiences thousands of expansion and contraction cycles over its service life. Each cycle stresses every fastener, every sealant joint, every material interface.
Metal expands and contracts more than masonry. Dark-colored materials experience greater temperature swings than light-colored materials. Components in direct sun exposure move more than shaded components. The south and west faces of your parapet undergo more dramatic thermal cycling than north and east faces.
Here's something I still can't fully explain: I've seen identical parapet assemblies on the same building perform completely differently based on which side of the building they're on. Same materials, same contractor, installed the same week. North side? Fine after 15 years. South side? Failed in 8. The sun exposure is the obvious answer, but the math doesn't quite add up. There's something else going on that I haven't figured out yet.
Okay, here's the thing about metal and brick: they expand at different speeds when they heat up. It's like if you and your friend are walking, but they take bigger steps. Eventually, you're not walking together anymore. Somebody's getting pulled or pushed. Same thing happens with your parapet. The metal wants to expand this much, the brick wants to expand that much, and something in between them has to deal with that difference.
Usually, it's the sealant.
And the sealant loses.
Proper design accounts for this movement by incorporating expansion joints at regular intervals. These joints create deliberate breaks in the assembly that allow each section to move independently without overstressing the materials or connections. The spacing depends on the materials you're using, the color (which affects heat absorption), and the orientation of the parapet.
Standard recommendations suggest expansion joints every 30 to 40 feet in metal coping systems. I've seen failures in installations that followed these recommendations because the designer didn't account for the actual thermal exposure on a dark-colored metal coping in full sun exposure on a south-facing wall. The movement exceeded what the standard spacing could accommodate, and the sealant joints failed within three years.
Your base flashing and counterflashing need to accommodate this movement too. Fasteners should use slotted holes or clips that allow for lateral movement rather than rigidly fixing the flashing in place. Sealant joints need to be properly sized (width-to-depth ratios matter) and use sealants with adequate movement capability for the expected expansion and contraction.
Most specifications include generic roof parapet detail drawings that don't account for the specific conditions of your building. A parapet in Minnesota experiences different thermal cycling than one in Arizona, but they often get the same standard details from the same architectural template. The Minnesota parapet might see a 140-degree temperature range from winter cold to summer heat. The Arizona parapet stays warmer in winter but the metal surfaces can reach 180 degrees in summer.
Different thermal exposures demand different solutions. The one-size-fits-all approach to roof parapet detail specifications creates vulnerabilities that won't show up until the assembly has gone through enough thermal cycles to stress the connections past their breaking point.
Material Compatibility Issues You Won't Find in Product Specs
Your copper counterflashing looks beautiful against that brick parapet wall. The aluminum coping cap offers durability at a reasonable cost. The galvanized steel termination bar secures your membrane properly. Each product meets its individual specification and comes with manufacturer warranties.
Put them together in the same assembly and you've created an electrochemical reaction that will corrode the aluminum within a decade.
Mix copper and aluminum? You've basically built a battery that eats your aluminum.
Galvanic corrosion happens when dissimilar metals contact each other in the presence of an electrolyte. Water works. Even humidity is enough. The more noble metal (copper in this case) stays protected while the less noble metal (aluminum) corrodes at an accelerated rate. The galvanic series ranks metals from most noble (cathodic) to least noble (anodic). Copper sits near the top. Aluminum sits much lower. Steel falls in between.
When you mix these metals in a parapet assembly, you need to isolate them from direct contact and from being connected through a conductive path. Isolation can be achieved through plastic or rubber washers, non-conductive spacers, or coating systems that prevent metal-to-metal contact. You also need to consider water runoff patterns. Copper runoff is particularly aggressive and will stain or corrode downstream metals even without direct contact.
Product specifications don't tell you this. The copper counterflashing spec sheet talks about the material properties of copper. The aluminum coping spec discusses aluminum's corrosion resistance and durability. Neither mentions what happens when you combine them in the same assembly with periodic water exposure.
Portland, Oregon. Medical office building. Beautiful place. Architect won awards for it. They specified copper through-wall flashing and counterflashing for aesthetic appeal and longevity, combined with prefinished aluminum coping to stay within budget. The installation was completed perfectly according to individual product specifications.
Within seven years, the aluminum coping showed severe pitting and corrosion along its entire length. Investigation revealed that rainwater running off the copper flashing carried dissolved copper ions that deposited on the aluminum surface below, creating galvanic cells that accelerated corrosion. The building owner faced a $78,000 coping replacement cost, plus the expense of installing isolation barriers that should have been included in the original design.
The property manager nearly cried when I gave him the repair estimate. "How did this happen?" Same way it always happens. Nobody asked if the materials would actually work together.
My guys joke that we should just keep a stack of aluminum coping in the truck because we replace it so often. It's not really a joke anymore.
Sealant compatibility presents similar hidden problems. Some sealants react with certain plastics or rubbers used in roofing membranes. Others contain solvents that can degrade foam insulation or certain coating systems. The sealant manufacturer tests their product against standard substrates, but your specific combination of membrane material, flashing, and substrate might not match their test conditions.
Bitumen-based products (asphalt, coal tar) can soften or degrade single-ply membranes like TPO or PVC. If your parapet wall detail includes any bitumen components (mastic, flashing cement, modified bitumen base flashing) in contact with your single-ply membrane, you need to verify compatibility. Some manufacturers provide compatibility charts. Many don't, leaving you to discover problems after installation when the membrane shows premature degradation.
Pressure-treated lumber (often used for blocking or cant strips) contains chemicals that can corrode certain metals. Fasteners driven through pressure-treated wood into metal flashing need to be stainless steel or specially coated to resist the corrosive compounds in the wood treatment. Standard galvanized fasteners will corrode faster than expected.
Paint and coating compatibility matters too. If you're field-painting metal flashing or coping, the paint needs to be compatible with the metal substrate and any factory coatings already present. Some paints won't adhere properly to certain factory finishes. Others will adhere initially but fail within a few years due to incompatibility with the substrate or with the thermal expansion characteristics of the metal.
The responsibility for identifying these compatibility issues falls into a gap between different parties. The architect specifies individual components but might not analyze how they interact. The manufacturer provides data on their specific product but doesn't test it with every possible adjacent material. The contractor installs what's specified and assumes the designer verified compatibility.
You need to ask these questions explicitly: What metals are in contact with each other? What's the water runoff pattern? Are any dissimilar metals connected through fasteners or other conductive paths? What sealants contact what substrates? Are there any bitumen products adjacent to single-ply membranes? What fasteners are going through what materials?
These aren't exotic concerns. They're basic material science that gets overlooked because everyone assumes someone else verified compatibility. The consequences might not appear for five or ten years, well after warranties expire and project teams move on to other work.
The Drainage Plane Problem That Shows Up Five Years Later
Water will get past your parapet's exterior face. That's not a failure. It's an assumption that proper design accounts for.
Brick absorbs water. Mortar joints develop hairline cracks. Sealant around penetrations degrades. Wind-driven rain finds its way through exterior cladding on every building.
The question isn't whether water penetrates the exterior face. The question is what happens to that water once it's inside your parapet wall assembly.
A drainage plane provides a continuous path for water to drain back to the exterior before it can migrate deeper into the wall assembly or into your building interior. In parapet walls, through-wall flashing serves as the primary drainage plane. It's installed within the wall assembly (typically at the roof line, but also at other critical heights) and slopes toward the exterior, collecting any water that's penetrated the outer wythe and directing it to weep holes or other drainage outlets.
Through-wall flashing sounds simple in concept. Installation reality gets complicated fast.
The flashing needs to be continuous with no gaps or tears. It needs to be properly lapped at joints (minimum six inches). It needs to slope toward the exterior (minimum 1/8 inch per foot, more is better). It needs to extend through the full thickness of the wall and turn up at the back face to prevent water from running past it. The exterior edge needs to project slightly beyond the wall face or include a drip edge to prevent water from running back under the flashing.
Weep holes must align with the through-wall flashing and remain open. Not blocked by mortar droppings during construction or by debris afterward. They need to be spaced closely enough to provide adequate drainage, typically 24 to 32 inches on center. Some designs use continuous vents rather than individual weep holes, which can be more effective but also more expensive.
The importance of proper parapet drainage became evident in recent high-profile construction projects. At One Willoughby Square in Downtown Brooklyn (New York YIMBY), the masonry facade installation reaching the roof parapet required meticulous attention to through-wall flashing and weep hole details to ensure the building's distinctive envelope would perform as intended. The project's visibility and quality standards meant that drainage plane continuity couldn't be compromised. A level of scrutiny that unfortunately doesn't apply to most commercial parapet installations.
I've opened up parapet walls that had through-wall flashing specified in the drawings but discovered it was installed without proper slope, or with gaps at the laps, or with the exterior edge turned up instead of down (creating a dam rather than a drainage path). The weep holes were there, properly spaced and aligned, but they weren't draining anything because the flashing wasn't directing water to them.
So now you've got water sitting in the wall. The brick stays wet. The mortar stays wet. Freeze-thaw cycles cause spalling and deterioration. Interior wall components (wood blocking, insulation, sheathing) get wet and begin to rot or grow mold. None of this is visible from the exterior or interior until the damage becomes severe.
Five years, sometimes ten years after construction, the problems finally show symptoms. Brick faces pop off. Interior staining appears. Energy costs increase because wet insulation has lost its R-value. By this point, the water intrusion has caused damage that costs exponentially more to repair than the original installation would have cost to do correctly. Proactive commercial roof maintenance is the only reliable way to catch drainage plane failures before they escalate.
The drainage plane concept extends beyond just through-wall flashing. Your entire flat roof parapet wall assembly needs to be designed as a system that manages water. This includes proper detailing at the base of the parapet where it meets the roof, at the top where coping attaches, and at any penetrations or interruptions in the wall.
Cavity walls (two wythes of masonry with an air space between) inherently provide better drainage than solid masonry walls because the cavity serves as a drainage space. But that cavity needs to remain clear. Mortar droppings that fall into the cavity during construction can create bridges that allow water to migrate from the outer to inner wythe, defeating the drainage plane.
Flashing dams (small upturned sections of through-wall flashing) can be used at control joints or expansion joints to compartmentalize the drainage plane and prevent water from traveling laterally within the wall cavity. These roof parapet detail elements rarely appear in standard specifications but can significantly improve long-term performance in longer parapet walls.
The drainage plane problem persists because it's invisible. You can't inspect through-wall flashing after the wall is built. You can't verify proper slope or continuity without destructive testing. You're relying entirely on the mason's installation quality and the inspector's diligence during construction. And most building inspectors don't verify through-wall flashing details because they can't see them once the next course of brick is laid.
You know what makes me crazy? When I find a problem and the building owner asks, "Why didn't the inspector catch this during construction?" Because the inspector was there for maybe 20 minutes, once, and half this stuff gets covered up before they could possibly inspect it. The through-wall flashing? Buried under brick. The base flashing termination? Covered by the next course. The sealant joint prep? Done after the inspector left.
I'm not blaming inspectors. They're doing what they can with the time they have. But there's this fantasy that someone's verifying every detail of every installation, and that's just not reality. Reality is: the mason does the work, covers it up, and we all hope it was done right. Sometimes it was. Sometimes it very much wasn't.
Parapet Height Codes vs. Real-World Performance (They're Not the Same Thing)
Building codes require parapets to extend at least 30 inches above the roof surface. That's a safety requirement designed to prevent people from accidentally walking off the roof edge. It has nothing to do with how well your parapet protects your roofing system or building envelope.
Thirty inches barely gets you above snow accumulation in northern climates. It provides minimal wind protection for your roof membrane. It offers almost no concealment for rooftop equipment.
It's the absolute minimum to meet code, and it's what most buildings get because taller parapets cost more to build.
Every additional foot of parapet height adds material costs (more brick or block, more flashing, more coping), structural requirements (taller walls need more robust support), and construction complexity. A 30-inch parapet might not require additional structural reinforcement beyond standard wall construction. A 48-inch parapet probably needs pilasters or reinforced cores to resist wind loads. A 72-inch parapet definitely requires engineering analysis and structural elements that add substantial cost.
So we build to code minimum and accept the performance compromises.
Wind uplift forces on roof membranes concentrate at the perimeter and corners. A taller parapet provides more protection from these forces by creating a larger zone of reduced wind pressure at the roof edge. Research has demonstrated that one of the most important functions of a roof parapet is to reduce the wind pressure at the roof edge, which improves the wind resistance of the roof assembly. Doubling parapet height from 30 to 60 inches can reduce edge zone wind uplift forces by 30 to 40 percent. That reduction might allow you to use less aggressive membrane attachment at the perimeter, potentially offsetting some of the cost of the taller parapet.
Thermal performance improves with parapet height too. Roof edges experience more extreme temperature cycling than field areas because they're exposed to weather on multiple sides. A taller parapet provides more thermal mass and insulation at the roof edge, reducing temperature extremes and the resulting stress on roofing materials. This matters most in climates with significant temperature swings or in buildings with strict energy performance requirements.
Equipment screening represents another practical benefit of taller parapets. Rooftop HVAC units, exhaust fans, and other equipment create visual clutter that affects building aesthetics. A 30-inch parapet won't hide much of anything. A 48-inch or 60-inch parapet can conceal most rooftop equipment from ground-level views, eliminating the need for separate equipment screens that add cost and create their own maintenance issues.
Parapet Height Decision Framework:
- Determine minimum code-required height (typically 30" above roof surface)
- Calculate snow accumulation depth for your climate zone
- Assess wind exposure using local wind speed data and building height
- Inventory rooftop equipment requiring screening
- Evaluate thermal performance goals and energy code requirements
- Calculate cost differential between 30", 42", and taller options
- Project long-term roof system service life at each height option
- Compare total cost of ownership including energy and maintenance over 20-30 years
- Select optimal height based on performance requirements, not just code minimum
The decision on parapet height should account for these performance factors, not just code minimums. What's your snow load? How much wind exposure does your building experience? Do you have rooftop equipment that needs screening? What are your energy performance goals? How important is long-term roof system durability versus first-cost savings?
A 42-inch parapet costs maybe 20 to 30 percent more than a 30-inch parapet. That's the material and labor difference for one additional foot of height. You get meaningful improvements in wind protection, thermal performance, and aesthetics. The roofing system might last longer because it experiences less stress. Energy costs might decrease because the roof edge performs better thermally.
I'm not suggesting you build parapets taller than necessary for your specific situation. I'm suggesting that "necessary" should be determined by performance requirements, not just code minimums. The cheapest compliant parapet isn't necessarily the most cost-effective solution when you factor in long-term performance and maintenance costs.
This conversation needs to happen during design, not after construction when you're stuck with whatever height the architect specified. Ask about the parapet height decision. Understand what performance you're getting (or giving up) at different heights. Make an informed choice rather than defaulting to code minimum because nobody questioned it.
Understanding what is a parapet roof means recognizing that code compliance and optimal performance aren't always the same thing. The roof parapet details you approve today will determine your building's performance for decades. Knowing the most vulnerable parts of your commercial roof helps you understand exactly why height decisions matter far beyond aesthetics.
Through-Wall Flashing: The Detail That Separates Amateurs from Professionals
You can hire the cheapest masonry contractor in your market and they'll build you a parapet wall that looks fine from the outside. The brick will be laid straight, the mortar joints will be consistent, and the coping will be properly attached.
Five years later, you'll be dealing with water damage that costs more to repair than you saved by hiring the low bidder.
The difference? Through-wall flashing installation quality.
Material selection for through-wall flashing matters more than most people realize. Rubberized asphalt membranes offer excellent waterproofing and self-sealing properties around fasteners, but they can be difficult to work with in cold weather and require careful handling to avoid tears. Composite flashings (typically a waterproof membrane laminated to a drainage mat or fabric) provide both waterproofing and drainage capacity, but they cost more than simple membrane products. Metal through-wall flashing (copper, stainless steel) offers maximum durability but requires skilled installation and proper soldering or sealing at joints.
The flashing needs to be positioned at the correct height within the wall assembly. At the roof line, it should be installed just above the level where the roof membrane terminates, creating a continuous drainage plane that catches any water penetrating the outer wythe and directs it back to the exterior before it can contact the roofing system. Additional through-wall flashing courses might be required at other heights depending on parapet design and height.
Laps between sections of through-wall flashing must be properly oriented (upper piece overlapping lower piece in the direction of water flow) and adequately sized (six-inch minimum, twelve inches is better for critical applications). The lap should be sealed with compatible mastic or adhesive to ensure water can't penetrate through the joint. End dams (upturned sections at the ends of flashing runs) prevent water from running off the ends of the flashing and into adjacent wall sections.
Integration between through-wall flashing and other flashing components requires coordination between trades. The roofing contractor's base flashing needs to extend up to and integrate with the through-wall flashing. The masonry contractor's through-wall flashing needs to project beyond the wall face far enough to clear any exterior cladding and direct water away from the wall. These roof parapet detail connections need to be worked out during construction, not assumed to happen automatically.
Weep hole alignment and maintenance presents another area where professional installation differs from amateur work. Weep holes should be installed as the wall is built, positioned to align with the through-wall flashing and spaced according to specifications. The mason needs to keep them clear of mortar droppings during construction. Some contractors use temporary weep hole inserts that get removed after the mortar cures, ensuring the holes remain open and properly sized.
Through-Wall Flashing Verification Checklist (During Construction):
- Flashing material matches specifications and is appropriate for application
- Material is handled carefully to prevent tears, punctures, or damage
- Flashing is positioned at correct height relative to roof membrane termination
- Continuous slope toward exterior (minimum 1/8" per foot) is maintained
- Laps are minimum 6" and properly oriented (upper over lower)
- Laps are sealed with compatible mastic or adhesive
- End dams are installed at terminations and transitions
- Flashing extends beyond wall face with proper drip edge
- Back edge turns up minimum 8" to prevent water bypass
- Weep holes align with flashing and are spaced per specifications
- Weep holes remain clear during construction (no mortar blockage)
- Integration with roof base flashing is properly detailed
- Flashing is protected during subsequent construction activities
- Photographic documentation of installation before concealment
What can you verify during construction? You can observe whether the mason is using quality flashing materials. You can watch how they handle the flashing. Are they careful to avoid tears and punctures, or are they rough with it? You can verify that laps are properly oriented and sealed. You can check that weep holes are being installed at the correct spacing and kept clear during construction.
What you can't verify after the wall is built is whether the flashing is continuous, properly sloped, and correctly integrated with other components. That's why contractor selection and construction observation matter so much for flat roof parapet installations. You're placing trust in the installation quality of components you'll never see again after construction.
Professional masons understand that through-wall flashing is critical infrastructure — tell-tale signs of a good roofer include attention to invisible details that determine long-term performance. Professional contractors welcome observation and questions about their through-wall flashing procedures. They understand it's a critical detail and they're confident in their installation quality.
Contractors who get defensive or dismissive about flashing details are telling you something about their work quality. Listen to that message.
If I could go back and tell 25-year-old me one thing about parapets, it'd be this: the through-wall flashing is everything. We sell coping like it's the solution. It's not. The flashing buried in that wall? That's what determines whether this thing lasts 30 years or fails in 5.
Why Your Parapet Coping Choice Matters More Than You Think
Coping selection usually comes down to aesthetics and budget. You're choosing between metal profiles based on how they look and what they cost. The architect might push for copper because it develops that prestigious patina. You're leaning toward prefinished aluminum because it's half the price and comes with a finish warranty.
Nobody's talking about how the coping profile affects water management or how the attachment method impacts long-term maintenance costs.
Coping serves a critical functional role beyond aesthetics. It sheds water away from the parapet wall, protecting the vulnerable wall-to-roof junction below. It covers and protects the top of the parapet wall from water intrusion. It needs to accommodate thermal movement without failing. It must resist wind uplift forces that try to peel it off the wall.
Profile design determines how effectively coping sheds water. Flat coping with minimal slope allows water to pond, increasing the likelihood of leaks through joints or fastener penetrations. Sloped coping (even just a few degrees) actively directs water off the surface. Gabled or peaked profiles shed water to both sides, which works well for thicker parapet walls but requires more material and fabrication complexity.
Drip edges on both sides of the coping prevent water from running back under the coping and contacting the wall surface. These edges need to project far enough beyond the wall face to be effective (minimum three-quarters of an inch, one inch is better). Too many coping systems skimp on drip edge projection to save material costs, then water runs down the wall face and finds its way into the assembly below.
Attachment method affects both initial installation cost and long-term maintenance requirements. Through-fastened coping (screws or nails through the coping face into the wall) costs less to install but creates penetrations through the waterproof surface. Each fastener represents a potential leak point. The fasteners also restrict thermal movement, creating stress that can cause oil-canning (visible waviness in metal panels) or fastener failure.
Cleat systems use concealed clips attached to the wall, with the coping snapping or sliding onto the cleats. This eliminates exposed fasteners and allows for thermal movement. Installation costs more because cleats need to be precisely positioned and the coping must be fabricated to tight tolerances. Long-term performance is typically better because there are no fastener penetrations through the waterproof surface and the system can accommodate movement.
Some contractors swear by adhesive-applied coping. They'll tell you it's the future, no fastener penetrations, cleaner look. I think they're out of their minds. Maybe it works great in some lab somewhere, but I've seen too many failures. Wind gets under that coping, and if the adhesive bond fails (and it will, eventually), you've got a metal frisbee flying off your building. No thanks. Give me mechanical attachment every time. Yeah, it costs more. Yeah, you see the fasteners. But it's still attached when the hurricane comes through.
Aluminum offers light weight and corrosion resistance at moderate cost, but it's relatively soft and can dent from hail or maintenance traffic. Copper provides superior durability and develops its characteristic patina, but costs significantly more and requires isolation from other metals to prevent galvanic corrosion. Steel (galvanized or stainless) offers strength and durability but weighs more than aluminum and costs more than basic aluminum profiles.
Stone or precast concrete coping provides a traditional appearance and excellent durability but weighs substantially more than metal, requiring more robust structural support. Stone coping needs careful detailing at joints to prevent water intrusion, and the joints require periodic maintenance. Installation costs are higher due to the weight and the need for specialized equipment and skills.
Thermal performance varies by material too. Metal coping conducts heat readily, creating a thermal bridge at the top of your parapet wall. This matters most in buildings with high energy performance standards or in climates with extreme temperatures. Thermally broken coping systems (metal coping with insulation or thermal breaks built in) address this issue but add cost and complexity.
Phoenix, summer of 2015. Warehouse facility installed flat aluminum coping with through-fasteners to minimize costs. The dark bronze finish looked sharp initially. Within four years, the building owner noticed multiple problems: water staining on interior walls near the parapet, visible oil-canning in the coping panels from thermal stress, and several fasteners that had backed out from expansion-contraction cycles. The flat profile allowed water to pond during monsoon rains, and the standing water found its way through fastener penetrations.
I'm on this roof in 2019 and the owner is standing there in a suit, sweating through it, asking me how bad it is. The coping looked fine from the ground. That's why he was so pissed when I called him up there. I showed him where the fasteners had backed out. Showed him the water stains. Showed him the oil-canning that you could only see from certain angles. He asked me who installed it. I told him. He made a phone call right there on the roof. I don't know what was said, but it was loud.
Replacement with sloped coping on a concealed cleat system cost $52,000. More than double what a properly designed system would have cost initially. The building owner also faced $18,000 in interior repairs from water damage that occurred during those four years.
Wind uplift resistance depends on both the coping weight and the attachment system strength. Light metal coping needs secure mechanical attachment to resist uplift. Heavier stone coping might rely partly on its own weight but still needs mechanical attachment for safety and code compliance. The attachment must be designed for the actual wind loads at your building's location and height, not just generic recommendations.
Expansion joints in the coping system need to align with expansion joints in the parapet wall below. The joints need to be wide enough to accommodate the expected movement and must be sealed with sealants that have adequate movement capability. Joint spacing affects both the coping system cost (more joints mean more fabrication and installation labor) and long-term maintenance (joints require periodic inspection and resealing).
I've replaced coping systems that were only ten years old because the wrong profile was selected (flat coping that ponded water and leaked), or the wrong attachment method was used (through-fasteners that failed due to thermal stress), or inadequate expansion joints were provided (causing buckling and fastener failure). The building owner spent money twice because the initial coping selection focused on appearance and first cost rather than long-term performance.
Material choice impacts more than just appearance and initial cost — similar to how standing seam vs corrugated metal roofing decisions affect both aesthetics and long-term performance. Your coping choice deserves more analysis than it typically gets. Consider the functional requirements, not just the aesthetics. Understand how different profiles, materials, and attachment methods perform over time. Factor in maintenance requirements and expected service life. The coping that costs 30 percent more initially might last twice as long and require half the maintenance, making it the more cost-effective choice over the building's life.
Modern parapet roof design increasingly recognizes that coping systems must balance aesthetic goals with functional performance. The parapet roof designs that perform best over decades are those where every material choice was evaluated for its contribution to the overall assembly's durability and weather resistance.
Expansion Joint Placement That Actually Accounts for Building Movement
Standard specifications call for expansion joints every 30 to 40 feet in parapet walls. That recommendation assumes average conditions, typical materials, and uniform exposure.
Your building probably doesn't meet all those assumptions.
Building movement patterns depend on the structural system. A steel-framed building expands and contracts differently than a concrete-framed building. A building with masonry bearing walls moves differently than one with a structural steel frame and masonry veneer. The foundation conditions matter too. A building on bedrock experiences different movement than one on expansive clay soils.
Your parapet wall moves with the building structure below it, but it also experiences its own thermal movement based on sun exposure and material properties. These two movement patterns need to be accommodated simultaneously, and they don't always align conveniently.
Structural expansion joints in the building below absolutely must continue up through the parapet wall. These joints accommodate the building's structural movement, and if they're not carried through the parapet, you're creating a rigid connection across a joint that's designed to move. The parapet will crack, the coping will buckle, or the flashing will tear. Something will fail because you're fighting the building's movement pattern.
Beyond the required joints at structural expansion joints, you need additional joints in the parapet to accommodate thermal movement of the parapet materials themselves. The spacing depends on the specific materials, colors, and exposure conditions. Dark-colored metal coping in full sun exposure needs closer joint spacing than light-colored stone coping in a shaded location.
Corner conditions concentrate stress and often require special treatment. An outside corner (where two parapet walls meet at an angle less than 180 degrees) experiences stress from movement in two directions. The coping needs to be detailed to accommodate this multi-directional movement, typically with expansion joints near the corner or with special corner pieces that allow for movement.
Inside corners (where two walls meet at an angle greater than 180 degrees) can sometimes be detailed without expansion joints because the geometry allows for some movement accommodation. However, long wall sections leading into an inside corner still need expansion joints at appropriate spacing before the corner.
Direction changes in the parapet create stress concentrations even if they're not true corners. A parapet that steps up or down in height needs careful detailing at the transition to prevent stress concentration and water intrusion. Changes in parapet thickness or material also create locations where movement characteristics change, potentially requiring expansion joints or special detailing.
Penetrations through the parapet (pipes, conduits, equipment supports) create rigid points that restrict movement. The expansion joint spacing should account for these penetrations, potentially requiring joints closer to penetrations than would be needed in an uninterrupted wall section.
L-shaped or U-shaped building footprints create complex movement patterns in the parapet walls. The long legs of the L or U experience different thermal exposure and movement than the connecting sections. Expansion joints need to be located to accommodate these different movement patterns, not just spaced at regular intervals around the perimeter.
Analyzing your specific building's movement patterns requires understanding the structural system, foundation conditions, material properties, and thermal exposure. This analysis should happen during design, with expansion joint locations determined based on the actual conditions rather than just applying standard spacing rules. The structural engineer, architect, and roofing consultant need to coordinate on expansion joint locations to ensure they're positioned appropriately for both structural and thermal movement.
What happens when expansion joints aren't properly located? I've seen coping systems buckle and tear at mid-span between joints because the spacing was too wide for the thermal movement. I've seen parapet walls crack at corners because no expansion joint was provided near the corner. I've seen flashing systems tear at structural expansion joints because the parapet detail didn't accommodate the movement.
These failures are predictable if you understand building movement patterns. They're also preventable with proper analysis during design. The cost of adding expansion joints in the right locations is minimal compared to the cost of repairing movement-related failures after construction.
Your parapet expansion joints need to be detailed completely, not just shown as a line on the drawings. The joint needs to extend through all layers of the wall assembly (exterior wythe, cavity or insulation, interior wythe if present). The through-wall flashing needs to be continuous through the joint with proper lapping. The coping needs an expansion joint that aligns with the wall joint below. All these roof parapet detail components need to be sealed with appropriate sealants and backer rods.
Joint width matters too. A joint that's too narrow won't accommodate the expected movement. A joint that's too wide is difficult to seal properly and might allow excessive water intrusion. The width should be calculated based on the expected movement, the sealant's movement capability, and the optimal width-to-depth ratio for the sealant being used.
This level of detail and analysis rarely happens on typical projects. Expansion joints get shown at standard spacing with generic details, and everyone hopes they'll work. Often they do, at least for a while. When they don't, the failures can be expensive to repair and might require removing and replacing significant sections of parapet wall and coping.
The Inspection Checklist That Catches Problems Before Water Does
Water damage from parapet failures doesn't happen suddenly. It develops over months or years as small problems gradually worsen. You can catch most of these problems early if you know what to look for and conduct regular inspections.
Start with the coping. Walk the entire parapet perimeter and look for loose sections, damaged areas, or signs of movement. When I inspect a parapet, I start at the top and work down. Not because that's the "right" way. It's just how I learned. First thing: I put my hands on that coping and try to move it. You'd be surprised how often it moves when it shouldn't. If I can wiggle it, water can get under it.
Metal coping should be securely attached with no visible gaps between the coping and wall. Stone or precast coping should be stable with no rocking or shifting. Check the joints between coping sections. Are they open wider than they should be? Is the sealant cracked, missing, or pulling away from the joint faces?
Then I'm looking at the joints. I carry this little flashlight (one of those bright LED ones) and I shine it along every sealant joint. You can see cracks and gaps that you'd miss in normal light. Takes forever on a big building. My knees hate me by the end. But that's where you find the problems, so that's where I look.
Drip edges should be intact and projecting beyond the wall face. Bent or damaged drip edges allow water to run back under the coping and contact the wall. This seems minor but it changes the water management pattern and can lead to wall saturation over time.
Move down to the counterflashing. You're looking for secure attachment, proper overlap with base flashing below, and intact sealant at the bottom edge. Counterflashing that's pulling away from the wall or showing gaps at fasteners needs attention. The sealant joint at the bottom of the counterflashing is critical. Shine a flashlight along the joint to look for cracks, gaps, or areas where the sealant has pulled away.
Base flashing should be firmly attached to the wall with no tears, punctures, or areas where it's pulling away from the substrate. Check the termination bar (if present) for secure fastening and proper sealant. Look for any areas where the base flashing has been damaged by foot traffic, equipment, or maintenance activities.
The roof membrane at the parapet wall needs inspection too. Look for areas where the membrane is pulling away from the wall, showing stress cracks, or exhibiting other signs of deterioration. Check for water stains on the membrane near the wall. These indicate water is running down the wall face and potentially finding its way behind the flashing.
Weep holes should be open and clear. Use a small wire or probe to verify they're not blocked. You should be able to see light through the weep hole or feel air movement. Blocked weep holes mean water can't drain from the wall cavity, leading to saturation and potential freeze-thaw damage in cold climates.
Look at the parapet wall face itself. Brick or block should be intact with no spalling, cracking, or efflorescence (white mineral deposits that indicate water movement through the masonry). Mortar joints should be sound with no significant cracks or missing mortar. Staining patterns on the wall face can indicate water intrusion paths or drainage problems.
Check expansion joints in both the coping and wall. The joints should be open (not filled with debris or old sealant) and properly sealed with fresh, flexible sealant. Expansion joints that are squeezed closed indicate movement has occurred and the joint might not be able to accommodate future movement. Joints that are open wider than designed might indicate excessive movement or structural issues.
Interior inspection matters too. From inside the building, look at the areas below the parapet for water stains, peeling paint, damaged ceiling tiles, or other signs of water intrusion. Check insulation if accessible. Wet insulation indicates water is penetrating the wall assembly. Mold growth or musty odors signal ongoing moisture problems. The smell of wet insulation is something you never forget.
Document your inspections with photos and notes. This creates a history that helps you identify developing problems. A crack that's slightly larger than it was six months ago indicates active movement. Sealant that's degrading faster than expected might indicate material incompatibility or excessive movement.
The vulnerability of parapet systems to extreme weather has gained attention in recent years. Research into hurricane-strength green roofs (Living Architecture Monitor) at the University of Miami's Lakeside Village development demonstrated that proper parapet design (including double parapet enclosures and careful attention to wind uplift forces) can protect roof systems even in High Velocity Hurricane Zones. While most buildings won't face Category V hurricanes, the principles of thorough inspection and robust detailing apply to all parapet systems regardless of location.
The complexity of parapet assemblies means even experienced professionals struggle with proper detailing. According to industry research, the coping at the parapet-to-wall interface condition is one of the most difficult transitions to detail for design professionals and contractors, with numerous areas for potential failure that can lead to air and moisture leakage issues within buildings (Tremco Sealants). This complexity underscores why regular inspection is critical. Even well-designed systems can develop problems if installation wasn't perfect or if materials degrade faster than expected.
Some conditions require immediate professional attention. Active leaks obviously need urgent response. Loose coping sections present safety hazards and should be secured immediately. Large cracks in the parapet wall might indicate structural problems. Significant areas of spalling brick or deteriorated mortar need evaluation by a mason.
Stop. If your parapet has any of these three signs, you need someone on that roof this week, not next month: One, interior water stains that appear after rain. Two, loose coping sections you can move by hand. Three, visible gaps in the counterflashing. This week. I'm serious.
Other conditions can be addressed during routine maintenance. Sealant that's starting to crack but hasn't failed completely can be resealed during your next scheduled maintenance cycle. Minor efflorescence can be cleaned and monitored. Small areas of damaged base flashing can be patched.
Professional inspections every three to five years provide value beyond what you can accomplish with routine owner inspections. A roofing professional or building envelope consultant can identify subtle problems that aren't obvious to untrained observers. They can assess whether deterioration is within normal limits or indicates a more serious problem. They have the experience to predict which minor issues will develop into major problems and which can be monitored without immediate action. Understanding roof inspection costs upfront makes it easier to budget for this proactive approach before a small problem becomes a five-figure repair.
Infrared thermography can detect wet insulation or areas of water intrusion that aren't visible during visual inspection. This technology costs money but can identify problems before they cause visible damage, potentially saving significant repair costs. Infrared inspection makes sense if you're experiencing unexplained energy cost increases, if you've had previous water intrusion problems, or if your parapet system is approaching the age where problems typically develop.
Conduct these inspections at least twice a year, similar to the emergency roof leak prevention protocols that catch small issues before they become disasters. The inspection checklist approach works because it shifts you from reactive (responding to water damage) to proactive (identifying and addressing problems before they cause damage). Most parapet-related water intrusion could be prevented if problems were caught and corrected during early stages rather than after years of water entry.
When Your Parapet Needs More Than a Band-Aid
You've noticed some issues during your parapet inspection. Maybe the sealant is failing in a few locations. Maybe you're seeing some minor water staining inside. The temptation is to patch the obvious problems and defer any major work. Budgets are tight and the damage doesn't seem that serious yet.
That failed sealant might be a symptom of excessive movement caused by missing or improperly spaced expansion joints. The water staining might indicate through-wall flashing that was never properly installed or has failed due to wall settlement. Patching the sealant or painting over the stains doesn't address why the problems developed in the first place.
At Joyland Roofing, we start parapet evaluations by understanding the root cause, not just documenting the symptoms. Why is the counterflashing pulling away from the wall? Is it because the fasteners are corroding, because the wall is moving, or because it was never properly attached? Why is water getting past your base flashing? Is the flashing torn, is it terminating too low on the wall, or is the membrane pulling away from the substrate?
These questions determine whether you need targeted repairs or more comprehensive intervention. Sealant replacement might solve your problem if the underlying system is sound and the sealant simply reached the end of its service life. If the sealant is failing because the assembly is moving excessively, you'll be resealing every few years until you address the movement issue.
I've worked with property owners who spent thousands on repeated patch repairs over five or six years, then finally invested in proper repairs that addressed the root causes. The total cost of all those patches plus the eventual proper repair exceeded what comprehensive repair would have cost initially. They also dealt with ongoing water intrusion and interior damage during those years of temporary fixes. Strategies for improving the lifespan of your commercial roofalways begin with addressing root causes — not surface symptoms.
The honest assessment is what you need, even if it's not what you want to hear. Sometimes your parapet needs complete rebuilding because the original construction was deficient. Sometimes you need selective repairs to specific components. Sometimes you genuinely can address the problem with maintenance-level work. We'll tell you which situation you're facing based on what we find during evaluation, not based on what we'd prefer to sell you.
Property owners in our area reach out to us when they're tired of contractors who either minimize problems to avoid scope creep or exaggerate issues to inflate the project. You deserve a clear understanding of what's wrong, why it's wrong, what your options are, and what each option will cost both initially and over time. That's how we approach every parapet evaluation.
Final Thoughts
Look, I've spent twenty years fixing other people's parapet mistakes. I've seen every shortcut, every cost-saving measure, every "good enough" installation that turned into an $80,000 repair bill. And I'm tired of having the same conversations.
The reality we've explored throughout this discussion is that smart parapet roof design is about what nobody sees — not the coping everyone admires from street level. That's the perspective that separates property owners who experience decades of trouble-free performance from those who face repeated water intrusion problems.
You now understand where parapet failures originate. The wall-to-membrane transition that gets rushed during construction. The counterflashing gap that relies on sealant everyone knows will fail. The thermal movement that stresses every connection twice daily. The material incompatibilities that product specs don't mention. The drainage planes that work only if they're properly installed. The code-minimum heights that sacrifice performance for cost savings. The through-wall flashing that separates professional work from amateur installation. The coping choices that affect function as much as appearance. The expansion joints that need building-specific analysis, not generic spacing. The inspection protocols that catch problems before they become expensive.
These aren't exotic concerns that only affect unusual buildings. They're fundamental aspects of parapet roof design and construction that get overlooked on most projects because everyone's attention focuses on the wrong details.
The next time someone tells you the parapet is "just" a detail, or that code minimum is fine, or that you're overthinking this, remember this article. Remember that the cheapest bid usually means the shortest base flashing. Remember that sealant isn't a permanent solution — it's a scheduled failure. Remember that the parts you can't see matter more than the parts you can.
Your next parapet roof design project — whether it's new construction, evaluation, or repair — deserves better than generic specifications and standard details. It deserves analysis of the actual conditions, materials, and exposure your building will experience. It deserves contractors who understand that the invisible details determine long-term performance. It deserves inspection and maintenance protocols that catch problems early.
Ask the questions we've raised throughout this article. Why is the base flashing terminating at that height? How will thermal movement be accommodated? What's the drainage plane strategy? How does the through-wall flashing integrate with other components? Where should expansion joints be located based on this building's specific conditions? What's the inspection and maintenance plan?
The professionals you work with should welcome these questions and provide substantive answers. If they dismiss your concerns or can't explain their approach to these critical details, you're talking to the wrong professionals.
Parapet roofing systems can provide decades of reliable service when they're properly designed, constructed, and maintained. The failures we've discussed aren't inevitable. They're the result of overlooking details that matter more than the components everyone focuses on. You now know which details those are and why they matter.
And if you're standing on your roof right now, wondering if your parapet is one of the good ones or one of the disasters waiting to happen, call someone who'll tell you the truth. Not what you want to hear. What you need to know.
Because I'd rather have an uncomfortable conversation now than watch you write a check for $60K in five years.