March 31, 2026
Cantilever Roof Overhang Design: Why Your Structural Calculations Are Probably Wrong
Author
Cantilever roof overhang design is one of those topics that looks deceptively simple from the outside — extend the rafters past the wall, add sheathing, done. But the overhangs that fail aren't failing because of bad shingles or poor weather sealing. They're failing because the structural calculations behind the cantilever were wrong from the start. This guide covers the rotational stress that most residential calculations ignore, the snow load realities that code tables don't capture, and the material and fastener decisions that separate a 30-year overhang from one that needs reconstruction in five. If you're planning a cantilevered roof overhang or troubleshooting an existing one, start here.
Table of Contents
- Why Most Cantilever Overhangs Fail Before the Roof Does
- The Load Triangle Nobody Talks About
- Rafter Tails vs. Lookouts: Picking Your Structural Battle
- Snow Load Miscalculations That Cost You Thousands
- The Fascia Board Illusion
- Wind Uplift and the Forgotten Underside
- Thermal Bridging Through Your Overhang
- When Building Codes Give You the Minimum (And Why That's Dangerous)
- Integrating Gutters Without Compromising Your Cantilever
- The Joyland Approach to Overhang Engineering
- Material Selection Beyond Just "What's Available"
- Final Thoughts
TL;DR
- Most cantilever failures stem from ignoring the cumulative load triangle: dead load, live load, and rotational stress working together
- Rafter tails can only cantilever safely to about 24 inches without supplemental support, regardless of what your builder claims
- Snow loads create dynamic stress patterns that standard calculations often miss, especially in valleys and drift zones
- Your fascia board carries almost no structural weight. It's a finish element that people mistakenly rely on for support
- Wind uplift on overhangs generates forces opposite to what most homeowners expect, pulling up instead of pushing down
- Thermal bridging through improperly insulated overhangs can account for 15-20% of your roof's total heat loss
- Code minimums exist to prevent catastrophic failure, not to optimize performance or longevity
- Gutter installation fundamentally changes your overhang's load distribution and requires advance planning
- Material choices should account for deflection rates under sustained loads, not just initial strength ratings
Why Most Cantilever Overhangs Fail Before the Roof Does
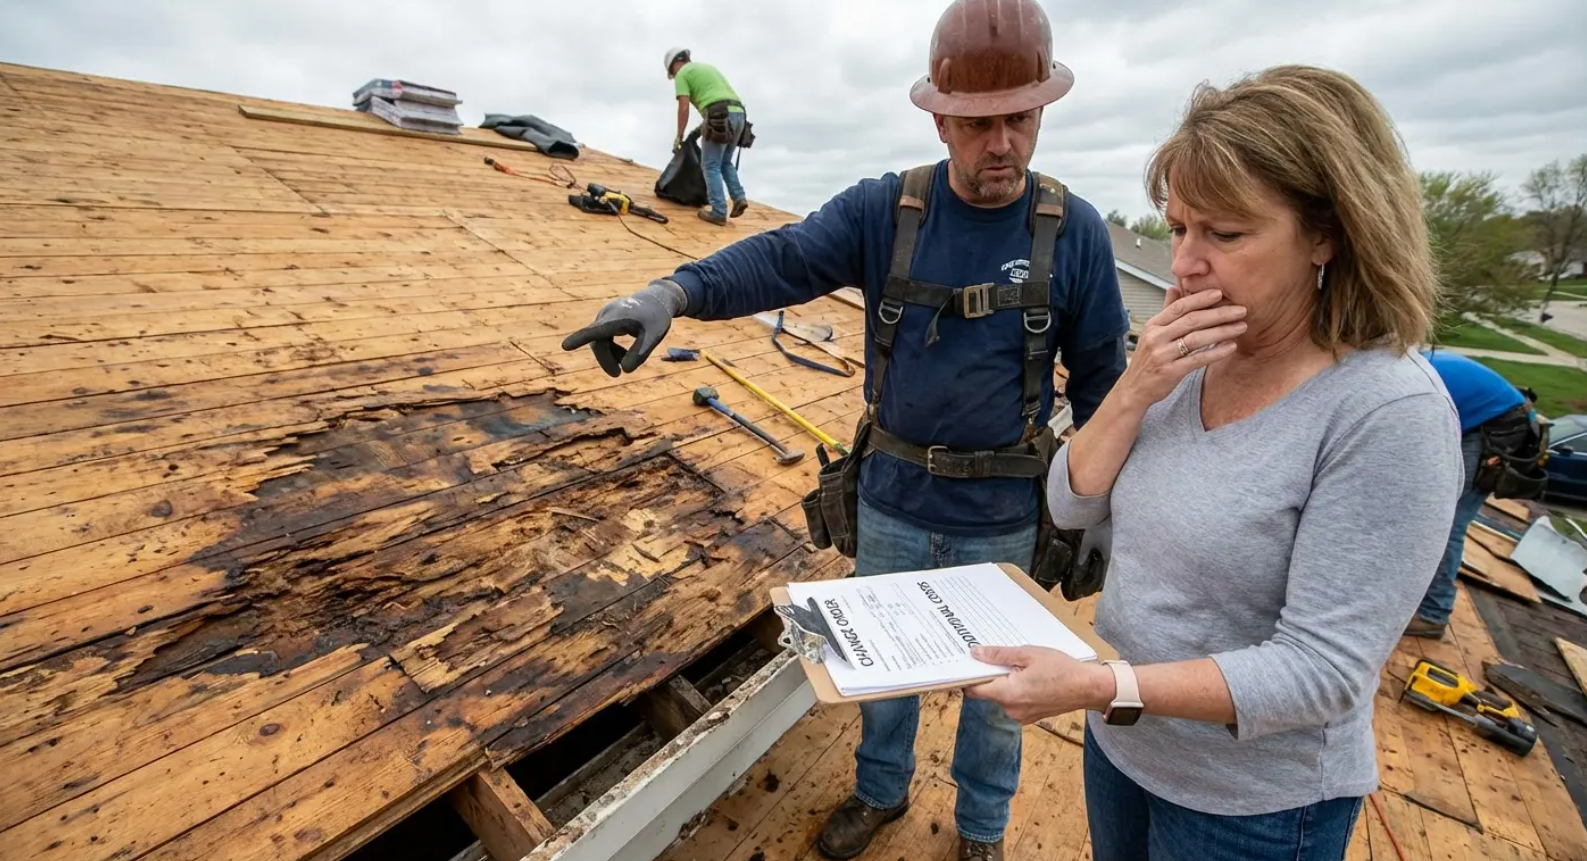
I pulled up to a house last week where the main roof looked perfect. Twenty-year-old shingles, no major issues, everything solid. The overhang? Sagging like a hammock. The owner was genuinely confused. "The roof is fine," he kept saying. "Why is this part failing?"
That's the question nobody asks until it's too late.
Proper cantilever roof overhang design can reduce cooling costs by up to 15% in hot climates by providing strategic shade — but only if the structure stays straight long enough to actually deliver those benefits. And most don't.
The problem is how we think about cantilevers in the first place. Most people (including contractors who absolutely should know better) treat them as simple extensions of the roof plane. You've got your rafters, you let them run past the wall, slap some sheathing on top, call it a day.
Physics doesn't work like that.
A cantilevered roof overhang experiences rotational stress at its fulcrum point that increases exponentially with distance. Every single inch you extend past your wall plate multiplies the torque force trying to rotate that rafter downward. The fulcrum point where your rafter crosses your wall plate takes tremendous rotational stress, concentrated in the connection points: nails, hurricane ties, whatever fastening system is holding everything together.
These connections experience micro-movements under load. Temperature swings cause expansion and contraction. Snow piles up and melts in cycles. Wind creates uplift. Each cycle loosens the connection imperceptibly until you've got visible sag.
The failures I see aren't from single catastrophic events. They're cumulative. Last winter, a guy in Vermont installed a 30-inch overhang using 2x6 rafters at 24-inch spacing. Technically within code for his snow load zone. Three winters later? Three-quarters of an inch of sag at midspan. The main roof structure stayed perfectly sound, but the cantilever roof overhang needed complete reconstruction.
The issue wasn't a single failure point but cumulative micro-movements at each rafter-to-wall-plate connection. Every freeze-thaw cycle, every snow load event, every thermal expansion loosened those connections by fractions of a millimeter. Eventually the accumulated deflection became both structurally and aesthetically unacceptable.
Start with the end result. How far do you actually need the cantilever roof overhang to project? What loads will it carry? What's the acceptable deflection over its lifespan? Then work backward to determine the structural support required.
The Load Triangle Nobody Talks About
Standard load calculations give you dead load plus live load. Dead load is your materials: sheathing, shingles, underlayment, fascia, soffit. Live load is snow, ice, a maintenance worker standing there, leaves and debris.
Add them up, check against your rafter span tables, you're good.
Wrong.
You're missing the third force: rotational stress. It doesn't appear in most residential calculations, yet it's often the dominant force trying to destroy your cantilever roof overhang design.
Your overhang materials might weigh 8 pounds per square foot. Snow might add another 20 pounds per square foot in a moderate climate. That's 28 pounds per square foot — and a 24-inch cantilever roof overhang on a 30-foot roof section carries about 1,680 pounds total. Your 2x6 rafters can handle that easily based on their span ratings.
But span ratings assume distributed loads across supported length. A cantilever concentrates all that weight at the unsupported end, creating a lever arm. That 1,680 pounds positioned 24 inches from the fulcrum generates 3,360 foot-pounds of rotational torque trying to rotate your rafter downward.
Your connection point (usually nails) now has to resist that rotational force on top of the vertical load. Nails are great at shear strength but terrible against rotational and withdrawal forces.
The three forces multiply each other's effects. Higher dead load increases the base weight. Higher live load adds dynamic stress cycles. Greater projection length amplifies the rotational component exponentially. A solution that handles vertical loads might fail catastrophically under rotational stress.
Rafter Tails vs. Lookouts: Picking Your Structural Battle
You've got two fundamental approaches to cantilever roof overhang design: extend your rafters past the wall (rafter tails) or build a perpendicular framework that cantilevers outward (lookouts).
Rafter tails are simpler. Your rafters run from ridge to beyond the exterior wall. The portion past the wall becomes your cantilevered roof overhang. Sheathing runs continuously, you've got good structural integration, the load path is straightforward.
The limitation is projection distance. Standard residential framing using 2x6 or 2x8 rafters at 16-inch or 24-inch spacing can safely cantilever about 24 inches before you're asking for trouble. Your rafter has to be anchored to the wall plate and ideally to the ceiling joists behind it. Structural engineers typically want to see at least a 3:1 ratio — 72 inches of supported rafter for every 24 inches of cantilever. When evaluating your cantilever roof structure, understanding these ratios helps you communicate effectively with contractors and make informed decisions.
The importance of proper cantilever ratios extends beyond residential construction. Samsung C&T's construction of the Dongdaemun Design Plaza in Seoul demonstrates how cantilever principles scale to dramatic architectural features. The DDP's distinctive cantilevered roof creates "the unique look of a landed spaceship," achieved through three-dimensional mega-trusses that maximize interior space. The same physics apply at residential scale: adequate backspan and proper load distribution determine whether the cantilever succeeds or fails.
Lookout systems give you greater projection — 36 or even 48 inches — because you're distributing the load across multiple connection points. You install blocking between rafters at the wall line, then run perpendicular members (lookouts) outward to create your cantilevered roof overhang. The tradeoff is complexity. Each lookout connection is a potential failure point, and most problematic are hybrid systems where builders extend rafter tails 16 inches and then add lookouts for another 12 inches. You've got two different structural systems sharing loads and deflecting at different rates. The connection between them becomes a concentrated weak point that neither system was designed to handle.
Snow Load Miscalculations That Cost You Thousands
Snow load tables lie to you. Not intentionally, but the numbers in building codes represent ground snow loads under uniform distribution. Your cantilever roof overhang doesn't experience uniform distribution.
Wind patterns deposit snow disproportionately on overhangs — picture a moderate wind during snowfall, where snow slides or blows toward the edge before settling. The cantilever roof overhang becomes a catch basin. You might have six inches of snow on your main roof and nine inches on the overhang. That's a 50% increase in load exactly where your cantilever roof structure is least able to handle it.
Worse is the melt-refreeze cycle. Daytime temperatures melt the bottom layer of snow. Meltwater runs toward the eaves — the coldest part of your roof — and refreezes at the overhang edge. Night after night, you're building an ice dam that can weigh 3-4 times what the same volume of fresh snow weighs. Ice weighs about 57 pounds per cubic foot. Fresh snow might weigh 5-10 pounds per cubic foot. An ice dam 12 inches tall, 8 inches deep, running the length of your roof can add thousands of pounds concentrated at the worst possible location.
A contractor in Montana designed a 28-inch cantilever roof overhang using the local 40 psf ground snow load specification, converting to 30 psf roof snow load and sizing 2x8 rafters at 16-inch spacing accordingly. First winter brought storms followed by sunny days. Ice dams formed along the entire eave, creating a solid 14-inch ridge of ice. The actual load reached approximately 65 psf — more than double the design calculation. By spring, the overhang showed 2 inches of deflection and required emergency shoring followed by complete reconstruction at a cost of $18,000.
Your 30 psf snow load zone just became a 60 psf reality. Building departments approve plans based on code-specified snow loads. You need to design for reality, not for code minimums. Our guide on dealing with ice dams covers exactly how this accumulation cycle unfolds and what prevents it.
The Fascia Board Illusion
FASCIA BOARDS DON'T HOLD UP YOUR OVERHANG.
Fascia is a finish element. It protects rafter ends from weather exposure, gives you a surface to mount gutters, makes your roofline look intentional rather than exposing raw framing. What it doesn't do is provide structural support against vertical loads or rotational deflection on a cantilevered roof overhang.
I've had three homeowners this year tell me they "fixed" their sagging cantilever roof overhang design by installing a 2x8 fascia. They replaced the 1x6 with a 2x8, used more nails, felt confident they'd solved the problem. The overhang still sags because the fascia was never the issue.
The structural deficiency lives in the cantilever design itself: inadequate rafter size, excessive projection, poor connection at the wall plate, or insufficient bracing. Installing heavy fascia can actually make things worse — you've added dead load to the end of your cantilever (the worst possible location for additional weight) without adding any meaningful support.
What fascia does provide is minor lateral stability — it ties rafter ends together, preventing individual rafters from twisting or moving independently. That's valuable for keeping your roofline straight, but it's not structural support in the sense most people mean.
When you've got real structural problems with your cantilevered roof overhang, you need to address the actual load path. Add blocking between rafters. Install supplemental support brackets. Reduce the projection. Upgrade to larger rafters. Sister additional members alongside existing rafters.
Wind Uplift and the Forgotten Underside
Wind doesn't just blow against your cantilever roof overhang design. It gets underneath and tries to peel it upward.
Wind moving across your roof creates pressure differentials. The top surface experiences positive pressure, but the underside experiences negative pressure — suction. Your overhang becomes a wing. And wings generate lift. This effect intensifies at roof edges where wind accelerates as it moves from horizontal to vertical flow around your eave.
A 90 mph wind can generate uplift forces exceeding 40 pounds per square foot on a cantilevered roof overhang. That's comparable to a heavy snow load, except it's pulling up instead of pushing down, and it's happening dynamically with gusts creating rapid load cycles.
Your fasteners have to resist this. The nails holding your sheathing to your rafter tails are now in withdrawal rather than shear. A 16d nail might have 140 pounds of shear strength but only 60 pounds of withdrawal strength. Open soffits make this worse — vented soffits give wind direct access to the underside of your cantilever roof structure during a storm.
Hurricane ties, structural screws, and metal connector plates aren't overkill. They're legitimate requirements for cantilevered roof overhang construction in any region with occasional high winds. The failure mode is progressive: uplift forces loosen fasteners during one storm, those loosened connections allow more movement during the next, eventually sheathing is barely attached and a strong gust tears the section loose.
Wind uplift forces are particularly concerning during severe weather events. Our guide on what to do after a storm hits your roof includes inspection steps specifically for overhang fastener withdrawal and sheathing separation.
Thermal Bridging Through Your Overhang
Your cantilever roof overhang is bleeding heat from your house, and you probably have no idea it's happening.
Every rafter that extends from your insulated attic space through your wall and into your uninsulated overhang creates a direct thermal pathway for heat to escape. Wood isn't a great insulator (R-value of about 1.25 per inch), but it's a fantastic conductor compared to the R-38 or R-49 insulation surrounding it in your attic. Studies on thermal bridging show that framing members can account for 15-20% of total heat loss through a roof assembly even when insulated cavities are properly filled. Your cantilevered roof overhang design concentrates this effect because the thermal bridge extends further and the temperature differential is greater.
Thermal bridging also contributes directly to ice dam formation. Heat escaping along your rafters warms the roof deck unevenly — areas directly above rafters stay warmer than areas between rafters. Snow melts in irregular patterns, and that meltwater refreezes at the eaves where the cantilever roof overhang is coldest.
The obvious solution (extending insulation out into the overhang) creates new problems. Insulating the overhang cavity traps moisture that naturally accumulates through condensation. You need ventilation in that space, which means you can't fill it with insulation without creating rot conditions.
Advanced framing techniques address this by creating thermal breaks where rafters cross the wall line — rigid foam insulation as a continuous layer across the exterior before roof sheathing eliminates the thermal bridge. Retrofit situations are harder. You can improve things by air-sealing the connection between your conditioned attic space and the overhang cavity, reducing convective heat loss even if you can't eliminate conductive loss through the rafters. Our guide on appropriate roof venting covers how attic airflow interacts with these thermal dynamics.
When Building Codes Give You the Minimum (And Why That's Dangerous)
Building codes exist to prevent your roof from collapsing and killing someone. That's a low bar.
Code compliance means your cantilever roof overhang design probably won't fall off during its design life. It doesn't mean it won't sag, deflect, or require premature maintenance. Your local code might allow 2x6 rafters at 24-inch spacing to cantilever 24 inches. That's compliant. It's also asking those rafters to perform at the absolute edge of their capability.
Deflection is the tell. Codes typically allow deflection up to L/240. For a 24-inch overhang, that's 1/10 inch of allowable sag. You probably won't notice 1/10 inch, but you'll definitely notice when it progresses to 1/4 inch or 1/2 inch after a few years of load cycles.
Code minimums also assume perfect construction: straight rafters, exact spacing, connections made with specified fasteners, lumber meeting grade specifications. Reality includes warped rafters, variable spacing, missed nails, and lumber at the lower end of the strength range. Stack those real-world variations on top of minimum code requirements and you've got a recipe for marginal performance.
Best practices exceed code minimums. Professional designers who care about long-term performance typically spec larger rafters, closer spacing, and better connections than code requires. The material cost difference is modest — maybe $200-400 for a typical cantilever roof overhang — but the performance difference over 20 years is substantial.
Integrating Gutters Without Compromising Your Cantilever
Gutters aren't an accessory you bolt on later. They're a significant load component that changes your cantilever roof overhang's structural behavior.
A 5-inch K-style gutter weighs about 1 pound per linear foot empty. Fifty feet of gutter adds 75 pounds to your fascia line — 75 pounds positioned 24 inches from your fulcrum creates 150 foot-pounds of additional rotational torque. Live loads are worse: a 5-inch gutter can hold about 1.2 gallons of water per linear foot when full, meaning your 50-foot gutter contains 500 pounds of water during heavy rain. Ice loading can push a 50-foot run to 800-1,000 pounds — a half-ton hanging from your fascia, creating rotational forces your cantilever roof overhang design was never designed to resist.
The failure mode is progressive: gutter weight pulls down on your fascia, fascia pulls on rafter ends, nails loosen, fascia starts pulling away from rafter ends, creating a gap that increases the lever arm and accelerates the failure.
The challenge of integrating functional elements into cantilevered structures isn't unique to residential construction. The new Pittsburgh International Airport terminal features 38 unique architecturally exposed steel columns supporting a massive cantilevered roof overhang, designed to account for not just the cantilever itself but the integration of lighting, drainage systems, and mechanical elements. Same principle applies at residential scale.
Before adding gutters to your cantilever roof overhang, our comprehensive guide on gutter cleaning and maintenancecovers how proper installation and maintenance affects structural integrity and long-term performance. Your rafter tails need to be sized for the additional loads, your fascia needs to be thick enough to hold fasteners (2x instead of 1x for longer spans), and gutter hangers need closer spacing in high-precipitation or ice-prone areas.
The Joyland Approach to Overhang Engineering
At Joyland Roofing, we approach cantilever roof overhang design as an engineering problem, not a carpentry afterthought. Every roof assessment we do includes overhang evaluation because I've seen too many situations where the main roof is fine but the cantilever roof overhang is quietly failing.
We start with load analysis specific to your location and structure: your actual snow load including drift factors, wind speeds, overhang projection length, and condition of existing framing. Then we work backward to determine what's required. Sometimes that means reinforcing existing cantilever roof structure. Sometimes it means acknowledging that your 36-inch overhang needs to be reduced to 24 inches. Sometimes it means complete reconstruction because the existing framing is fundamentally inadequate.
When we perform a real roof inspection, we evaluate your cantilevered roof overhang as a critical structural component. We're not interested in building to minimum code — we're interested in overhangs that will still be straight and functional when your roof needs replacement in 25 years.
Material Selection Beyond Just "What's Available"
Material selection for cantilever roof overhang design requires different thinking than material selection for your main roof structure. You're looking for stiffness, dimensional stability, and resistance to deflection under sustained loads.
Lumber species matters. Douglas Fir has higher stiffness than Southern Yellow Pine of the same grade, which means it deflects less under load — important for a cantilever design where deflection is often the limiting factor. Lumber grade is critical: a 2x8 rafter graded Select Structural has significantly better performance characteristics than the same dimension in #2. The price difference might be 30%, but the performance difference in a cantilevered roof application is substantial.
Engineered lumber deserves consideration for longer overhangs. LVL or I-joists offer superior stiffness and dimensional stability compared to dimensional lumber. Structural engineers often require a 2:1 backspan ratio for residential wood cantilever systems — engineered lumber can help meet these requirements with smaller member sizes. But premium materials don't fix bad cantilever roof overhang design. A custom home builder in Colorado spec'd LVL beams for a 32-inch overhang on a mountain home, believing engineered lumber would solve deflection concerns — then used the same nail connections he'd use for dimensional lumber. LVL is denser, meaning nails don't grip as well. By year two, visible gaps appeared between the LVL and the wall plate. The retrofit fix cost $4,200. Proper connection hardware from the start would have cost a fraction of that.
Fastener selection matters independently of lumber choice. Structural screws provide better withdrawal resistance and shear strength than nails for critical connections. Ring-shank nails are the minimum for sheathing attachment — smooth-shank nails work loose under the cyclical loading that cantilever roof overhangs experience. Stainless steel or hot-dip galvanized fasteners prevent rust-jacking, especially in coastal areas or anywhere that uses salt for ice control.
Material selection becomes even more critical during a complete roof replacement — it's the ideal time to upgrade your cantilevered roof overhang materials and structural connections simultaneously, at far lower incremental cost than a standalone retrofit.
Final Thoughts
That house I mentioned at the beginning? The one with the sagging overhang while the main roof looked perfect? The owner ended up spending $16,000 fixing it. The original builder saved maybe $350 by using 2x6s instead of 2x8s and skipping proper blocking. Math is cruel like that.
Cantilever roof overhang design is more complex than it looks. What appears to be a simple roof extension is actually a sophisticated structural element dealing with multiple competing forces — rotational stress, load triangles, thermal bridging, snow drift patterns, wind uplift, and gutter loads — that most residential construction barely acknowledges. The path forward depends on your situation. New construction gives you the opportunity to get the cantilever roof overhang design right from the start. Existing structures require honest assessment of what you've got and realistic decisions about what needs to happen to achieve adequate performance.
The cost difference between adequate and excellent cantilever roof overhang design is modest compared to the cost of repairs, reconstruction, or living with a roofline that looks progressively worse over time. Don't settle for code-minimum construction if you want better-than-minimum performance. If you're concerned about your existing cantilevered roof overhang or planning new construction, contact Joyland Roofing for an overhang assessment. We'll tell you what you're working with and what needs to happen to achieve the performance you expect. You can also review typical roof costs and pricing to understand how overhang upgrades fit into your overall project budget.