March 31, 2026
Flat Roof Patio Ideas That Treat Your Roof Like the Fifth Wall It Already Is
Author
Table of Contents
- Why We've Been Thinking About Flat Roofs All Wrong
- The Structural Reality Check Nobody Talks About
- Waterproofing Isn't Boring (It's Your Foundation for Everything Else)
- Material Choices That Actually Matter for Rooftop Living
- Privacy Solutions That Don't Scream "I Built a Fortress"
- Plant Selection Beyond the Usual Succulent Advice
- Shade Strategies When You Can't Just Plant a Tree
- Lighting That Works With Weather, Not Against It
- The Maintenance Schedule You'll Actually Follow
- When to Call Professionals (And When You're Overthinking It)
TL;DR
- Your flat roof already bears weight daily. Understanding its load capacity determines everything you can safely add. (Not what's trending on Pinterest.)
- Waterproofing upgrades aren't optional prep work. They're the difference between a patio that lasts decades and one that destroys your ceiling in three years.
- Material weight matters more than material type. A lightweight composite deck can outperform traditional wood when you're working 30 feet above ground.
- Privacy on a rooftop requires vertical thinking. Planters, trellises, strategic furniture placement. Permanent walls just create wind tunnels.
- Drainage patterns dictate layout, and water doesn't care about your furniture arrangement.
- Native plants adapted to your region's wind and sun exposure will survive where Instagram favorites won't.
- Removable, modular elements give you flexibility without requiring structural modifications every time you want change.
- Maintenance access points need protection, not decoration. (You'll thank yourself when your HVAC tech doesn't have to dismantle your entire setup.)
Why We've Been Thinking About Flat Roofs All Wrong
Your roof is supporting a decade of debris, two HVAC units, and last winter's snow. It's already working.
The question isn't whether it can handle a patio. The question is what kind of patio it can handle based on what it's already handling.
Big difference.
I've watched enough rooftop patio disasters to know the pattern. Someone gets excited, orders furniture, hauls it up three flights of stairs, arranges everything perfectly. Six months later there's a water stain spreading across their ceiling. The problem wasn't the furniture. It was that nobody checked if the roof could handle it first.
We've got two types of people. The ones who treat their roofs like they're made of glass, terrified to add anything beyond a potted plant. Then there's the other group who pile on pavers and hot tubs without checking whether their roof was designed for occupied space or just weather resistance.
Both miss the point.
Your roof is a structural element with specific capacities. Understanding those capacities unlocks flat roof patio ideas you've been talking yourself out of for years.
Most flat roofs in residential and commercial buildings can support between 20 to 30 pounds per square foot as a baseline live load. That's building code talking, not a suggestion. Some can handle significantly more, especially if they were designed with rooftop access in mind. You need to know your number before you buy a single piece of furniture.
When you know that number, everything becomes a math problem instead of a guessing game. A standard resin wicker chair weighs about 15 pounds. A lightweight aluminum lounger runs 20 to 25 pounds. Suddenly you're not asking "Can I have seating?" You're asking "How much seating, and what type makes sense for my load capacity?"
This shift — from possibility to optimization — separates flat roof patio ideas that feel like afterthoughts from ones that feel like they were always meant to be there.
According to Ground Up Construction Management, homeowners in areas like San Diego increasingly recognize that small yards, close neighbors, and tight city lots make traditional backyard patios difficult to build, driving more property owners to look at their unused roof space as a viable solution for outdoor living. When ground-level options are constrained, flat roof patio ideas become less about luxury and more about practical space utilization.
Look, I'm reframing the entire conversation here. Your flat patio isn't something you build from scratch. It's square footage you already paid for, sitting unused while you squeeze into a cramped ground-level yard or skip outdoor entertaining entirely. The roof is your fifth wall, and treating it as such means approaching it with the same intentionality you'd bring to finishing a basement or converting an attic.
The difference between a successful flat patio and a failed one? Whether you respected the structural realities or ignored them.
I'm not interested in showing you aspirational photos that require budgets most people don't have. I'm interested in helping you activate space that's been sitting empty above your head. For more inspiration on what's possible before you dive into the structural details, browse our patio roof ideas guide — it covers the full range of covered and open rooftop configurations worth considering.
The Structural Reality Check Nobody Talks About
Getting Your Load Capacity Number (And Why It's Not Negotiable)
You can't find this number on Google.
You need your building plans, or you need a structural engineer to assess what you're working with.
Dead load refers to the permanent weight your roof already carries: the roofing membrane, insulation, decking, and any fixed equipment. Live load is everything else — the temporary and variable weight like people, furniture, snow accumulation, and that herb garden you're planning.
Building codes in most U.S. jurisdictions require flat roofs to support a minimum live load of 20 psf, but that's for basic access and maintenance. If your roof was designed as an occupied roof deck, that number jumps to 60 psf or higher. The difference between those two scenarios is the difference between a couple of chairs and a full outdoor living room.
Original building plans will specify design loads. If you don't have them, your local building department might have copies on file, especially for newer construction. For older buildings, you're looking at either hiring an engineer or working conservatively within assumed minimums.
A structural engineer's assessment typically costs between $500 and $1,500 depending on your location and building complexity. Expensive? Sure. But compare that to the $30,000 I've seen people spend fixing a collapsed roof deck. Suddenly that engineering fee looks pretty reasonable.
Some warning signs suggest your roof wasn't designed for what you're planning: visible sagging, ponding water that doesn't drain within 48 hours after rain, or existing cracks in the roofing membrane. If you're seeing any of these, stop planning furniture layouts and start planning a professional assessment. It's also worth understanding how long flat roofs last in general — if your roof is aging, that's a critical input before investing in any flat patio build-out.
Pre-Assessment Checklist: What to Gather Before Calling a Structural Engineer
- [ ] Original building plans or architectural drawings
- [ ] Property deed and any renovation records showing roof work
- [ ] Photos of current roof condition, including drains, vents, and any visible damage
- [ ] List of existing roof equipment (HVAC units, satellite dishes, solar panels)
- [ ] Measurements of your roof area and any planned patio dimensions
- [ ] Notes on observed water pooling locations and drainage patterns
- [ ] Contact information for your local building department
- [ ] Budget range for both assessment and potential structural upgrades
Honestly, nobody has half this stuff. Do your best.
Weight Distribution Strategies That Actually Work
Placing a 200-pound planter in the center of an unsupported span is fundamentally different from placing that same planter directly over a roof joist or support beam.
Your roof's structure includes joists, beams, or in some cases, a concrete deck. Weight placed directly over these structural elements gets transferred efficiently to your building's walls and foundation. Weight placed between supports creates deflection — the bending that occurs when a structural member carries a load across its span.
You want to minimize deflection by concentrating heavier elements where your roof is strongest. For most flat patio roof applications, that means positioning large planters, heavy furniture, or water features along the perimeter walls where structural support is greatest.
Client in Chicago (let's call her Maria) wanted four massive cedar planters for herbs. I said no. She said yes. We argued. Eventually we compromised by positioning them over the support beams instead of where she wanted them, which would've been a disaster. The roof joists ran perpendicular to the building's length, so we lined all four planters directly over a primary support beam running along the building's edge. Total load was about 1,000 pounds when everything was saturated. Three years later, she admits I was right. Still waiting for that admission in writing.
Pavers and deck tiles serve a secondary function beyond aesthetics. They distribute point loads across a wider area. A furniture leg pressing directly onto a roofing membrane concentrates weight into a few square inches. That same leg resting on a paver spreads the load across the entire paver surface, reducing pressure per square inch significantly.
Interlocking deck tiles work particularly well because they create a floating surface that distributes weight while remaining removable. You're not permanently altering your flat patio roof, and you can adjust your layout as needs change without leaving mounting holes or adhesive residue. When planning weight distribution, consider how different materials affect your overall load capacity — similar to how proper commercial roof maintenance requires understanding your roof's structural limitations before adding anything to the surface.
Avoid creating "load clusters" where multiple heavy elements sit close together. Spacing out your heaviest pieces prevents cumulative stress in any single area, even if each individual piece falls within acceptable weight limits.
Waterproofing Isn't Boring (It's Your Foundation for Everything Else)
Okay, this section is going to be dry. I'm about to explain waterproofing membranes, and your eyes are already glazing over. But this is the only thing standing between you and a functional rooftop flat patio, so stay with me.
Why Your Existing Membrane Probably Isn't Enough
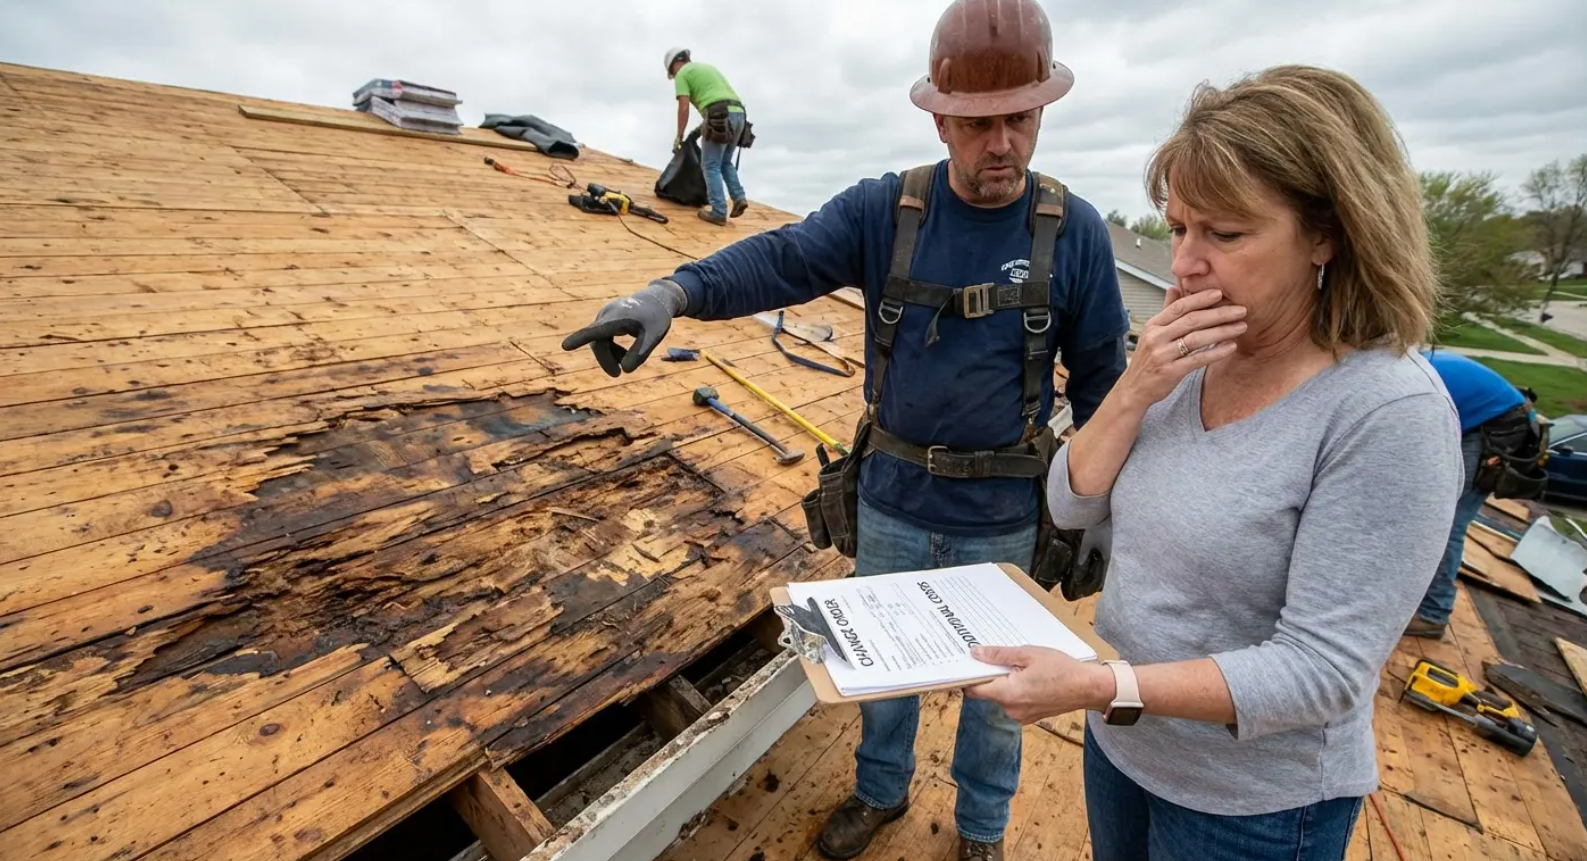
Standard EPDM, TPO, or modified bitumen roofing membranes are designed to keep water out. They're not designed to withstand constant foot traffic, furniture dragging, planter placement, and the general wear that comes with using your roof as a living space.
That distinction matters because a punctured membrane doesn't announce itself with sirens and flashing lights. It announces itself months later when you notice a water stain spreading across your ceiling, and by then you're looking at interior repairs on top of roof repairs.
Ever drag furniture across a rubber membrane in July? It's sticky, resistant, and you can feel the material stretching under the chair legs. That stretching? That's the beginning of damage.
Occupied roof assemblies typically include a protection layer above the waterproofing membrane. This might be a slip sheet, a drainage mat, or a more robust protection board depending on your setup. The goal is creating a sacrificial layer that absorbs the abuse so your waterproofing doesn't have to.
If you're working with an existing roof that wasn't designed for foot traffic, you have options. Adding a protective layer over your existing membrane is possible and often more cost-effective than a complete roof replacement. Interlocking rubber tiles, drainage mats with built-in protection, or even a properly installed paver system over pedestals can provide the buffer your membrane needs.
Understanding the difference between standard and occupied roof membranes is crucial, especially when you're considering flat roof patio ideas for residential applications that need to support foot traffic and furniture. These flat patios work only when the waterproofing underneath can handle the increased demands.
You're also dealing with drainage considerations that go beyond basic slope. Occupied roofs need positive drainage that doesn't create tripping hazards or standing water where people walk. Your waterproofing strategy needs to account for how water moves around furniture, under pavers, and through the gaps in your deck tiles.
Drainage Patterns You Can't Ignore
Water doesn't care about your furniture arrangement. It's going to flow downhill regardless of whether you've placed a sofa in its path.
Flat roofs aren't flat. They're pitched at a minimum slope (usually 1/4 inch per foot) to direct water toward drains, scuppers, or edge drainage. Understanding where your water goes determines where your furniture can't go.
Blocking a drain with a planter box creates ponding. Which creates stress on your waterproofing membrane. Which eventually creates leaks. Placing furniture in a drainage path creates the same problem with the added bonus of water damage to your furniture.
Walk your roof during a light rain (or shortly after) and watch where water flows. You'll see the patterns immediately. Those low spots where water collects? Not furniture zones. Those drainage paths cutting across your roof? Those need to stay clear or need to be bridged with materials that allow water to pass underneath.
According to The Patio Factory, flat roofs typically allow for a pitch of up to 10°, and while not quite flat, this ever-so-slight pitch serves to promote drainage — a critical consideration when selecting decking materials that won't impede water flow. Your flat patio design must work with this pitch, not against it.
Seattle project, couple years back. Owner installed a beautiful L-shaped sectional sofa directly in the primary drainage path between the roof's high point and its main scupper drain. Within three months, water began pooling behind the sofa during heavy Pacific Northwest rains. The standing water couldn't reach the drain, creating a permanent wet zone that damaged the sofa's base and started degrading the protective layer over the membrane. After relocating the sofa 6 feet to the side and installing a raised pedestal deck system that allowed water to flow underneath, the drainage issue resolved completely. The lesson cost $2,400 in sofa replacement and waterproofing repairs. Money that could have been saved by observing water flow before placing furniture.
Pedestal paver systems solve this elegantly. The pavers sit on adjustable supports that lift them above the roof surface, creating a gap where water can flow freely underneath. You get a level walking surface regardless of your roof's slope, and drainage continues unimpeded.
For areas where you can't avoid placing items in drainage paths, consider using furniture with legs instead of solid bases. Open-grid decking materials work similarly, letting water pass through rather than pooling on top.
Your drainage system also includes overflow protection. Every roof drain should have a secondary overflow positioned slightly higher than the primary drain. Make sure your flat patio design doesn't block these. They're not suggestions — they're code requirements that prevent catastrophic water buildup during heavy storms.
Material Choices That Actually Matter for Rooftop Living
Decking That Won't Destroy Your Weight Budget
Traditional pressure-treated lumber weighs about 3 to 4 pounds per board foot. Composite decking runs 2.5 to 3.5 pounds per board foot. That difference feels negligible until you're covering 300 square feet and suddenly you're talking about hundreds of pounds of difference in total load.
Weight matters. Obviously.
But here's what nobody mentions until it's too late: wind. Wind uplift becomes a serious concern on rooftops where you don't have the protection of surrounding structures. Lightweight materials need proper securing to prevent them from becoming projectiles during storms. Heavier materials resist wind better but eat into your load capacity faster.
Interlocking deck tiles offer the best balance for many rooftop applications. They're lightweight (most run 1 to 3 pounds per square foot installed), require no permanent fastening, and can be removed seasonally if needed. Composite tiles resist UV degradation better than wood and don't require the annual maintenance that wood demands.
Speaking of maintenance, you're working on a roof. Every time you need to sand, stain, or seal your deck, you're doing it in full sun exposure with no shade, probably dealing with wind, and managing all your tools on a surface that has edges with significant drop-offs. The maintenance burden of high-maintenance materials multiplies when the working conditions are difficult.
Porcelain pavers have become a popular flat patio option for this reason. Nearly zero maintenance, excellent UV resistance, available in large format tiles that minimize joint lines, and the weight (typically 4 to 6 pounds per square foot for a complete pedestal system) is manageable for most roofs that were designed with any occupancy in mind.
Composite wood-look tiles give you the aesthetic of wood without the maintenance or weight. The better products use capped composite technology that resists fading, staining, and moisture absorption. They won't warp or crack the way real wood does when exposed to repeated wet-dry cycles — which is basically your rooftop's entire existence.
For a flat roof patio cover or pergola structure, aluminum framing has almost entirely replaced wood in rooftop applications. Lighter, corrosion-resistant, and available in powder-coat finishes that last decades without repainting. The only downside is higher upfront cost, which pays back quickly in eliminated maintenance costs.
Furniture That Belongs on a Roof
Standard outdoor furniture isn't designed for rooftops. It's designed for patios at grade level, where wind exposure is minimal and the consequences of a chair blowing over are limited to a scuff on the patio.
On a rooftop flat patio, a chair that blows over can go over the edge. That's a safety issue, a liability issue, and a very bad day for anyone below.
Furniture weight and wind resistance become primary selection criteria. Heavier furniture stays put better, but each pound counts toward your load capacity. The balance point is furniture that's heavy enough to resist wind but light enough to leave room for everything else you want up there.
Look for furniture designed specifically for rooftop or marine environments. These products account for higher wind exposure, UV intensity at elevation, and the need for secure anchoring. Many include built-in attachment points for ballast weights or anchoring straps.
Sectional configurations offer advantages over individual pieces. Connected sections can't blow apart independently, creating a larger combined mass that resists wind better than individual chairs would. The combined weight distributes across more floor area, reducing load concentration.
Avoid glass tabletops on rooftops. Not because glass is inherently wrong, but because tempered glass that shatters on a rooftop creates cleanup challenges that are genuinely dangerous. A glass top that falls from a rooftop presents obvious hazards. Concrete, composite, or aluminum tabletops are better choices at elevation.
Storage on a rooftop is tricky. You need somewhere to keep cushions, tools, and accessories, but every storage solution you add is permanent weight. Built-in storage benches along perimeter walls distribute weight well and serve double duty as additional seating. Avoid freestanding storage cabinets that can tip or blow in high winds.
Privacy Solutions That Don't Scream "I Built a Fortress"
The Wind Tunnel Problem With Solid Walls
First instinct for rooftop privacy is usually walls. Fence panels, solid screens, privacy boards. Block the view, solve the problem.
The actual problem you create: solid walls on rooftops act as sails. They catch wind, creating lateral forces that structural elements weren't designed to resist. They also create turbulence zones — areas of swirling, unpredictable wind that make the rooftop space uncomfortable even when wind speeds elsewhere are modest.
I've seen privacy screens tear off rooftops in storms. I've seen solid pergola walls require expensive structural reinforcement to meet wind load requirements. Every time, someone chose privacy over practicality and paid for it.
The solution isn't no privacy. It's privacy that doesn't fight the wind.
Slatted screens (horizontal or vertical boards with gaps between them) provide visual privacy while allowing wind to pass through. The principle is similar to a snow fence — the gaps reduce wind pressure while still disrupting sightlines. Aluminum or composite slatted panels resist weathering without the maintenance wood requires.
Living screens — plants trained on trellises or grown in tall planters — work similarly. The plant mass filters wind rather than blocking it, reducing turbulence while providing green privacy that solid walls can't offer. Height limits exist based on your load capacity and structural support, but a well-planned row of ornamental grasses or columnar shrubs in lightweight containers creates effective screening without wind load issues.
Strategic furniture arrangement provides psychological privacy even without physical barriers. A sofa positioned with its back toward a neighboring building creates a sense of enclosure without any structural elements. Raised planters at seated eye level block sightlines from lower neighboring properties while staying well within manageable height and weight limits.
Retractable privacy screens give you flexibility that permanent solutions don't. Retract them when wind picks up, extend them when you want privacy, store them seasonally. The hardware costs more than fixed panels, but the flexibility and reduced wind load risk justify the premium for most rooftop applications.
Plant Selection Beyond the Usual Succulent Advice
What Actually Survives Rooftop Conditions
Rooftop growing conditions are brutal. High wind exposure. Intense UV at elevation. Minimal soil volume. Temperature extremes that exceed ground-level conditions by 10 to 20 degrees in both directions. Drought stress during hot periods, waterlogging risk during heavy rain.
Instagram plant recommendations don't account for any of this.
Succulents do work. But "just plant succulents" ignores the wind factor that makes most ground-level succulents struggle on rooftops. The varieties that survive are compact, low-growing types that don't catch wind — not the tall, dramatic specimens that photograph well.
Ornamental grasses are underutilized in rooftop flat patios. They're designed by evolution to flex in wind, not break. Varieties like Karl Foerster feather reed grass, Blue Oat Grass, or Prairie Dropseed handle rooftop exposure remarkably well. They're lightweight (grass roots don't require deep soil), visually dynamic, and genuinely low-maintenance once established.
Sedums and sempervivums go beyond basic succulent advice. These genera include hundreds of species adapted to rocky, exposed, windy conditions that closely mirror rooftop environments. Mat-forming varieties spread horizontally and resist wind uplift. Many handle both drought and periodic waterlogging — the two conditions your rooftop will alternate between.
Dwarf conifers bring year-round structure to flat patios. Varieties like Dwarf Alberta Spruce, Mugo Pine, and Blue Star Juniper stay compact (under 4 feet over many years), tolerate wind, and provide the kind of persistent green that annual and perennial plantings can't offer in winter.
For edible gardens — a popular goal in flat roof patio designs — concentrate on herbs rather than vegetables. Herbs generally require less soil depth, tolerate stress better, and provide return on the investment of roof garden infrastructure more reliably than tomatoes or peppers that need deep root zones and consistent watering. Rosemary, thyme, oregano, and sage handle rooftop conditions far better than basil (which hates wind) or cilantro (which bolts in heat).
Lightweight growing media is non-negotiable. Standard garden soil weighs 75 to 100 pounds per cubic foot when wet. Engineered growing media for roof applications (blends incorporating perlite, pumice, or expanded shale) weigh 35 to 55 pounds per cubic foot saturated — roughly half the weight. This difference determines whether your planting scheme fits within your load capacity or blows past it.
Container choice matters almost as much as growing media. Fiberglass containers weigh a fraction of terracotta or concrete while offering better insulation for roots. Self-watering containers reduce the irrigation burden significantly — a meaningful benefit when your water source is three flights of stairs away.
Shade Strategies When You Can't Just Plant a Tree
Structures That Work at Elevation
Shade trees take decades to grow and can't be planted in containers on rooftops. You need structural shade solutions, and on a rooftop, those solutions have to account for wind loads that don't exist at ground level.
Shade sails are popular at grade level and genuinely problematic on rooftops. The attachment points — wherever those corners anchor — experience significant tension in wind. On a rooftop, you're often anchoring into parapet walls or structural posts that weren't designed for those forces. Shade sails that look great in calm weather become structural hazards when wind speeds climb.
Freestanding pergolas with solid footings work well when they're properly anchored. The key phrase is "properly anchored" — into structural elements, not just set on paving tiles. Pergolas that aren't anchored against wind uplift become projectiles. The ballast approach (filling a hollow base with concrete or gravel) works for moderate wind conditions but has limits. In high wind zones, you need mechanical anchoring to structural supports.
Retractable awning systems offer the best combination of shade coverage and wind safety. Modern motorized awnings include wind sensors that automatically retract when speeds exceed safe thresholds. The retracted position presents minimal wind resistance. Extended position provides meaningful shade. The sensor integration means you don't have to monitor weather constantly or risk forgetting to retract during a storm.
Tensile shade structures — the sail-like fabric canopies you see over commercial plazas — can work on residential flat patios when properly engineered. The key is that the engineering actually happens. The attachment points need to be designed for the specific loads, not improvised. When done correctly, these structures handle wind beautifully because the fabric tension increases with wind rather than fighting it. When done incorrectly, they fail dramatically.
Umbrella placement on rooftops requires bases that are heavier than grade-level recommendations. The standard 50-pound umbrella base that works fine in a backyard isn't enough on a roof where wind exposure is significantly higher. Plan for bases in the 75 to 100-pound range, positioned to keep the umbrella's center of gravity low. Tilt-only umbrellas are safer than cantilever designs on rooftops — less leverage arm for wind to exploit.
Lighting That Works With Weather, Not Against It
The Rooftop Lighting Reality
Rooftop lighting faces conditions that ground-level lighting doesn't. Constant UV exposure. Temperature extremes. Wind. Rain that hits at angles rather than falling straight down. Connections that need to handle expansion and contraction cycles.
IP ratings matter on rooftops in ways they don't in protected outdoor spaces. IP65 (dust-tight and protected against water jets) is a minimum for rooftop lighting. IP67 or IP68 (temporary or continuous immersion protection) is better, especially for fixtures that might sit in standing water before your drainage cycles through.
String lights are the first thing everyone considers and the first thing that fails on rooftops. Standard string lights aren't designed for wind oscillation — the repeated motion fatigues the wire insulation and socket connections over time. Commercial-grade string lights with thicker wire gauges, rubber-insulated sockets, and reinforced connection points exist specifically for exposed outdoor environments and perform dramatically better.
Low-voltage landscape lighting systems have advantages for rooftops because the low voltage is inherently safer to work with and connections are easier to weatherproof. LED technology has made low-voltage systems bright enough for functional task lighting, not just ambient effects. The transformers can be located inside or in protected mechanical spaces, eliminating one of the weather-exposed components.
Solar lighting is appealing for rooftops because you don't have to run wiring (a genuine challenge on most rooftop flat patios) and you're working with the one resource your rooftop has in abundance. The quality range is enormous. Budget solar fixtures provide novelty lighting at best. Commercial-grade solar fixtures with quality battery storage provide reliable illumination even after several cloudy days.
Avoid recessing fixtures into your deck surface. Recessed fixtures create waterproofing complications at every penetration point and make membrane inspection and maintenance more difficult. Surface-mounted and post-mounted fixtures are easier to install correctly and easier to relocate when your layout evolves.
The Maintenance Schedule You'll Actually Follow
What Regular Maintenance Actually Looks Like
The maintenance reality of a rooftop flat patio is more demanding than ground-level outdoor spaces, and most people don't factor this in during planning.
Drain inspection and cleaning: every month during leaf-fall season, quarterly otherwise. Your drains are the only thing standing between a heavy rainstorm and a flooded roof. Debris accumulates faster than you'd expect. Five minutes of drain clearing prevents hours of water damage remediation.
Membrane inspection: every six months. Walk the perimeter and any accessible areas under your deck system. Look for any signs of membrane damage — blistering, cracking, separation at seams, or damage where furniture legs might have penetrated the protection layer. Early detection of membrane issues is the difference between a $200 repair and a $10,000 problem. Knowing how to spot the most vulnerable parts of your roof before they become failures saves you significant money.
Fastener and anchor inspection: after every significant wind event. Check that all pergola anchors, screen attachments, and furniture tethering systems are secure. Wind fatigue loosens fasteners over time — a fastener that was tight in spring may be loose by fall after a season of wind oscillation.
Plant container inspection: monthly during growing season. Check for root bound conditions (roots growing out of drainage holes and potentially into the roof membrane), soil subsidence that might redirect water, and any signs of container failure. Fiberglass containers can crack; self-watering reservoirs can overflow; drainage holes can clog.
Furniture inspection: seasonal. Check all structural connections, especially on pieces that experience significant wind movement. Look for corrosion at metal joints, cracking at plastic or composite connection points, and deterioration of any covering or cushion materials. Replace anything that shows structural compromise — furniture failure on a rooftop has consequences that ground-level failure doesn't.
When to Call Professionals (And When You're Overthinking It)
The Clear Lines
You need a professional for structural assessment — always. No exceptions. The load capacity calculation that determines whether your flat roof patio ideas are feasible isn't something you can calculate from a YouTube video.
You need a professional for any penetrations through your roofing membrane. Anchor bolts, electrical conduit, drainage modifications — anything that goes through your membrane needs to be done by someone who knows how to maintain waterproof integrity at penetrations.
You need a professional for waterproofing work. Adding protection layers, upgrading your membrane, addressing existing damage — all of this should be done by qualified roofing contractors who can warrant their work and who have the product knowledge to select compatible materials. Understanding roof inspection costs ahead of time helps you budget for these professional touchpoints without surprises.
You can probably handle furniture selection and arrangement without professional help, assuming you've done your structural homework first.
You can probably handle plant selection and installation, assuming you've chosen appropriate growing media and containers.
You can probably handle most lighting installation, assuming you're using surface-mounted systems and not penetrating the membrane.
The pattern here is that the irreversible decisions — the ones that affect your roof's structural integrity or waterproofing — require professional involvement. The reversible decisions — furniture, plants, lighting that doesn't penetrate the membrane — are within most people's capability to manage independently.
Where people get into trouble is confusing the two categories. Anchoring a pergola post into a parapet wall feels like furniture placement. It isn't. It's a structural modification that affects load paths and potentially creates water infiltration points. Treat it accordingly.
The other trap is the sunk cost problem. Once you've invested $15,000 in a beautiful flat patio setup, calling a professional to assess a problem feels like admitting the whole project was a mistake. It isn't. Problems found early cost a fraction of what they cost once they've developed. A $500 inspection that catches a membrane issue beats a $15,000 remediation every time. Proactive strategies for improving the lifespan of your commercial roof apply equally to residential flat roof patios — the principle of catching problems early is universal.
When Your Flat Roof Patio Needs a Professional Eye
You've got the furniture arranged, the planters looking great, the lighting set up. And now you're noticing something — a small stain on the ceiling below the rooftop, a drain that seems slower than it used to be, a seam in your deck tiles that's pulling apart.
These aren't decorating problems. They're roofing problems that happen to live under your patio.
At Joyland Roofing, we work with property owners on flat roof patio assessments that start with the roof, not the furniture. We look at your membrane condition, drainage performance, load distribution, and any areas where your flat patio setup may be creating conditions your roof wasn't designed to handle.
Most of the time, what we find is manageable — minor adjustments to furniture placement, a drain that needs clearing, a protection layer that needs repair in one area. Occasionally we find something more significant that's much better addressed now than in two years when it's progressed.
The goal isn't to talk you out of your rooftop flat patio. It's to make sure what you've built lasts as long as you want it to and doesn't cost you more in roof repairs than it gave you in outdoor living.
Final Thoughts
Your flat roof is genuinely usable space. It wants to be your flat patio. But it needs you to approach it on its terms, not yours.
Understand the load capacity before you buy the first piece of furniture. Observe the drainage patterns before you decide where anything goes. Choose materials for maintenance practicality, not just initial appearance. Build in flexibility with modular, removable elements wherever possible. Protect your membrane like the irreplaceable asset it is.
The modern patio roof ideas that hold up over time — the rooftops that still look great and perform flawlessly a decade after installation — share these characteristics. They were built by people who asked the right questions first and made aesthetic decisions second.
Flat roof patio ideas are everywhere. The structural knowledge to execute them successfully is rarer. Now you have both.
If you're ready to turn your unused roof into the outdoor space you've been wanting, start with what's underneath it. Get your roof assessed, understand your capacity, and build from there. Everything else follows.