January 1, 2026
Emergency Roof Leak? Here's What to Do in the Next Hour (Not What Google Tells You)
Author
Most roof leak advice online sounds helpful but completely misses the moment that actually matters: the first hour after you notice the problem. That’s when the real damage starts multiplying, and it’s also when homeowners tend to make the most expensive mistakes.
The typical advice? Grab a bucket. Maybe throw up a tarp. Google a quick fix and hope the storm passes.
That might make the situation feel under control, but it doesn’t address what’s actually happening above your ceiling. By the time water starts dripping into a room, it has usually been moving through your roof system, insulation, and framing for a while already. What you see on the floor is just the final stage of a much bigger process. If you’re already seeing active water intrusion, you may need emergency roof leak repair during the rain rather than temporary DIY fixes.
The problem is that most guides treat a roof leak like a plumbing leak: water in, water out, problem contained. But roofs fail differently. Water spreads sideways through insulation, tracks along rafters, and finds openings in places that have nothing to do with where the drip appears.
That’s why two homeowners can experience the exact same leak but end up with completely different repair bills.
This guide isn’t about quick hacks or temporary fixes. It’s about understanding what’s actually happening inside your house during a leak and what actions in the first hour can limit the damage—or accidentally make it worse.
Because the bucket might catch the drip. But it won’t stop what’s happening behind your ceiling.
Table of Contents
- Why the Bucket Strategy Is Basically Useless
- The Damage Timeline Nobody Warns You About
- What You Actually Need to Do Right Now
- Why Emergency Tarps Sometimes Make Everything Worse
- The Insurance Photos You're Probably Not Taking
TL;DR
Most damage happens in the first hour, not during the storm. That bucket you're grabbing? Basically useless for the real problem. Take photos before you do anything else because your insurance will thank you. Emergency tarps can actually make things worse if done wrong.
Why the Bucket Strategy Is Basically Useless
Look, here's what nobody tells you about roof leaks: the real emergency isn't the water dripping on your floor. It's the clock.
You've probably seen dozens of articles about buckets and tarps. But nobody talks about the cascading failure happening inside your walls right now.
Water doesn't just drip down and stop. It spreads sideways through insulation, soaks into drywall, and saturates wood framing in patterns you can't predict. The bucket catching drips in your living room? That's making you feel better while the actual damage spreads through spaces you can't even see.
When You Panic vs. When You Actually Think
Your brain wants you to stop the visible water. That's natural. But here's what happens when you follow that instinct: you waste your most valuable resource (time) on the least important problem (the drip you can see).
I've watched homeowners spend 20 minutes moving furniture and another 15 finding the right bucket while water saturates ceiling joists and spreads across attic insulation. By the time they think about calling someone, the damage footprint has tripled.
Think triage, not cleanup. Your first 60 minutes should focus on stopping source water if possible, documenting everything, and getting professional help on the way. Everything else can wait.
Last year, a client called me at 8 PM during a storm. She'd spent half an hour moving furniture and mopping up water. By the time I got there at 10, the water had spread into the wall cavity between her bedroom and bathroom. What should've been an $800 flashing repair turned into $4,200 because she prioritized cleanup over calling someone.
The Bucket Makes You Feel Like You're Handling It
Sure, put a bucket down if water's actively dripping. But if that's your entire strategy, you're already losing.
The bucket addresses the symptom. It does nothing about the water that's already in your ceiling cavity, nothing about the moisture spreading through your insulation, and nothing about the structural wood that's been soaking for however long this leak existed before you noticed it. And you did notice it late. Everyone does. Leaks don't announce themselves until they've been happening for a while.
The bucket makes you feel like you're handling it. That false sense of control costs you money.
The Damage Timeline Nobody Warns You About
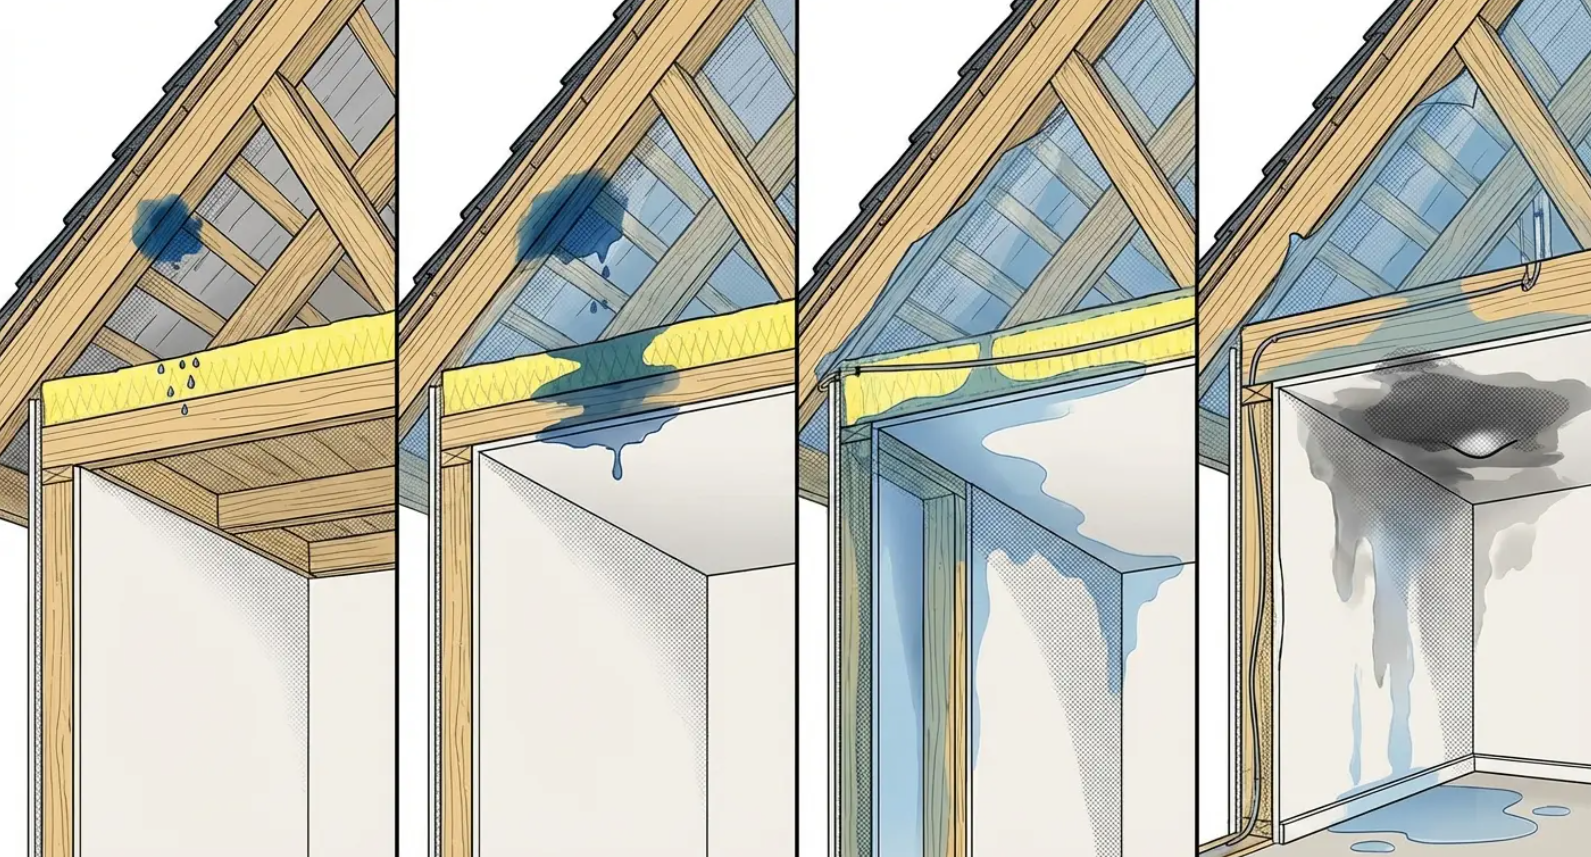
Most people think roof leak damage follows a simple pattern: water comes in, water goes down, water stops. Reality is way more complicated and much faster than you'd expect.
Within the first 15 minutes of active leaking, water begins migrating through ceiling materials. By 30 minutes, it's spreading sideways across insulation and potentially reaching wall cavities. At the 60-minute mark, you're looking at saturation in multiple building components. Two hours in, and you've likely got moisture in places that won't dry without professional intervention.
The timeline accelerates dramatically if you're dealing with wind-driven rain or if your leak is near HVAC ducts, which act like highways for water distribution.
| Time Elapsed | What's Happening | Materials Getting Destroyed | Repair Cost Range |
|---|---|---|---|
| 0-15 minutes | Initial ceiling penetration | Drywall surface, paint | $200-$500 |
| 15-30 minutes | Sideways spread begins | Insulation, ceiling joists | $500-$1,200 |
| 30-60 minutes | Wall cavity gets hit | Framing, electrical boxes | $1,200-$3,000 |
| 1-2 hours | Multiple areas saturated | Multiple rooms, HVAC ducts | $3,000-$6,000 |
| 2-4 hours | Structural damage threshold | Load-bearing members, flooring | $6,000-$12,000 |
| 4+ hours | Mold conditions established | Everything that got wet | $12,000-$25,000+ |
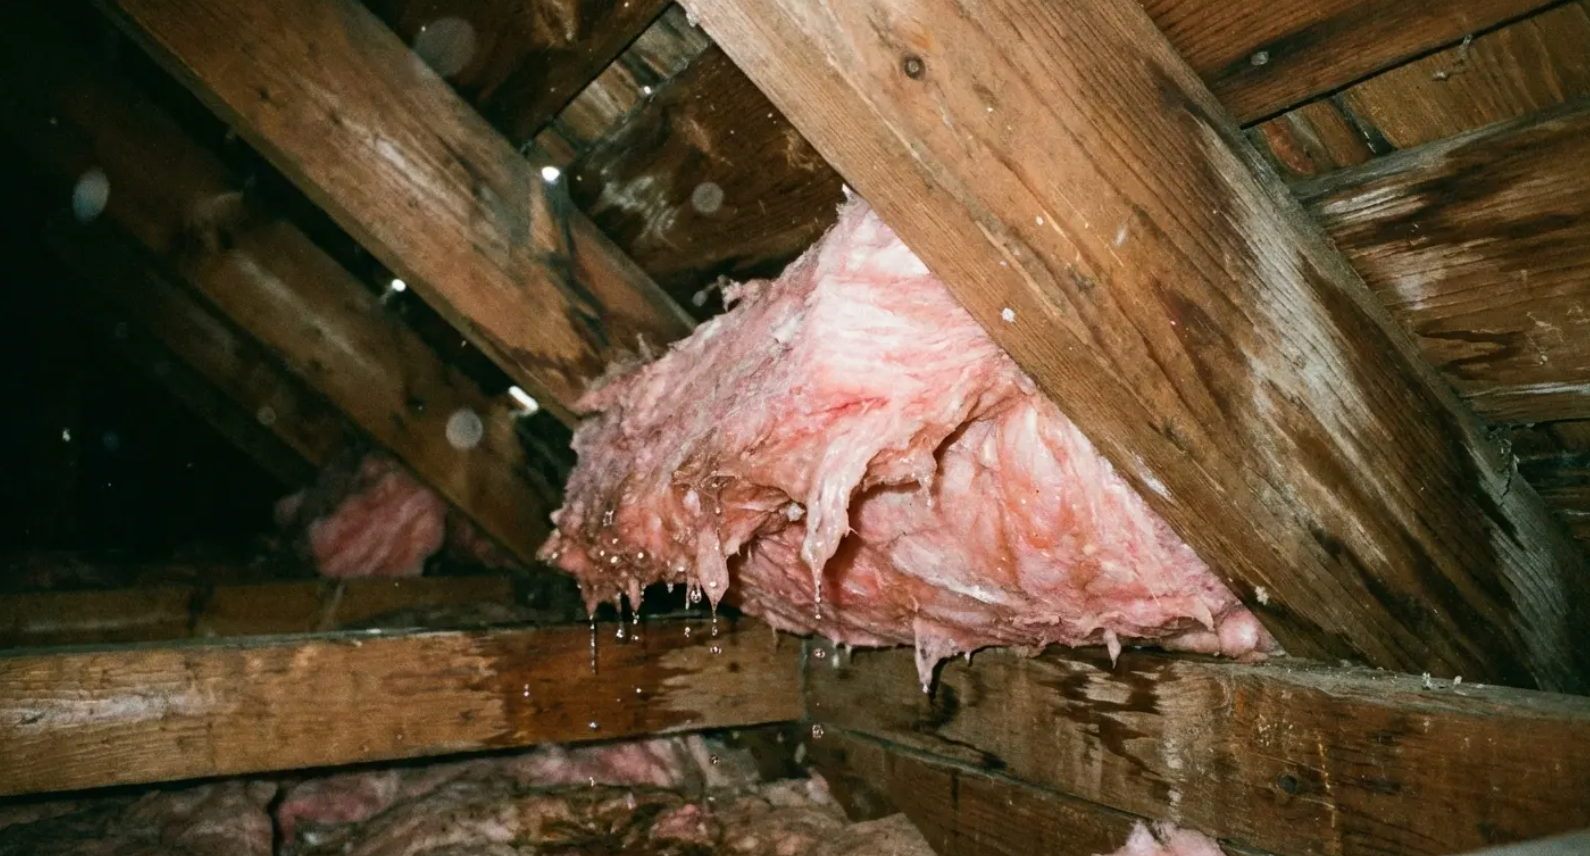
Your Insulation Is Acting Like a Sponge
Attic insulation acts like a sponge. Once it gets wet, it holds moisture against your ceiling drywall and roof framing for days or weeks. Even if you stop the leak source immediately, that saturated insulation continues damaging surrounding materials.
Worse, wet insulation loses its R-value completely. You're also losing energy efficiency in that section of your home. You can't see this happening. There's no drip to catch. But this hidden saturation is often responsible for more damage than the visible leak itself.
Professional restoration often requires removing and replacing insulation even when the ceiling appears fine. That's not upselling. That's preventing mold growth and structural deterioration you won't discover until it's way more expensive to fix.
Drywall Doesn't Recover
Drywall has a moisture tolerance, and once you exceed it, the material is compromised even if it looks okay after drying. The threshold is lower than most people think.
You don't need standing water or visible staining for drywall to require replacement. Moisture meters (which professional restorers use) often show elevated readings in areas that appear completely normal. That's why you'll sometimes get repair estimates that seem excessive based on what you can see. The damage isn't visible, but it's real.
Saturated drywall loses structural integrity, becomes a mold risk, and can fail weeks or months after the leak is repaired. Replacing it during the initial repair is cheaper than dealing with a ceiling collapse or mold remediation later.
What You Actually Need to Do Right Now
The window between discovering your leak and getting professional help is where you either minimize damage or accidentally make it worse. Most advice focuses on containment, which we've established is only part of the equation.
The actions you take right now directly impact repair costs, insurance coverage, and how quickly you get back to normal. Here's what matters.
Take Photos Before You Touch Anything
Pull out your phone and start recording. Not just photos but video with narration.
Walk through every affected area and describe what you're seeing: "This is the master bedroom ceiling, there's active dripping here, the carpet is wet in about a three-foot radius, I can see staining spreading across the ceiling toward the window." Timestamp matters. Your insurance claim may hinge on proving when damage occurred and how extensive it was at discovery.
Take photos of the exterior roof area if you can do so safely (from the ground, not by climbing). Document any visible damage, missing shingles, or debris. Photograph your attic if accessible, focusing on wet insulation, water stains on framing, and the underside of roof decking.
This feels tedious when water's dripping on your floor, but this documentation is worth thousands of dollars in insurance disputes.
What to document right now:
- Exact time you first noticed the leak
- Wide shot showing entire affected room
- Close-ups of active drip points
- Water stains on ceiling (multiple angles)
- Any wall discoloration or moisture
- Video walkthrough describing what you see
- Wet flooring, carpet, or furniture
- Exterior roof area from ground level
- Missing or damaged shingles
- Attic space showing wet insulation
- Current weather conditions
Your Phone Is Embedding Proof
Your phone automatically embeds date, time, and location data in photos and videos. Insurance adjusters know this. If you need to prove the extent of damage at time of discovery, metadata-stamped media is more credible than your memory or written notes.
Don't just take one photo of each area. Take multiple angles, close-ups of damage, and wide shots showing context. Overdo it. You can always delete extras, but you can't go back in time to capture what you missed.

If You're Going to Catch Water, Do It Right
If you're going to catch water, use the largest, flattest container you have. A storage bin works better than a bucket because it has more surface area and is harder to kick over. Put a towel in the bottom to reduce splash and noise.
Place the container on a waterproof barrier (trash bag, tarp, shower curtain) because you're probably going to spill when emptying it. If water is running down a wall, use painter's tape to create a channel directing it toward your container.
A friend in New Hampshire had water running down an interior wall during a winter storm. Instead of just placing a bucket at the base of the wall, she used blue painter's tape to create a V-shaped channel on the wall surface, directing water flow into a wide plastic storage container. She placed a beach towel inside to eliminate splashing and set the whole thing on a flattened garbage bag. This setup contained the water flow for six hours until the emergency roofer arrived, preventing water from spreading along the baseboard into the adjacent room's carpeting. The total water collected was about 4 gallons, way more than a standard bucket would have held.
Don't Do These Things
Don't poke holes in bulging ceiling drywall to "let the water out" unless you're prepared for way more water than you expect and you've cleared the area of anything that can be damaged. That bulge contains gallons, not cups.
Don't attempt roof repairs yourself during active weather. The emergency room visit costs more than the roofer.
Don't turn off your HVAC system unless water is actively dripping into it. Air circulation helps dry ambient moisture.
Don't use a shop vac on ceiling leaks unless you're certain of electrical safety. Water and electricity are still a bad combination.
Don't wait to call professionals because you want to "see if it gets worse." It's already worse than you think.
Why Emergency Tarps Sometimes Make Everything Worse
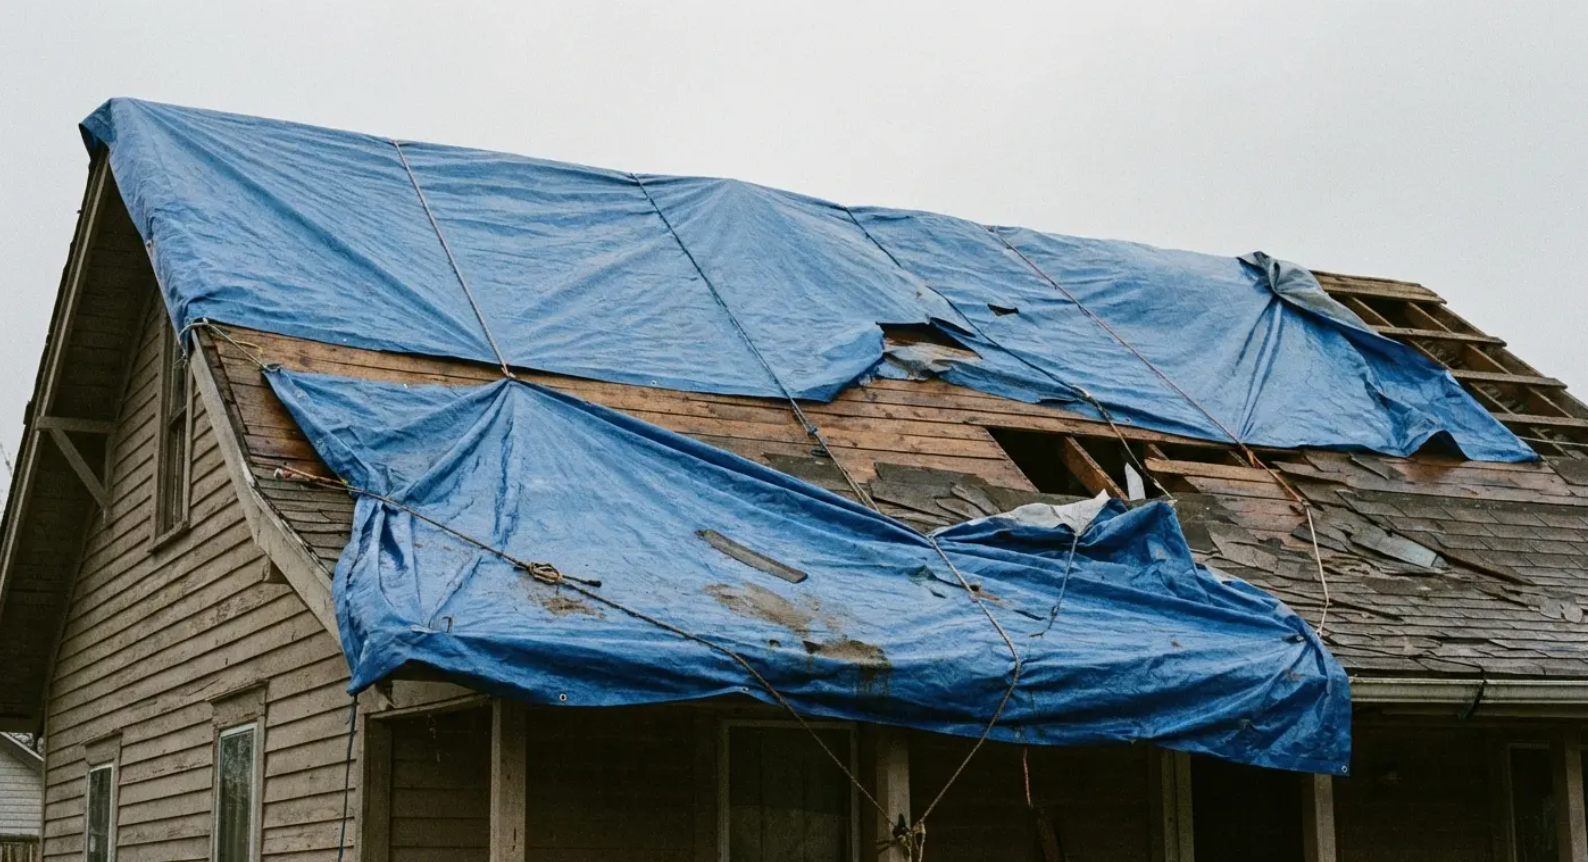
Emergency roof tarping is standard advice, and in many situations, it's necessary. But there's a darker side to temporary tarping that nobody discusses: improperly installed tarps can trap moisture against your roof deck, create new leak points, and cause damage that exceeds the original problem.
I've seen emergency tarps installed during storms that channeled water into new areas, held moisture against shingles until they deteriorated, and created uplift points that tore off additional roofing during subsequent weather events.
You need to understand when tarping helps, when it hurts, and how to tell if the tarping company you're considering knows the difference.
Tarps Can Trap Moisture
Tarps are waterproof. That's the point. But waterproof means moisture can't escape any more than it can enter.
If a tarp is installed over wet roof decking (which is likely if you're dealing with an active leak), that moisture is now trapped between the tarp and your roof structure. In warm weather, this creates a greenhouse effect. Moisture condenses on the underside of the tarp, drips onto decking, and you've got a slow, continuous leak even though the tarp is "working."
Professional tarping addresses this with ventilation strategies and proper material selection. Emergency tarping from inexperienced contractors often doesn't. You end up paying for a solution that creates a new problem.
Every Fastener Is a Potential Leak
Tarps need to be secured. That means fasteners penetrating your roof in multiple locations. Each penetration is a potential leak point.
Proper installation uses minimal fasteners placed strategically in areas that will be replaced during permanent repairs. Rushed or inexperienced installation uses too many fasteners, places them in areas that won't be replaced, or fails to seal them properly. Now you've got dozens of new holes in your roof, and some of them will leak.
This is particularly problematic if the tarp stays in place for weeks (which is common when roofing contractors are backlogged). Those fastener holes deteriorate over time, especially through freeze-thaw cycles. The tarp that was supposed to protect your home is now causing additional damage.
Questions to Ask Before Agreeing to Tarping
How will you address trapped moisture under the tarp?
What type of fasteners will you use, and where will they be placed?
Will fastener locations be documented for the permanent repair crew?
How is the tarp secured against wind uplift without creating excessive roof penetrations?
What's your plan if weather prevents safe installation?
These questions separate professionals from predators. Legitimate emergency roofing companies have specific answers. Fly-by-night operators will give vague responses or pressure you to "just let them handle it." That pressure is a red flag. Even in an emergency, you're entitled to understand what's being done to your home and
The Insurance Photos You're Probably Not Taking
Insurance claims for roof leaks have specific documentation requirements and timing windows that most homeowners don't discover until it's too late. Your policy requires prompt notification, but "prompt" is defined by the insurance company, not by your schedule.
Some policies specify 24-hour notification windows. Others require documentation of mitigation efforts. Nearly all of them have clauses about secondary damage that could have been prevented.
If you wait too long to report, take inadequate documentation, or fail to demonstrate reasonable mitigation efforts, you risk partial or complete claim denial.
You're Required to Prevent Additional Damage
Your insurance policy almost certainly requires you to take reasonable steps to prevent additional damage after a covered event. This is called mitigation.
If you discover a leak and do nothing, allowing water to damage flooring, furniture, and walls that could have been protected, your insurance company can deny coverage for that secondary damage. They'll pay for the roof repair (if it's a covered peril), but not for the damage you could have prevented.
Photos showing you moved furniture, placed containers, and called for emergency service demonstrate good faith effort. This documentation can be the difference between full coverage and a massive out-of-pocket expense.
Adjusters Are Backlogged
Insurance adjusters are backlogged. After major storms, they're handling hundreds of claims. Your leak might be an emergency to you, but you're in a queue.
Damage changes over time. The leak you reported on Monday looks different by the time an adjuster arrives on Friday. Stains spread. Materials dry (or appear to dry). New damage develops.
Your initial documentation becomes critical evidence of the original damage scope. Take photos immediately, then take follow-up photos every day until the adjuster arrives. This creates a visual timeline showing damage progression. If the adjuster tries to argue that some damage is pre-existing or unrelated, your timeline proves otherwise.
Get a Contractor Estimate First
Get a contractor estimate before the adjuster arrives, not after. This gives you an independent assessment of damage and repair costs.
When the adjuster provides their estimate, you have a comparison point. Adjusters work for the insurance company. Their job is to settle claims fairly, but they're also incentivized to minimize payouts.
Having a contractor estimate in hand prevents you from accepting an inadequate settlement because you don't know what repairs should cost.

When Leaks Stop on Their Own (That's Bad News)
You've noticed the dripping stopped. Maybe the rain let up, or maybe you can't figure out why, but there's no more active water coming through your ceiling. Relief, right?
Not exactly. Leaks that stop without intervention often indicate something more concerning than leaks that continue consistently.
When a leak stops on its own, it usually means one of three things: the water source has temporarily shifted (and will return), the leak path has become blocked by debris (creating pressure elsewhere), or there's been structural movement that temporarily closed the gap (which means your roof structure is flexing under load). None of these scenarios are good news.
Your Roof Structure Is Moving
Roofs are designed to handle some flex. Wind load, snow weight, temperature changes create minor structural movement. But when that movement is enough to open and close leak paths, you're dealing with deflection that exceeds design parameters.
This often indicates compromised framing, deteriorated fasteners, or inadequate structural support. The leak stopping isn't a fix. It's evidence that your roof structure is moving enough to temporarily seal a gap that shouldn't exist in the first place.
This type of damage requires structural assessment, not just patching the leak point. Ignoring it means the next weather event will likely cause more extensive damage because the underlying weakness remains.
My neighbor had water dripping through his dining room ceiling last winter during a heavy snowfall. After two hours of steady dripping, the leak completely stopped even though snow continued falling. He figured the problem had resolved itself and didn't call anyone. Three weeks later, during a rainstorm, the same leak returned but this time it was accompanied by a second leak eight feet away. When a roofer finally inspected the attic, he discovered that a roof rafter had developed a stress crack and was deflecting under snow load, temporarily closing the original leak point while creating stress elsewhere. The rafter movement had also loosened flashing in a second location. What could have been a $1,200 flashing repair in January became a $6,800 structural repair and re-roofing project in February.
Debris Is Creating a Dam
Sometimes leaks stop because leaves, shingle granules, or other debris have created a temporary dam that redirects water. This feels fortunate, but it's creating hydraulic pressure in your roofing system.
Water doesn't disappear. It finds another path. That path might be into a wall cavity, under flashing, or into areas with even less drainage capacity than the original leak point. You won't see this new damage immediately. It develops slowly in hidden spaces.
By the time it becomes visible, you're dealing with rot, mold, or structural damage that costs way more to repair than the original leak would have. A leak that stops mysteriously deserves investigation, not celebration.
The Real Cost of Waiting vs. Acting
Every emergency roof leak presents a decision point: act now with incomplete information, or wait to gather more data and make a more informed choice. This feels reasonable. In reality, it's a false choice.
The cost of waiting almost always exceeds the cost of acting, even if your immediate action turns out to be partially unnecessary. The relationship between time and cost isn't linear. It's exponential. Damage that costs $800 to address in the first two hours can easily become a $5,000 problem by the next day and a $15,000 restoration project by the end of the week.
Mold Starts Growing Fast
Mold spores are everywhere. They're in your home right now, dormant and harmless. They become a problem when they find moisture and organic material (wood, drywall, insulation).
In the right conditions, mold begins growing within 24 to 48 hours of water exposure. Once mold growth starts, you're no longer dealing with a roof leak repair. You're dealing with mold remediation, which requires specialized contractors, containment procedures, air quality testing, and often involves removing and replacing materials that could have been saved if addressed earlier.
Mold remediation costs typically start around $2,000 for small areas and escalate quickly for larger contamination. This is entirely preventable with prompt action.
Wood Starts Deteriorating Immediately
Wood framing begins to deteriorate when moisture content exceeds 20%. At 30% moisture content, wood starts losing structural integrity. Prolonged exposure to moisture creates conditions for wood rot, which compromises load-bearing capacity.
This process starts faster than most people realize. Within 72 hours of significant water exposure, you can have measurable deterioration in structural wood.
The repair cost difference is dramatic: replacing a section of wet roof decking might cost $400. Replacing deteriorated framing members, decking, and addressing the structural deficiency can easily run $4,000 to $8,000. That's a 10x to 20x cost multiplier for waiting three days.
The Insurance Deductible Math
Here's a financial reality most people don't consider: if your repair costs are close to your insurance deductible, you're probably not filing a claim anyway.
Many homeowners have $1,000 to $2,500 deductibles. If you act immediately and your total damage is $1,800, you might choose to pay out of pocket to avoid the claim. But if you wait and damage escalates to $6,000, you're filing a claim, paying your deductible, and potentially facing premium increases.
The waiting period can push you from a manageable out-of-pocket expense into insurance claim territory. This has multi-year financial implications through premium adjustments. Acting quickly often keeps damage below the claim threshold, which saves you money long-term even if the immediate response feels expensive.
How to Vet an Emergency Roofing Company Fast
You're in crisis mode. Your roof is leaking, you need help now, and you're about to trust someone with access to your home and authority to make expensive decisions. This is exactly when predatory contractors thrive.
Storm chasers, unlicensed operators, and scam artists know that desperate homeowners make quick decisions with minimal vetting. You don't have time for extensive research, but you also can't afford to hire the wrong company.
The good news: legitimate emergency roofing companies have specific characteristics that are quick to verify. You can separate professionals from predators in under 10 minutes with the right questions and verification steps.
Verify License and Insurance Immediately
Ask for their license number and insurance certificate. Legitimate companies provide this immediately without hesitation. They're used to the request.
Take those numbers and verify them through your state's licensing board website (most have online lookup tools) and call the insurance company directly using a number you find independently (not one the contractor provides). This takes less than two minutes if you're focused.
If the contractor hesitates, makes excuses, or promises to provide documentation "later," end the conversation. No exceptions. Working with an unlicensed or uninsured contractor voids most homeowner insurance coverage and leaves you liable for any injuries or additional damage they cause.
Check for an Actual Local Presence
Search for the company's physical address. Is it a real office or a UPS store mailbox? Check Google Maps street view. Storm chasers use temporary addresses or PO boxes.
Look at their Google Business profile. When was it created? If it's less than a month old and you're in a region that just experienced storms, that's a red flag. Check for reviews older than the recent weather event.
Legitimate local companies have review history spanning months or years. New companies aren't automatically scams, but companies that appear suddenly after disasters often are. You want a contractor who'll still be around in six months when you need warranty work.
Tell Them You're Getting Multiple Quotes
Tell them you're getting multiple quotes before deciding. Legitimate companies understand this and respect it.
Predatory contractors will pressure you to sign immediately, often with tactics like "this price is only good if you commit today" or "we have limited emergency slots available." These are manipulation techniques.
Real emergency roofing companies want your business, but they're not desperate for it. They have established customer bases and don't need to pressure strangers into immediate commitments. Any contractor who makes you feel rushed or uncomfortable has disqualified themselves. Trust that instinct.
Ask About Pricing Up Front
Ask them to explain what they'll do and provide a rough price range based on what you've described. They should be able to give you a general estimate for emergency services (tarping or temporary repairs) even without seeing the damage. They've done this hundreds of times.
If they refuse to discuss pricing until they arrive, or if their emergency service fee seems dramatically higher or lower than other quotes you're getting, investigate further.
Dramatically low prices often indicate unlicensed operators or contractors who'll discover "additional damage" once they're on your roof. Dramatically high prices suggest price gouging. Most legitimate emergency roofing services in a given market cluster within a similar price range. Outliers in either direction deserve scrutiny.
When to Call Joyland Roofing Instead
If you're in our service area and you need someone now, call us at [phone number]. We'll verify our license right on the phone, give you a straight answer about what needs to happen, and we're not going to pressure you into anything. We've been doing this for years and we'll still be here when you need warranty work next year.
Our approach to emergency roof leaks focuses on documentation support (because we know the insurance process is complicated), immediate damage mitigation that doesn't create secondary problems, and honest assessment of what needs to be done right now versus what can wait for a scheduled repair.
Final Thoughts
Look, roof leaks suck. You're stressed, water is dripping on your stuff, and you're trying to figure out who to trust when everyone's trying to sell you something.
The good news? You're reading this, which means you're already ahead of most people who just panic and make expensive mistakes.
Take photos. Call someone licensed. Don't let anyone pressure you into immediate decisions. That's it. The rest is just details.
The first 60 minutes matter more than everything that comes after. Documentation protects your financial interests. Strategic response minimizes damage. Careful contractor selection prevents you from trading one problem for another.
You're not going to remember everything in this guide when you're standing in your living room with water dripping on your floor. That's fine. Remember this: document first, act strategically, verify before you hire, and understand that the visible damage is probably 30% of what's happening. Everything else builds from those principles.
Your roof leak is fixable. The damage is manageable. You just need to move through the emergency phase with intention rather than panic.