
When homeowners start exploring dormer roof design, most of the focus naturally goes to curb appeal—how it looks from the street, how it complements the home, and how much extra space it creates inside. But the reality is, a successful dormer has far less to do with appearance and far more to do with how it integrates into your existing roof system. The structure beneath the surface, from framing connections to water drainage and ventilation, determines whether your dormer performs for decades or starts causing problems within just a few years.
That’s why understanding the fundamentals of your roof before making changes is critical. If you’re unsure whether your current setup can handle an addition, take a moment to read this guide to better understand your roof’s condition and what it may need before moving forward.
In this guide, we’ll break down what really matters in dormer roof design—so you can make informed decisions that protect both your investment and your home.
Table of Contents
- TL;DR
- The Hidden Structural Triangle Most Homeowners Never See
- Why Your Dormer's Success Depends on What Happens Below the Roofline
- The Pitch Compatibility Problem Nobody Talks About
- How Interior Ceiling Angles Dictate Your Dormer's Real Value
- Valley Formation and Why It's Your Dormer's Weakest Link
- Working With Joyland Roofing on Complex Dormer Integration
- Final Thoughts
TL;DR
- That hidden triangle where your dormer meets your main roof? It matters way more than how the dormer looks from the street. Get the valley and header wrong and you're looking at problems within five years.
- Your main roof pitch and dormer pitch need to work together, not just look good together. This affects everything from how water drains to how much money you waste on materials.
- All that extra square footage sounds great until you try to put furniture in a room with three-foot knee walls and sloped ceilings. Plan the interior before you frame the exterior.
- Valley flashing fails more than anything else in dormer construction. It's where two roof planes meet, where water concentrates, and where most contractors cut corners.
- The real regret comes later when you realize the dormer messed up your attic ventilation and created heat loss points nobody mentioned during the sales pitch.
The Hidden Structural Triangle Most Homeowners Never See
You're on Pinterest looking at dormer styles. Gabled, shed, eyebrow — which one looks best on a craftsman? Which matches your neighborhood?
Wrong question — or at least, not the first question.
There's this space you'll probably never photograph, never see once the drywall goes up. It's the triangular cavity where your dormer's side wall meets your main roof deck. And honestly — this hidden zone is what separates a dormer that works from one that'll have you calling contractors in five years, trying to figure out why there's water staining your bedroom ceiling.
The geometry here controls water flow, air movement, insulation continuity, and how structural loads transfer down into your house. Get it right and you'll forget the dormer's even there. Get it wrong and you've created a maintenance nightmare that looks beautiful from the street.
When you're researching what is a dormer and exploring the different types of dormer available, most resources show you pretty pictures. Gabled dormer types have that classic peaked roof everyone recognizes. Shed dormer types run along a wider section with a single sloping plane. Eyebrow dormer types curve gracefully. But these dormer styles tell you absolutely nothing about whether your specific house can handle the addition, or whether the contractor actually knows how to integrate it properly.
According to White Crane Construction, with a full shed dormer that goes along the whole width of the house, you can typically almost double the square footage of the upstairs. But only if the underlying structural integration is executed properly. That "if" carries enormous weight.
Load Path Reality vs. Aesthetic Preference
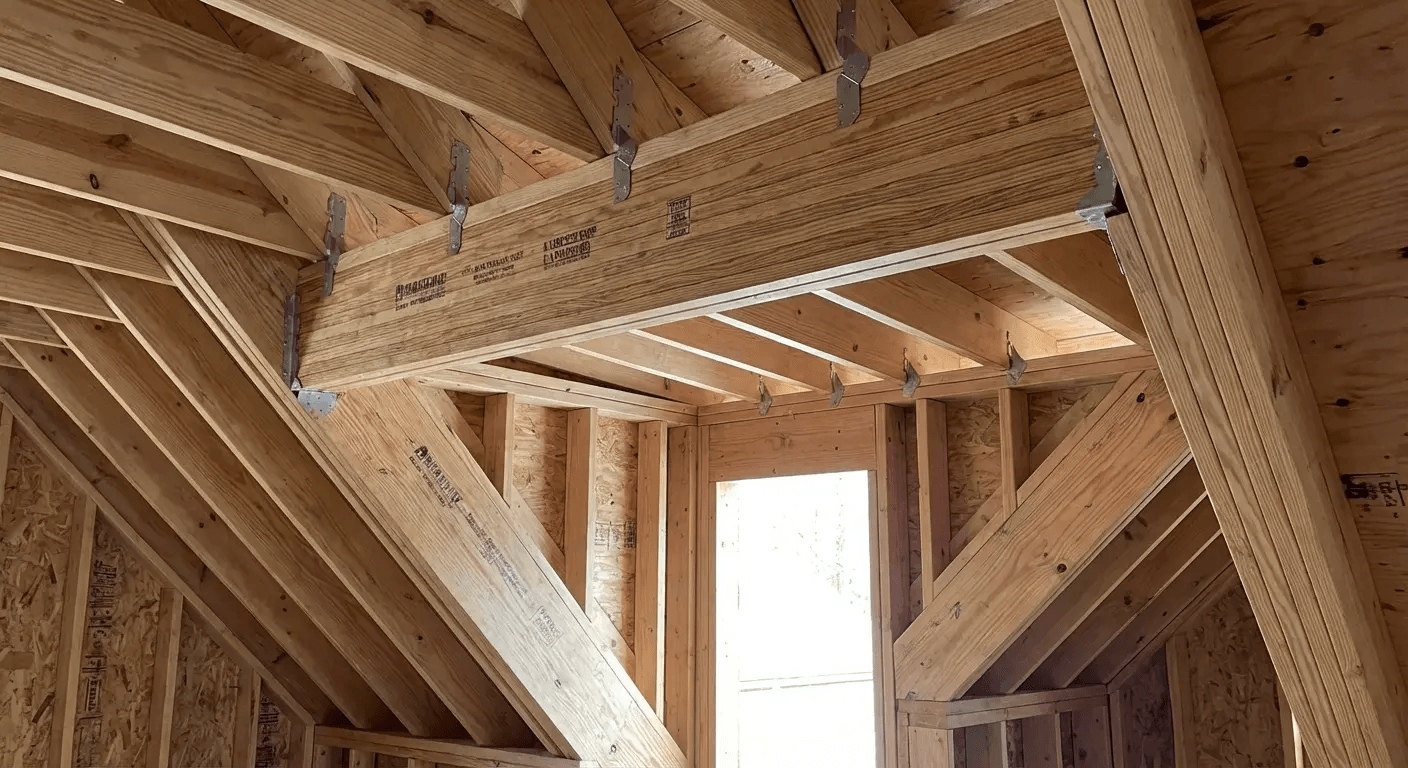
Your dormer adds concentrated weight at a point where your roof structure wasn't designed to carry it. The combined mass of framing, sheathing, shingles, and snow accumulation now bears down on a specific section of your roof plane.
The load doesn't magically spread itself out evenly. It follows a path — a specific path through headers, king studs, and into your existing rafter system. If that path isn't clearly engineered and properly executed, you'll see sagging ridgelines, stress cracks in interior ceilings, or structural deflection that compromises your entire roof geometry.
Roofing experts featured in This Old House Magazine put it directly: "the broader the dormer, the greater the load, so it's important to consult with an engineer to size new rafters and ridge beams accordingly." This isn't optional guidance for complex projects. This applies to every dormer addition, regardless of size or types of dormers you're considering.
The Ventilation Disruption You Didn't Plan For
Adding a dormer interrupts the ventilation channel that existed in your attic space. You've just inserted a structure that blocks the continuous air path from soffit to ridge vent. The result? Dead zones where moisture and heat just sit there.
Disrupted ventilation leads to condensation on the underside of your roof deck. Condensation leads to mold, sheathing rot, and expensive repairs that technically have nothing to do with the dormer itself but everything to do with how it changed your attic's thermal dynamics. This is one reason why your home needs appropriate roof venting — and why any dormer roof design project needs to treat ventilation as a core engineering item, not an afterthought.
You can't treat the dormer as an isolated addition. It's now part of a system, and that system needs to breathe differently than it did before.
Different types of dormers create different ventilation challenges. A narrow gabled dormer might allow airflow to route around it with minimal intervention. A full-width shed dormer completely blocks the attic's air path and demands a comprehensive ventilation redesign. Neither approach is inherently better — they just require different solutions.
Why Your Dormer's Success Depends on What Happens Below the Roofline
The roofline everyone sees? That represents maybe five percent of your dormer project. The other ninety-five percent that determines success or failure happens in the framing, sheathing, and integration work that occurs before a single shingle gets installed.
I'm talking about header sizing, valley board placement, sheathing transitions, and the precise angles where new framing members intersect existing structure. These elements don't show up in your finished photos, but they show up in your dormer's performance every single time it rains.
Most contractors can install shingles competently. Far fewer understand how to integrate a dormer into an existing roof system in ways that respect water physics, structural load transfer, and thermal dynamics. The difference between these two skill sets becomes painfully apparent three to five years after installation. Understanding the most vulnerable parts of your roof helps explain why integration points — not surface materials — are where most failures originate.
Sheathing Continuity and Why Gaps Become Leaks
Your main roof has continuous sheathing that creates a solid surface for your underlayment and shingles. Cutting into that sheathing to install a dormer creates edges. And edges are where things go wrong.
Every spot where new sheathing meets old represents a potential entry point for water. The transition needs to be tight, properly flashed, and integrated with your water-resistive barrier in a way that assumes water will find every microscopic gap. Because it will.
Contractors who actually understand dormer roof design don't just butt new sheathing against old and call it done. They create overlapping transitions, use appropriate sealants at the right points, and install flashing that directs water away from the seam rather than along it.
Here's a checklist our crew uses. Show it to your contractor and watch their reaction. That'll tell you everything:
- New sheathing overlaps existing sheathing by minimum 2 inches at all horizontal seams
- Ice and water shield extends 6 inches beyond all sheathing transitions
- Fasteners penetrating old sheathing are sealed with roofing cement
- Gap between new and old sheathing doesn't exceed 1/8 inch at any point
- Transition points are staggered, not aligned vertically (prevents water channeling)
- Underlayment is shingled properly over all seams, upper layers over lower
- No exposed nail heads or fasteners visible at sheathing edges
- Sheathing edges at dormer sidewalls are protected by step flashing before siding installation
Step Flashing Integration Points
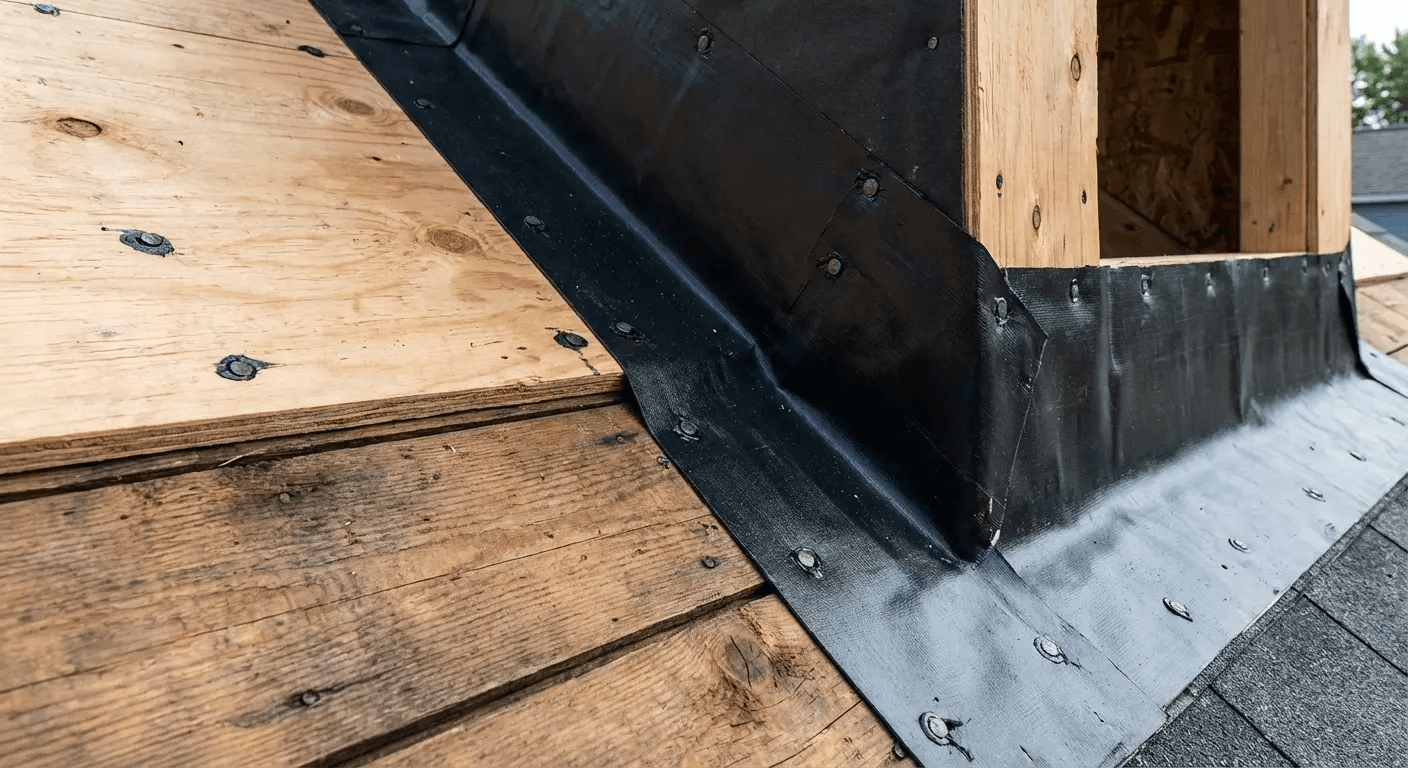
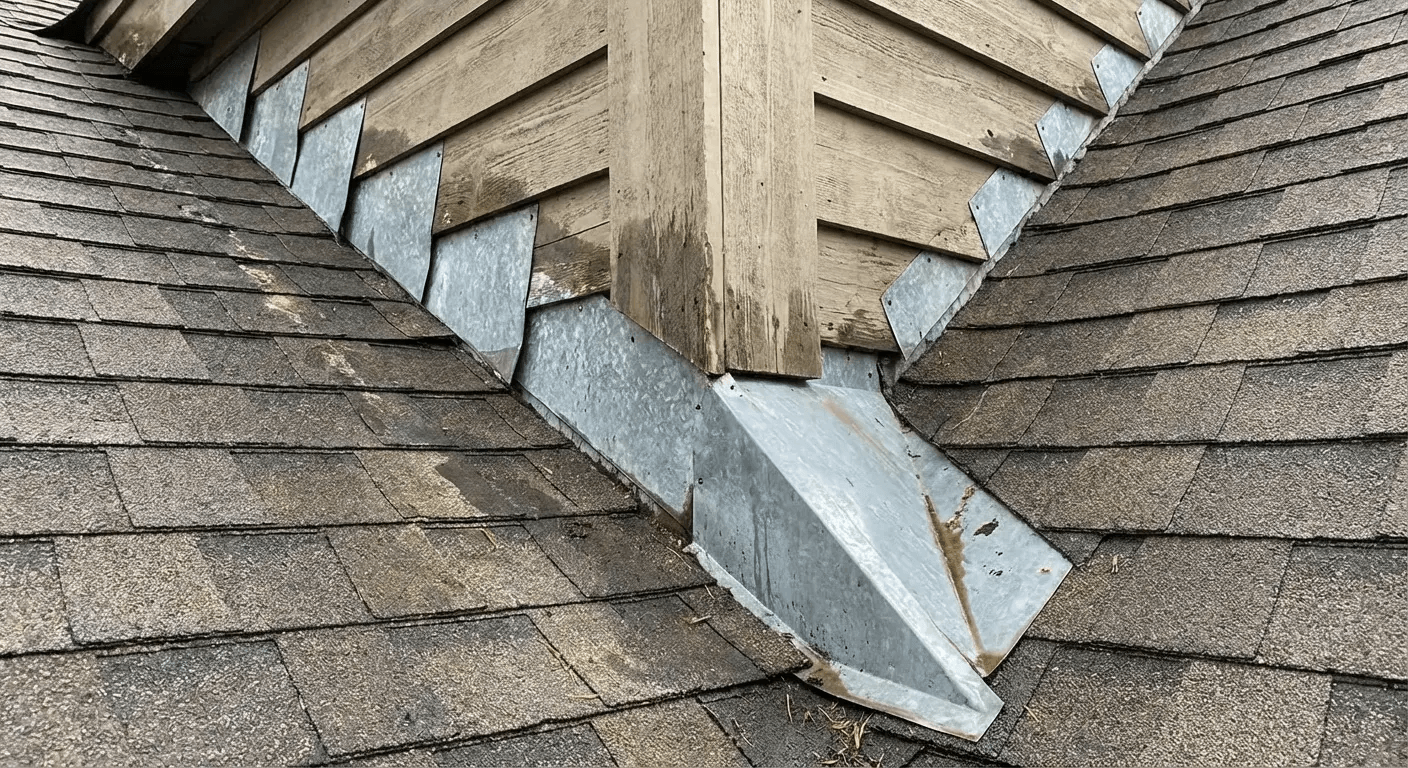
Where your dormer's side walls meet your main roof slope, you need step flashing. Each shingle course gets its own flashing piece, creating a layered system that sheds water progressively down the roof plane.
Quality step flashing installation requires precision at every single course. You can't install three shingle courses, then go back and add flashing. Each piece needs to be integrated as you progress up the roof. This means coordinating roofing and flashing work in a specific sequence that many crews rush through because it's tedious.
At the bottom corners where your dormer's side walls terminate, you need kickout flashing that redirects water away from the wall and onto the main roof surface. Without kickouts, water running down your step flashing dumps directly against your dormer's corner trim, eventually finding its way behind your siding and into your wall cavity.
This is what drives me crazy: contractors who know better still skip the kickout flashing because it takes an extra fifteen minutes. Fifteen minutes — to prevent thousands in water damage.
A homeowner in Portland discovered water stains on their dining room ceiling three years after a dormer addition. The leak wasn't at the valley or the dormer roof. It was at the lower corner where the dormer sidewall met the main roof. The contractor had omitted kickout flashing, and water had been running behind the corner trim board with every rain. By the time the leak became visible inside, the wall cavity had extensive rot requiring removal of exterior siding, replacement of wall studs, and mold remediation. The missing $45 piece of kickout flashing resulted in $8,700 in repairs.
The Pitch Compatibility Problem Nobody Talks About
Roof pitch isn't just an aesthetic number. It's a functional specification that determines how water sheds, how snow slides, how materials perform, and how valleys form where two roof planes intersect.
When you add a dormer to an existing roof, you're introducing a second pitch into the equation. That second pitch needs to work with your main roof pitch in ways that go far beyond looking good from the street.
Most homeowners select dormer pitch based on visual proportion. These are reasonable aesthetic considerations, but they completely ignore functional implications that will affect your dormer roof design's performance for its entire lifespan.
Architects are starting to rethink traditional approaches entirely. Dezeen reported in March 2026 on Templeton Ford's reimagined dormer window for their home in West Sussex, where the roof curves down in three tiers rather than following conventional pitch relationships. It's beautiful custom architecture — but it also proves the point: when architects deliberately break conventional pitch rules, they do so with full awareness of the structural and drainage implications. They're not winging it.
Valley Angle Mathematics and Water Flow Velocity
Where your dormer roof meets your main roof, you create a valley. The angle of that valley depends on the pitch relationship between the two roof planes.
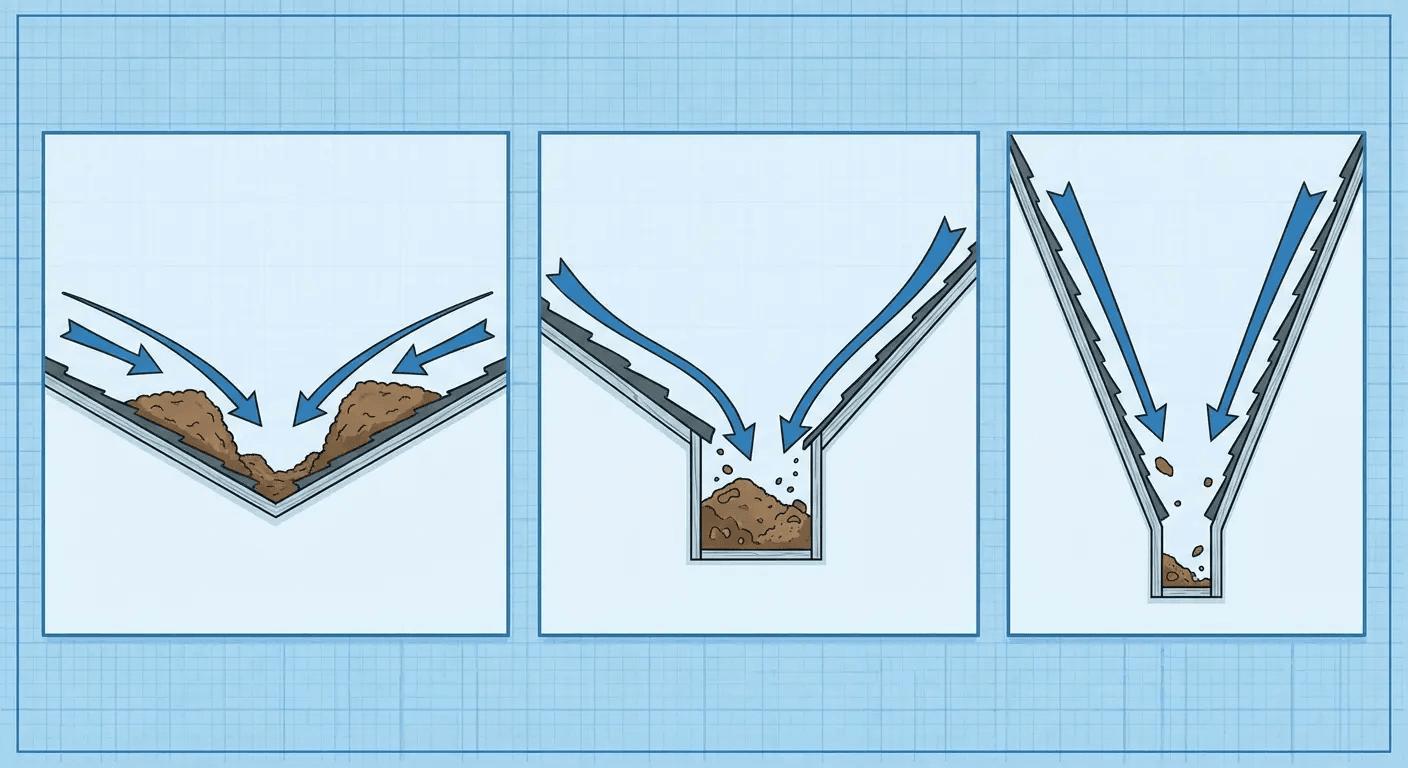
A steeper valley angle creates faster water flow. Sounds good, right? Except it also creates more erosive force on your valley flashing and increases the likelihood of water overshooting the valley during heavy rain.
A shallower valley angle slows water flow, which reduces erosion but increases the chance of debris accumulation and standing water during moderate precipitation. You're balancing competing concerns, and the optimal balance depends on your climate, your roof's exposure to trees and debris, and your local rainfall patterns.
The valley angle math gets complicated fast — we use software for this. But you should know it matters.
Understanding the different types of dormer construction helps here. A shed dormer with a 4:12 pitch added to an 8:12 main roof creates a very different valley angle than a gabled dormer matching the main roof pitch. Neither is inherently better, but each creates specific drainage characteristics you need to account for.
Material Waste Multipliers in Complex Pitch Relationships
Shingles, metal roofing, and tile all come in standard dimensions. When your dormer pitch differs significantly from your main roof pitch, you increase cutting waste because materials sized for one angle don't transfer efficiently to another.
On a typical dormer project, poor pitch compatibility can increase material waste by fifteen to twenty-five percent, according to Selective Remodeling's analysis of dormer installations. That waste shows up in your project cost, but it also shows up in installation time (more cuts mean slower progress) and in the number of seams and transitions that need to be weatherproofed.
Choosing a dormer pitch that creates favorable geometry with your main roof pitch can reduce waste, lower costs, and create fewer potential failure points. It requires thinking about the project as a geometry problem rather than a style selection exercise.
How Interior Ceiling Angles Dictate Your Dormer's Real Value
You're adding a dormer to gain usable space. That's the goal driving most dormer projects — whether you're converting attic space into a bedroom, creating a home office, or making an existing upper floor feel less cramped.
Here's the disconnect nobody mentions until it's too late: the interior volume a dormer creates often doesn't translate into usable square footage the way you imagine. Angled ceilings, knee walls, and irregular floor plans reduce furniture placement options and create awkward spaces that feel smaller than their measured dimensions suggest.
House dormers look substantial from the outside. They add visual mass to your roofline and suggest significant interior expansion. But volume and usability aren't the same thing. A dormer might add 120 square feet by measurement while only adding 65 square feet of genuinely functional space once you account for ceiling height restrictions and furniture placement realities.
This matters because you're making financial decisions based on cost per square foot. If you're spending $25,000 on a dormer addition that nominally adds 120 square feet, you're calculating roughly $208 per square foot. If only 65 of those square feet are truly usable, your real cost is $385 per square foot. That's a dramatically different value proposition.
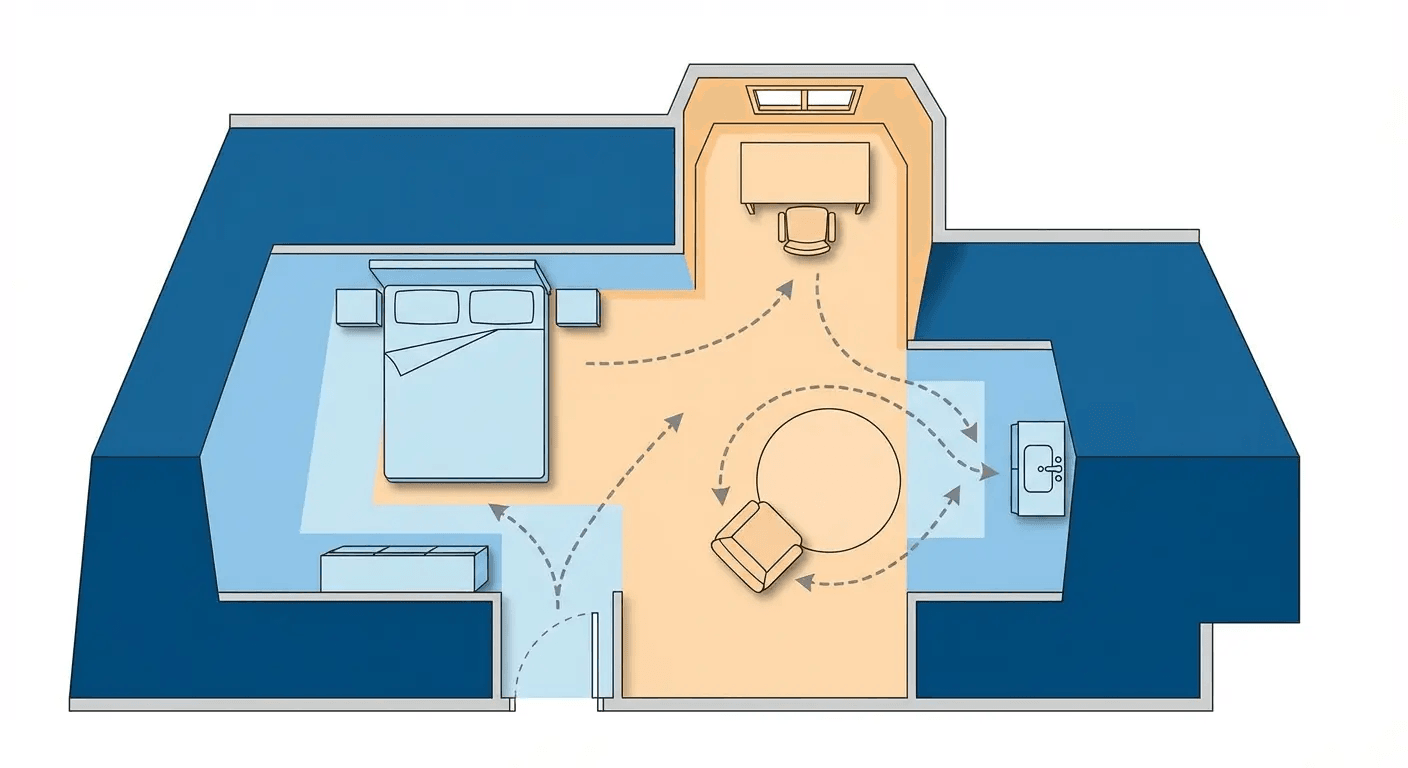
Window Placement and Functional Light Distribution
Dormer windows obviously provide light, but where that light falls in the room determines whether it's useful or merely decorative. A dormer window placed to look good from the street might cast light onto a knee wall rather than into the room's functional center.
Think about how you'll actually use the space. If it's a bedroom, does the window light fall on the bed or on empty floor space? If it's an office, does it illuminate your work surface or create glare on your screen?
Adjusting window placement by even twelve inches can dramatically change light distribution patterns. This requires thinking about the dormer's interior function during the exterior design phase, not after framing is complete and window openings are already cut.
Innovative approaches to dormer roof design are addressing these spatial challenges. Architectural Record featured Anya Moryoussef's "Blind Dormer House" in Toronto, where a blank-faced dormer contains a powder room with an aperture above that brings in ample daylight despite presenting no street-facing window. This demonstrates how dormer function can be prioritized over conventional window placement expectations — though it requires architectural expertise most residential projects don't access.
Different dormer styles interact with light distribution in distinct ways. Roof dormers with multiple windows can create even light distribution but require careful spacing to avoid creating dark zones between windows. Single large windows concentrate light but can create harsh contrast between illuminated and shadowed areas.
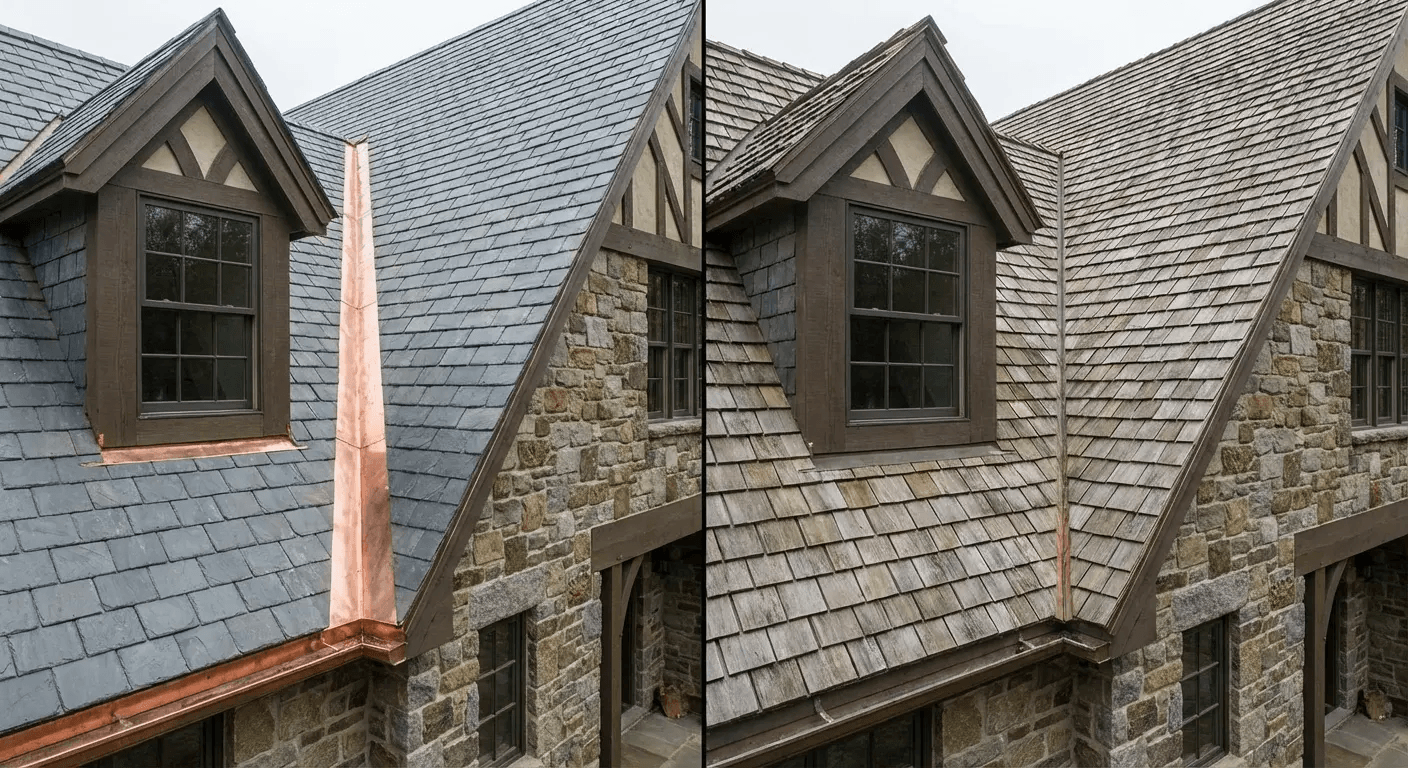
Valley Formation and Why It's Your Dormer's Weakest Link
Valleys concentrate water flow. Instead of water spreading across your entire roof surface, it channels into a linear path where two roof planes meet. That concentrated flow creates erosive force, carries debris, and tests every aspect of your valley construction.
Your dormer creates at least two valleys — one on each side where the dormer roof meets the main roof. These valleys will handle more water volume and more debris than most other parts of your roof system. They need to be overbuilt relative to the rest of your roof, not constructed to the same standard.
Understanding dormer roof design means recognizing that not all roof surfaces face equal stress. Valleys represent your highest-stress zones, and dormer valleys often experience even more stress than main roof valleys due to their geometry and position. This is true regardless of the dormer types or roof dormers you're working with.
Open vs. Closed Valley Construction Methods
Open valleys use metal flashing visible between shingle courses, creating a clear channel for water flow. Closed valleys weave shingles from both roof planes together, hiding the valley flashing beneath overlapping shingles.
Open valleys handle high water volume better because they provide an unobstructed path for flow. They also make debris removal easier since you can see what's accumulating in the valley. Closed valleys look cleaner and create visual continuity across the roof surface, but they can trap debris and create dams that force water under shingles during heavy rain.
For dormer valleys specifically, open construction usually performs better because dormer valleys tend to accumulate more debris than main roof valleys. The geometry creates turbulence that drops leaves and branches right into the valley channel.
Different types of dormers create different valley stress profiles. A narrow gabled dormer creates short valleys with relatively low flow volume. A full-width shed dormer creates long valleys that channel substantial water volume during heavy rain. Your valley construction method should match the stress profile your specific dormer geometry creates.
Valley Flashing Width and Underlayment Reinforcement
Standard valley flashing runs eighteen to twenty-four inches wide. That's adequate for typical roof valleys with moderate water flow. Dormer valleys often benefit from wider flashing — thirty-six inches or more — because the concentrated flow and debris accumulation create more stress than standard valleys experience.
Underlayment beneath valley flashing also deserves extra attention. Two layers of underlayment, or a single layer of reinforced membrane specifically designed for valleys, provides insurance against the inevitable small failures that occur in flashing over time.
Ice Dam Vulnerability in Valley Configurations
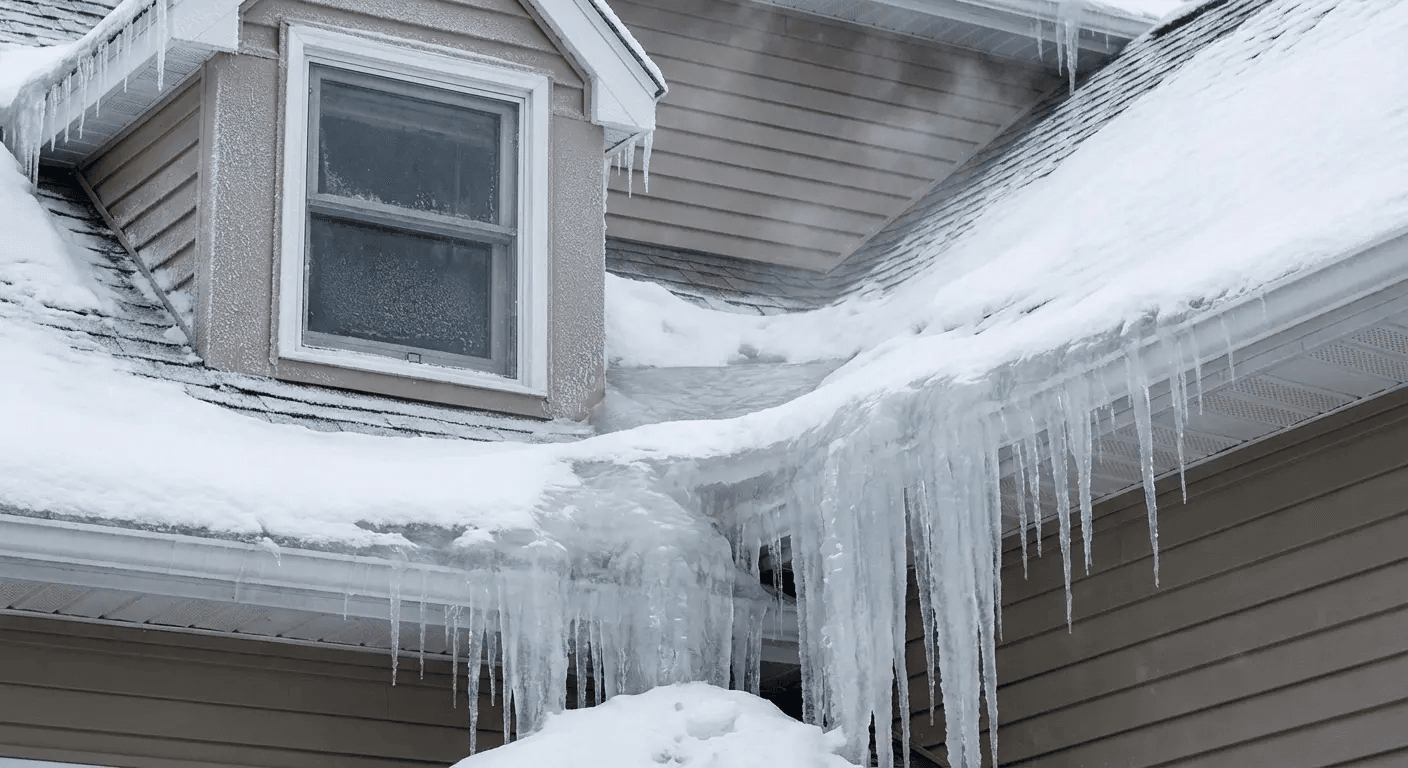
If you're in a climate that experiences freezing temperatures and snow accumulation, your dormer valleys become prime locations for ice dam formation. Ice dam prevention needs to be part of your dormer roof design from the start, not an afterthought.
The valley geometry creates a natural collection point for melting snow, and the temperature differential between your heated interior and exterior conditions creates freeze-thaw cycles that build ice dams.
Ice dams force water upward under shingles, bypassing all your carefully installed flashing and waterproofing. Valley ice dams are particularly destructive because they affect both roof planes simultaneously, creating leak potential across a wider area than ice dams on simple roof slopes.
Preventing valley ice dams requires thinking about heat loss from your interior (better insulation and air sealing in the dormer structure), water drainage (heated cables or other ice-melting systems in the valley), and material selection (ice and water shield extending well beyond the valley centerline).
According to White Crane Construction's senior designer, the entire dormer project can take about 6-8 months from initial home consult to finished construction, with engineering challenges representing one of the biggest hurdles — particularly in figuring out how to restructure the load points of the roof and address valley configurations that will perform through seasonal extremes.
That timeline reflects the complexity of getting dormer integration right. Quick installations that compress this timeline often skip the engineering analysis that prevents valley failures and ice dam vulnerabilities. A professional roof inspection of your existing structure before any dormer work begins is money well spent — it establishes a baseline and identifies any pre-existing vulnerabilities your dormer addition needs to account for.
John Esh | CEO & Master Installer
- 25+ Years Experience: From ground crew to Master Certified Installer.
- Local Roots: Serving Lancaster, Harrisburg, and SEPA since 1991.
- Credentials: GAF Master Certified (ME27586); Licensed in PA (PA124258) & MD (#137952).
- The "Why":
Obsessed with "radical transparency" to remove the fear factor from home improvements.
James Wesser | Content Producer
- Background: Former local news digital producer and journalist.
- The Mission: Turning complex roofing jargon into clear, "fluff-free" answers for homeowners.
- Local Tie: When not filming on-site, he’s likely roaming Hersheypark or building digital worlds.